- docs
- FlowFuse User Manuals
- Using FlowFuse
-
- Getting Started
- Static asset service
- Bill of Materials
- FlowFuse Concepts
- Instance States
- Changing the Stack
- Custom Hostnames
- Custom Node Packages
- DevOps Pipelines
- Environment Variables
- FlowFuse Expert
- FlowFuse File Nodes
- FlowFuse MQTT Nodes
- FlowFuse Project Nodes
- FlowFuse Tables
- Groups
- High Availability mode
- HTTP Access Tokens
- Instance Settings
- Logging
- persistent-context
- Role-Based Access Control
- Shared Team Library
- Snapshots
- Team Broker
- Teams
- User Settings
- FlowFuse API
- Migrating a Node-RED project to FlowFuse
- Device Agent
- Device Agent
- Hardware Guides
- FlowFuse Cloud
- FlowFuse Cloud
- FlowFuse Self-Hosted
- Quick Start
- Installing FlowFuse
- Upgrading FlowFuse
- Administering FlowFuse
- Support
- Community Support
- Premium Support
- Debugging Node-RED issues
- Contributing
- Contributing to FlowFuse
Docker Install
This guide walks you through detailed set up of FlowFuse Platform on a Docker container environment using Docker Compose. Typically suited for small/medium on premise deployments. By the end, you will have a fully functioning FlowFuse instance running in a Docker container.
The following guide walks through a full production-ready deployment. If you want to install FlowFuse for evaluation purposes, please refer to the Quick Start Guide.
Checklist
Prerequisites
Before you begin, ensure you have the following:
- Domain Name & DNS: A domain name that you own and can configure DNS settings for (explained in DNS)
- Install Docker: Docker Engine and Docker Compose (in
2.23.1version or higher) must be installed on your system (either as a standalone binary or as docker plugin).
For a production-ready environment, we also recommend:
- Database: Prepare dedicated database on a external database server (see FAQ for more details)
- TLS Certification: Prepare TLS certificate for your domain and configure FlowFuse platform to use it (see Enable HTTPS)
Requirements
To run the FlowFuse platform smoothly, we recommend the following minimum hardware specs:
- CPU: 2 cores
- Memory: 4 GB RAM
- Storage: 20 GB disk space Each Node-RED instance you host will uses 0.1 CPU cores and 256 MB of memory by default. This parameters can be adjusted in admin area of FlowFuse platform. Keep this in mind when sizing your hardware, especially if plan to create multiple hosted instances.
When deploying the FlowFuse platform behind a firewall or proxy, ensure that the following ports are open and forwards a traffic to the server where FlowFuse is installed:
- Port
80(HTTP) - Port
443(HTTPS)
AWS Elastic Container Service
At this time we do not support deploying FlowFuse to AWS's Elastic Container Service.
DNS
The orchestration uses an instance of Nginx to route requests to each Node-RED instance. To do this it needs each instance to have a unique hostname, to generate this the instance name is prepended to a supplied domain.
To make this work you will need to configure a DNS server to map a wildcard domain entry to the IP address of the host running Docker. e.g *.example.com.
The FlowFuse Application will be hosted on http://forge.example.com
Note At this moment FlowFuse platform is not capable to run on localhost. You must point your domain to the external IP address of the host machine, not the loopback address (127.0.0.1).
Notes on how to setup DNS can be found here.
Installing FlowFuse
Download installation files
Download the latest version of the FlowFuse Docker Compose file and example .env file used for installation configuration:
curl -L -o docker-compose.yml https://github.com/FlowFuse/docker-compose/releases/latest/download/docker-compose.yml
curl -L -o .env https://raw.githubusercontent.com/FlowFuse/docker-compose/refs/heads/main/.env.example
Configure
Installation configuration is done via the .env file. The minimal configuration required is the domain name you will be using for the platform.
Edit downloaded .env file with the editor of your choice and update the DOMAIN variable with the domain you will be using for the platform.
Alternatevily, use sed to update the DOMAIN variable in the .env file:
sed -i 's/^DOMAIN=.*/DOMAIN=example.com/' .envPlease note that once set, the DOMAIN value should not be changed as it is used as part of the configuration stored in the database of each Node-RED instance. The ability to migrate to different domain is on the feature backlog.
Enable HTTPS (optional)
If you want to serve the FlowFuse platform and Node-RED instances over TLS you will need to obtain a wildcard TLS certificate for the domain you are using eg *.example.com. If you are running on an Internet facing machine you can use our configuration files to generate it atomatically.
Otherwise you will need to contact a SSL Certificate vendor and configure Nginx manually.
Automatic TLS Certificate
Note: Automatic TLS generation is possible only for the publicly available servers
In the .env file, set the TLS_ENABLED variable to true:
TLS_ENABLED=trueProceed to the next paragraph to start the platform with automatically generated TLS certificate.
When using automatic TLS certificate generation, the platform will take a few minutes to generate them on the first platform startup. For a short period of time browsers may report untrusted certificate warning. This is expected behavior and should resolve itself once the certificate is generated.
Custom TLS Certificate
If you have own TLS certificate, you can use it in FlowFuse platform installation as well. As mentioned before, the certificate must be a wildcard one for the domain you are using.
If your TLS certificate is issued by a private Certificate Authority, additional configuration is required so that Hosted Instances trust the CA. See What additional configuration is required when the TLS certificate is issued by a private Certificate Authority? for the step-by-step instructions.
To configure FlowFuse platform with your certificate, you need to have:
- certificate key file
- certificate's full chain (server certificate and intermediate certificates bundled into single file)
To add your certificate to the platform, edit the .env file downloaded earlier and set values for TLS_ENABLED, TLS_CERTIFICATE and TLS_KEY variables. TLS_ENABLED variable should be set to true.
TLS_CERTIFICATE should contain the full chain of the certificate while TLS_KEY should contain the key file. Example of .env file with the custom TLS certificate configuration:
TLS_ENABLED=true
TLS_CERTIFICATE="
-----BEGIN CERTIFICATE-----
MIIFfzCCBKegAwIBAgISA0
...
-----END CERTIFICATE-----
-----BEGIN CERTIFICATE-----
MIIFfzCCBKegAwIBAgISA0
...
-----END CERTIFICATE-----
"
TLS_KEY="
-----BEGIN PRIVATE KEY-----
MIIEvQIBADANBgkqhkiG9w0BAQEFAASCBKcwggSjAgEAAoIBAQD
...
-----END PRIVATE KEY-----
"
Start FlowFuse platform
Note: Make sure all configuration are done above before proceeding.
Note: Commands must be executed within the same directory where the Docker Compose and .env files are located.
With automatic TLS certificate generation
docker compose --profile autotls -p flowfuse up -dIn all other scenarios, including custom TLS certificate
docker compose -p flowfuse up -dThe platform will take a few minutes to start up. You can check the status of the containers by running:
docker compose -p flowfuse psVisit forge.example.com (replace example.com with the domain configured in the .env file) in your browser to access the FlowFuse platform.
First Run Setup
The first time you access the platform in your browser, it will take you through creating an administrator for the platform and other configuration options.
For more information, follow this guide.
Once you have finished setting up the admin user there are some Docker specific items to consider.
Upgrade
Note: If you are upgrading from version 2.10.0 or lower, please follow this guide
- Find the Docker Compose project name:
The output will show the project name, as well as the location of Docker Compose file used for creating the project.
docker compose ls - Stop the existing project (replace
$projectNamewith your project name):docker compose -p $projectName down --rmi all - Download the latest Docker Compose files:
curl -L -o docker-compose.yml https://github.com/FlowFuse/docker-compose/releases/latest/download/docker-compose.yml - Make sure the
.envfile is present and contains your installation-specific configuration. Download an example.envfile if needed:curl -o .env.example https://raw.githubusercontent.com/FlowFuse/docker-compose/refs/heads/main/.env.example - Pull the latest version of the default stack container (and any other stacks you have configured)
docker pull flowfuse/node-red:latest - Start the project depending on the TLS configuration (replace
$projectNamewith your project name):
- automatic TLS:
docker compose --profile autossl -p $projectName up -d - any other scenario:
docker compose -p $projectName up -d
Common Questions
How to use external database server?
FlowFuse platform uses PostgreSQL database to store its data. By default, the database is created and managed by the Docker Compose. If you want to use an external database server, you need to:
- on your database server, create
flowforgeandff-contextdatabases as well as a user with access to both of them (seeconfigs.postgres_db_setupandconfigs.postgres_context_setupin thedocker-compose.ymlfile for the reference) - configure the connection to the database in the
.envfile. Set theDB_HOST,DB_USER,DB_PASSWORDvariables to the connection details of the external database server
Once ready, start the application .
How can I provide my own TLS certificate?
If you have your own TLS certificate, you can use it in FlowFuse platform installation as well. See Enable HTTPS section for more details.
Additionally, if your TLS certificate is issued by a private Certificate Authority, you will need to perform some additional configuration to make hosted Node-RED instances trust the CA. See What additional configuration is required when the TLS certificate is issued by a private Certificate Authority for the step-by-step instructions.
What additional configuration is required when the TLS certificate is issued by a private Certificate Authority?
When the FlowFuse platform is configured with a TLS certificate issued by a private Certificate Authority (CA), hosted Node-RED instances will not trust the CA by default. As a result, opening the editor for a hosted instance will fail with a certificate trust error.
To make hosted Node-RED instances trust the private CA, follow the steps below:
-
Update the environment file. In the
.envfile created during the installation process, setDOCKER_DRIVER_PRIVATE_CA_PATHto the path of your Certificate Authority certificate file. This must be the path to the file stored on the Docker host server. For example, if theca.pemfile is located at/usr/local/ssl/ca.pem:DOCKER_DRIVER_PRIVATE_CA_PATH="/usr/local/ssl/ca.pem" -
Modify the Compose file. In the
docker-compose.ymlfile used to create the FlowFuse Docker stack, uncomment theNODE_EXTRA_CA_CERTSenvironment variable and the corresponding volume mount on theforgeservice so the certificate is passed correctly to the platform. You can apply both changes with a singlesedcommand:sed -i.bak -E -e 's/^#([[:space:]]*- "NODE_EXTRA_CA_CERTS=)/\1/' -e 's/^#([[:space:]]*- \$\{DOCKER_DRIVER_PRIVATE_CA_PATH\})/\1/' docker-compose.yml && rm docker-compose.yml.bak -
Restart the Forge service to apply the changes:
docker compose restart forge -
Apply changes to running instances. Once the platform is online, manually suspend and start all running hosted instances so they pick up the new TLS settings.
I would like to invite my team members to the platform with e-mail, how can I do that?
In order to configure FlowFuse platform with external e-mail server, you need to adjust EMAIL_* variables in the .env file. Find the .env file end edit Email configuration section with following details:
EMAIL_ENABLED- set totrueto enable e-mail functionalityEMAIL_HOST- provide SMTP server hostEMAIL_PORT- provide SMTP server port (default is587)EMAIL_SECURE- set totrueif the connection should be securedEMAIL_USER- provide SMTP server usernameEMAIL_PASSWORD- provide SMTP for the user defined inEMAIL_USER
Restart the core application to apply the changes:
docker compose restart forgeConnection Refused error
After starting the platform, I can't access it in the browser - I see "Connection Refused error"
If you are using the Digital Ocean Docker Droplet to host FlowFuse you will need to ensure that port 80 & 443 are opened in the UFW firewall before starting.
FlowFuse platform is running on ports 80 and 443, so you need to open these ports in the firewall. Below are examples of commands to open these ports:
Ubuntu:
sudo ufw apply http
sudo ufw apply https
CentOS:
sudo firewall-cmd --zone=public --add-service=http --permanent
sudo firewall-cmd --zone=public --add-service=https --permanent
sudo firewall-cmd --reload
Windows (command prompt):
netsh advfirewall firewall add rule name="Open Port 80" dir=in action=allow protocol=TCP localport=80
netsh advfirewall firewall add rule name="Open Port 443" dir=in action=allow protocol=TCP localport=443
Windows (PowerShell):
New-NetFireWallRule -DisplayName 'WSL 8080TCP' -Direction Inbound -LocalPort 8080 -Action Allow -Protocol TCP
New-NetFireWallRule -DisplayName 'WSL 8080TCP' -Direction Outbound -LocalPort 8080 -Action Allow -Protocol TCP
I installed FlowFuse on Windows with WSL2, application is running but I can't access it in the browser
Next to opening the ports in the firewall, you need to configure port forwarding from Windows host to WSL2 server.
To forward traffic from an external IP to your container, run the following PowerShell command (administrator privileges required):
netsh interface portproxy add v4tov4 listenport=80 listenaddress=0.0.0.0 connectport=80 connectaddress=127.0.0.1This command forwards traffic from port 80 on your external IP address to port 80 on your localhost, where the Nginx Proxy container is listening for connections.
How can I enable persistent storage for Node-RED instances?
Node-RED instances running in Docker do not have direct access to a persistent file system to store files or use for storing context data.
FlowFuse includes a File Storage service that can be enabled to provide persistent storage.
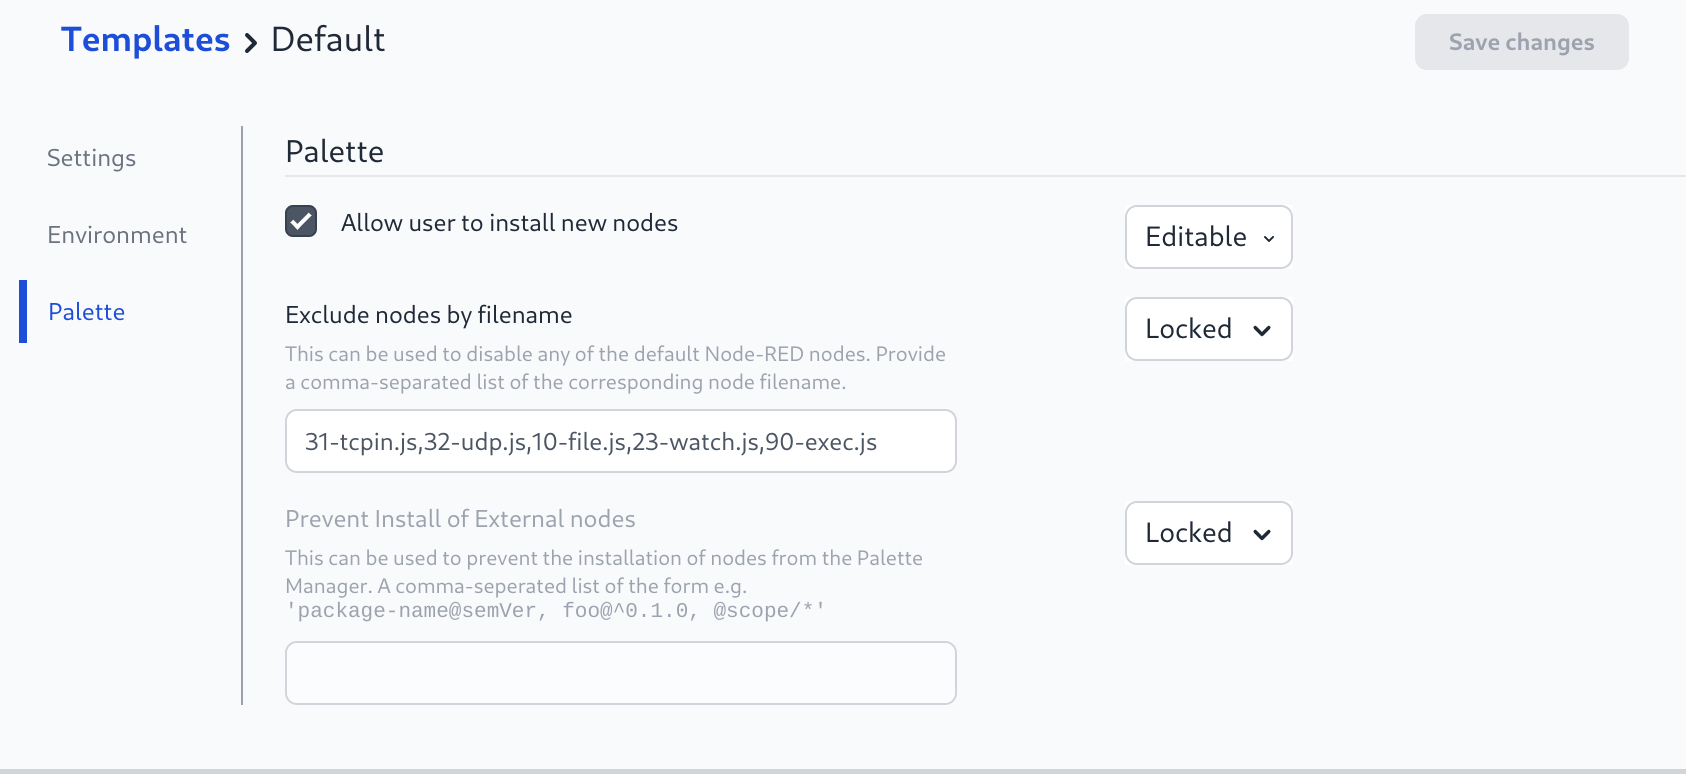
To disable the default File nodes, edit the Template and add 10-file.js,23-watch.js to the "Exclude nodes by filename" section
FlowFuse Docker Compose files includes FlowFuse File Storage component by default and starts it along with the platform.
Full details on configuring the File Storage service are available here.
Uninstall
- Bring the services down with
docker compose -p flowfuse down -v(note the extra-vto delete all the volumes, only include this if you do not want to reuse this install) - Use
docker imagesto list container images - Use
docker rmi [imagename]:[tag]to remove all images that start withflowfuse/
Table of Contents
- Checklist
- Prerequisites
- Installing FlowFuse
- Start FlowFuse platform
- First Run Setup
- Upgrade
- Common Questions
- How to use external database server?
- How can I provide my own TLS certificate?
- What additional configuration is required when the TLS certificate is issued by a private Certificate Authority?
- I would like to invite my team members to the platform with e-mail, how can I do that?
- Connection Refused error
- I installed FlowFuse on Windows with WSL2, application is running but I can't access it in the browser
- How can I enable persistent storage for Node-RED instances?
- Uninstall