- docs
- FlowFuse User Manuals
- Using FlowFuse
- Getting Started
- Static asset service
- Bill of Materials
- FlowFuse Concepts
- Instance States
- Changing the Stack
- Custom Hostnames
- Custom Node Packages
- DevOps Pipelines
- Environment Variables
- FlowFuse Expert
- FlowFuse File Nodes
- FlowFuse MQTT Nodes
- FlowFuse Project Nodes
- FlowFuse Tables
- Groups
- High Availability mode
- HTTP Access Tokens
- Instance Settings
- Logging
- persistent-context
- Role-Based Access Control
- Shared Team Library
- Snapshots
- Team Broker
- Teams
- User Settings
- FlowFuse API
- Migrating a Node-RED project to FlowFuse
- Device Agent
- Device Agent
- FlowFuse Device Agent Introduction
- Quick Start
- Installation
- Register your Remote Instance
- Running the Agent
- Deploying your Flows
- Hardware Guides
- FlowFuse Cloud
- FlowFuse Cloud
- FlowFuse Self-Hosted
- Quick Start
- Installing FlowFuse
- Overview
- Configuring FlowFuse
- DNS Setup
- Docker install
- Add Project Stacks on Docker
- Docker Engine on Windows
- Docker from AWS Market Place
- Docker on Digital Ocean
- Email configuration
- First Run Setup
- FlowFuse File Storage
- Install FlowFuse on Kubernetes
- Upgrading FlowFuse
- Administering FlowFuse
- Administering FlowFuse
- Configuring Single Sign-On (SSO)
- Licensing
- Monitoring
- Telemetry
- User Management
- Support
- Community Support
- Premium Support
- Debugging Node-RED issues
- Contributing
- Contributing to FlowFuse
- Introduction
- Adding Template Settings
- API Design
- Creating debug stack containers
- Database migrations
- FlowFuse Architecture
- Local Install
- State Flows
- Device Editor
- Instance states
- Invite External Users
- Project Creation
- Reset Password Flow
- Team creation Flow
- User Login Flows
- User Sign up Flow
- Team Broker
- Working with Feature Flags
Register your Remote Instance
To connect your hardware to FlowFuse, you will need to:
- Install the Device Agent on your hardware
- Add a "Remote Instance" to FlowFuse, via the FlowFuse UI
- Connect your hardware to FlowFuse by configuring the Device Agent
The best configuration to use will depend on how many Remote Instances you want to connect:
- Single Instance Registration: for connecting a single Remote Instance, or a small number of Remote Instances, to the platform.
- Bulk Registration: for setting up one or more Remote Instances which will automatically register themselves to the platform when the device agent is run.
Single Remote Instance Registration
For a single Remote Instance, or small batch of Remote Instances, you can manually register each Remote Instance individually, naming each Remote Instance and assigning it to an application.
Add Remote Instance
- Go to your teams's Remote Instances page.
- Click the Add Remote Instance button.
- You will be prompted to give the Remote Instance a Name, an optional Type and to chose which Application, if any, the Instance should be assigned to.
-

- The Type field can be used to record additional meta information about the Remote Instance.
- If you do not wish to assign the Remote Instance to an Application at this time, you can do so later.
-
- Click Add
Connect Hardware to FlowFuse
Once the Remote Instance has been added in the FlowFuse UI, you will be shown the Device Agent Configuration dialog which contains all the information needed to connect your hardware to the FlowFuse platform.
Quick Connect
By default, you are offered the Setup command method that was introduced in FlowFuse V2.1, and provides a one-time passcode to automatically connect the hardware to FlowFuse.

Running this command on hardware with the Device Agent installed will automatically configure it and connect it to FlowFuse.
Manual Setup
For older versions of the device agent, you can expand the the Manual Setup section and use the configuration data with the Device Agent Web UI or the Manual Download methods instead.
Repeat these steps for each Remote Instance you want to connect to the platform.
Bulk Registration
If you have dozens, or hundreds of pieces of hardware to connect, you can use the Device Provisioning Configuration method.
This approach provides you with a single "Provisioning Token" for all of your Remote Instances. When passed to the flowfuse-device-agent, this token will automatically register your Remote Instances with the relevant instance or application. There is no need to "Add Remote Instance" each time, as is the case with the Single Device Registration method.
Generating a "Device Provisioning Configuration"
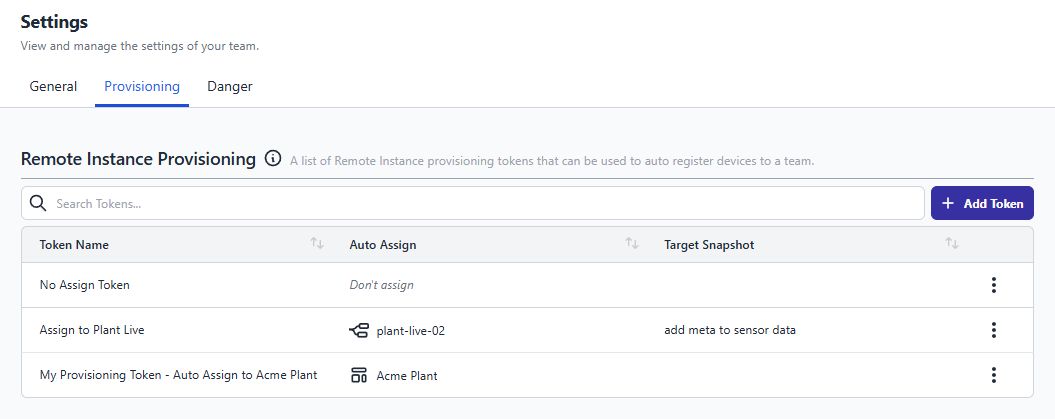
- Go to your Team Settings page.
- Open the Provisioning tab.
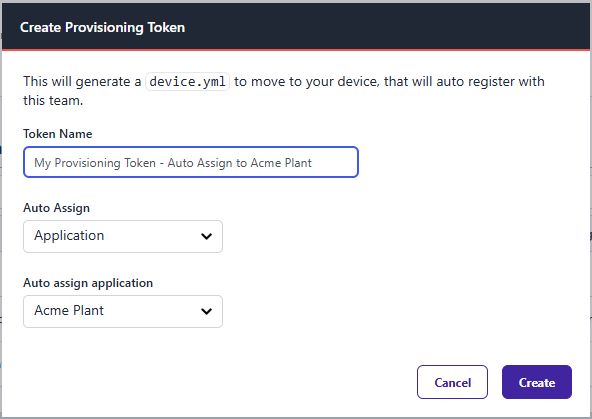
- Click the Add Token button.
- Enter a value for Token Name
- Optionally, chose whether the device should Auto Assign to an Instance, an Application, or be left unassigned.
- Select an Instance if you want the device to be automatically assigned to an instance.
- Select an Application if you want the device to be automatically assigned to an application.
- Click Create
Once the Provisioning Token has been created, you will be shown the Device Provisioning Configuration dialog:
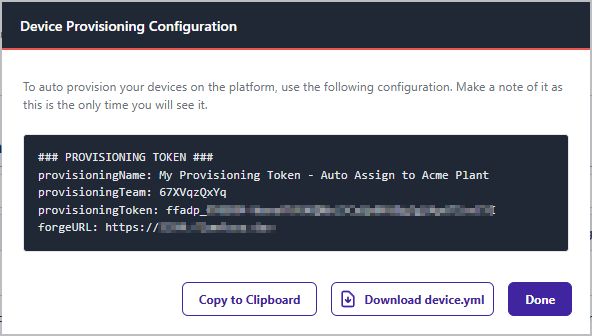
IMPORTANT: This is the only time the platform will show you this information. Make sure to take a copy or use the Download button to save the configuration file locally.
Once the token is created, it will be shown in the list of tokens on the Provisioning tab.
Connecting your Hardware
Install the configuration
The Device Agent requires information about the FlowFuse Platform, and how to connect. This comes in the form of a a Device Configuration file or a Device Provisioning Configuration file present in its working directory
There are three methods by which you can get this configuration onto your hardware:
- Quick Connect: Copy the Setup Command (with one-time passcode) and run it in a terminal window on the hardware. Your hardware will then automatically configure itself.
- Device Agent Web UI: Copy the configuration file (
device.yml) to your hardware using its built in Web UI.- The Device Agent must be running and the command line flag for the Web UI must be enabled.
- Manual Download: Download the configuration file directly into the hardware's Working Directory.
Methods
Quick Connect
The Quick Connect method was introduced in FlowFuse v2.1. This is the fastest way to connect your hardware to the platform.
When registering your hardware you would have been presented the following dialog, with a one-time-passcode that the Device Agent can use to retrieve it's configuration:
If you're no longer able to see that dialog, you can regenerate the configuration by following the Regenerating Configurations steps, or clicking "Finish Setup" on the Remote Instance's page:

When the quick connect command has been run, the terminal window will report that the Remote Instance has connected to the platform and will output a new command for you to use to start the Remote Instance agent with the new configuration.
NOTES
- The Setup command is only valid for 24h. If you do not use it within this time, you will need to regenerate it.
- The 3 word One-Time-Code (OTC) contained in the Setup command is single use and is deleted immediately upon use.
Device Agent Web UI

If the Device Agent is running with the Web UI enabled, you can download the configuration file to the Remote Instance using the Web UI. This is useful if you don't have direct access to the Remote Instance's file system. Once the configuration file is downloaded, the device agent will automatically restart and load the configuration.
Manual Download
Place the Device Configuration or Device Provisioning Configuration file onto your hardware. in the Working Directory
By default, the device agent expects the configuration file to be named device.yml, if not, you will need to start the device agent with the -c Command Line Option and specify the path of the configuration file.
The agent can then be started with the command: [^global-install]
flowfuse-device-agentYou will see the Device Agent start and perform a 'call-home' where it connects back to the platform to check what it should be running.
Additional Information
If you copy or download a Device Provisioning Configuration file to your hardware, you will see the Device Agent start and perform a 'call-home' where it connects back to the platform to auto register itself in the Team's Remote Instances. If successful, the real Device Configuration is generated and downloaded to the device. The original Provisioning Configuration will be overwritten meaning subsequent runs will not need to perform the auto registration again.
Assign the Remote Instance
The next step is to assign the device to a Node-RED instance or application. Note, that if you've followed Single Device Registration or Bulk Registration to register your device, it will automatically be assigned to an Application or Instance.
Applications
This step will permit you to push Snapshots to your Remote Instance via DevOps Pipelines, or via a Target Snapshot from the Application.
Assign to Application
- Go to your teams's Remote Instances page.
- Open the dropdown menu to the right of the Remote Instance you want to assign and select the Add to Application option.
- Select the application in the dialog and click Add to continue.
Remove from Application
To remove the Remote Instance from an application:
- Go to your teams's Remote Instances page.
- Open the dropdown menu to the right of the Remote Instance you want to remove and select the Remove from Application option.
- Confirm the action by clicking the Remove option.
The Remote Instance will stop running the current Node-RED flows. It will then wait until it is assigned to another application or instance.
Bulk Assigning Remote Instances to an Application
If you have a large number of Remote Instances to assign to an application, you can use do them all at once:
- Select the Remote Instances you want to assign and open the Actions dropdown menu.
- Select the Move to Application option and then select the application or instance you want to assign the Remote Instances to.
- Click Move to continue.
Details:
- Remote Instances that are already assigned to the chosen application will not be changed or updated.
- For any Remote Instance that is moved by the operation:
- Remote Instances moved by the operation will have their target snapshot cleared, device group membership cleared and will be sent an update command.
- Remote Instances in Fleet Mode will automatically apply the changes resulting in Remote Instances restarting with the basic starter snapshot flows.
- Remote Instances in Developer Mode will continue to run their current flows until they are switched to fleet mode at which point they will update accordingly.
NOTE: If you wish to keep the flows currently running on the Remote Instance, it must be in developer mode at the time of operation. Once the Remote Instance is moved, create a new snapshot with the "Set as Target" option checked.
Hosted Instances
This method establishes a deployment relationship where a Hosted Instance becomes the source for snapshot deployments to your Remote Instance(s).
Important: This is a legacy feature; assigning to Applications is the recommended approach as it provides better fleet management and DevOps Pipeline capabilities. For guidance, see when to use each approach.
Assign to Hosted Instance
- Go to your team's Remote Instances page.
- Open the dropdown menu to the right of the Remote Instance you want to assign and select the Add to Instance option.
- Select the Hosted Instance in the dialog and click Add to continue.
Note: There are constraints on which instances can be assigned to each other. For detailed information, refer to Assignment Rules and Constraints.
Remove from Hosted Instance
To remove the Remote Instance from a Node-RED instance:
- Go to your teams's Remote Instances page.
- Open the dropdown menu to the right of the Remote Instance you want to remove and select the Remove from Hosted Instance option.
- Confirm the action by clicking the Remove option.
The Remote Instance will stop running the current Node-RED flows. It will then wait until it is assigned to another Hosted Instance or Application
Bulk Assigning Remote Instances to a Hosted Instance
If you have a number of Remote Instance to assign to an instance, you can do them all at once.
- Select the Remote Instances you want to assign and open the Actions dropdown menu adjacent to the Add Remote Instance button.
- Select the Move to Instance option and then select the instance you want to assign the Remote Instances to.
- Click Move to continue.
Details:
- Remote Instances that are already assigned to the chosen instance will not be changed or updated.
- For any Remote Instance that is moved by the operation:
- If the chosen instance has a target snapshot set, the newly assigned Remote Instances will inherit this.
- If the chosen instance does not have a target snapshot set, newly assigned Remote Instances will have their target snapshot cleared.
- Remote Instances in fleet mode will automatically apply the changes.
- Remote Instances in developer mode will continue to run their current flows until they are switched to fleet mode at which point they will update accordingly.
Bulk Removing Remote Instances from an Application or Instance
If you have a number of Remote Instances to remove from an application or instance, you can do them all at once.
- Select the Remote Instances you want to remove and open the Actions dropdown menu adjacent to the Add Remote Instance button.
- Select the Unassign option.
- Depending on where you are viewing Remote Instances, this may say "Remove from Application" or "Remove from Instance".
- Confirm the action by clicking Unassign.
Details:
- Remote Instances that are already unassigned will not be changed or updated.
- For any Remote Instance that was previously assigned to an application or instance:
- Remote Instances in developer mode will be switched to fleet mode.
- Remote Instances will have their target snapshot and Remote Instance group membership cleared.
- Remote Instances will be informed of the changes resulting in their flows being cleared and the Remote Instance entering a stopped state waiting for a new assignment.
Regenerating Configurations
To regenerate Remote Instance configurations:
- Go to your team's or instance's Remote Instances page.
- Open the dropdown menu to the right of the Remote Instance and select the Regenerate Configuration option.
- You will need to confirm this action as the existing configuration will be immediately revoked. If the Remote Instance tries to use the old configuration it will fail to connect and will delete its local copy of the snapshot it was running. Click Regenerate Configuration to continue.
You will then be shown the Remote Instance Configuration dialog again with a new setup command and the manual configuration to copy or download.
Deleting a Remote Instance
To delete a Remote Instance:
- Go to your team's or instance's Remote Instances page.
- Open the dropdown menu to the right of the Remote Instance and select the Delete Remote Instance option.
- Confirm the action by clicking the Delete option.
The next time the Remote Instance attempts to connect to the platform it will find it is no longer authorised and will stop and delete its local copy of the flows it was running.
Node-RED Settings
Most Node-RED settings are managed by the platform as part of deploying an instance to the Remote Instance. However some settings can be overridden locally on the Remote Instance.
HTTPS configuration
Available in Device Agent 0.10+
The https configuration option in device.yml can be used to enable HTTPS within Node-RED. The values are passed through to the Node-RED https setting.
The ca, key and cert properties can be used to provide custom certificates and keys. The values should be set to the contents of the certificate/key.
Alternatively, the properties caPath, keyPath and certPath can be used instead to provide absolute paths to files containing the certificates/keys.
https:
   keyPath: /opt/flowfuse-device/certs/key.pem
   certPath: /opt/flowfuse-device/certs/cert.pem
   caPath: /opt/flowfuse-device/certs/ca.pem
httpStatic configuration
Available in Device Agent 0.10+
This option can be used to serve content from a local directory.
If set to a path, the files in that directory will be served relative to /.
httpStatic: /opt/flowfuse-device/static-contentIt is also possible to configure it with a list of directories and the corresponding path they should be served from.
httpStatic:
  - path: /opt/flowfuse-device/static-content/images
    root: /images
  - path: /opt/flowfuse-device/static-content/js
    root: /js
localAuth configuration
Available in Device Agent 3.20+
This option can be used to enable local login for the Node-RED editor. This option is not recommended for day to day use.
It can be configured under the Remote Instance's Settings
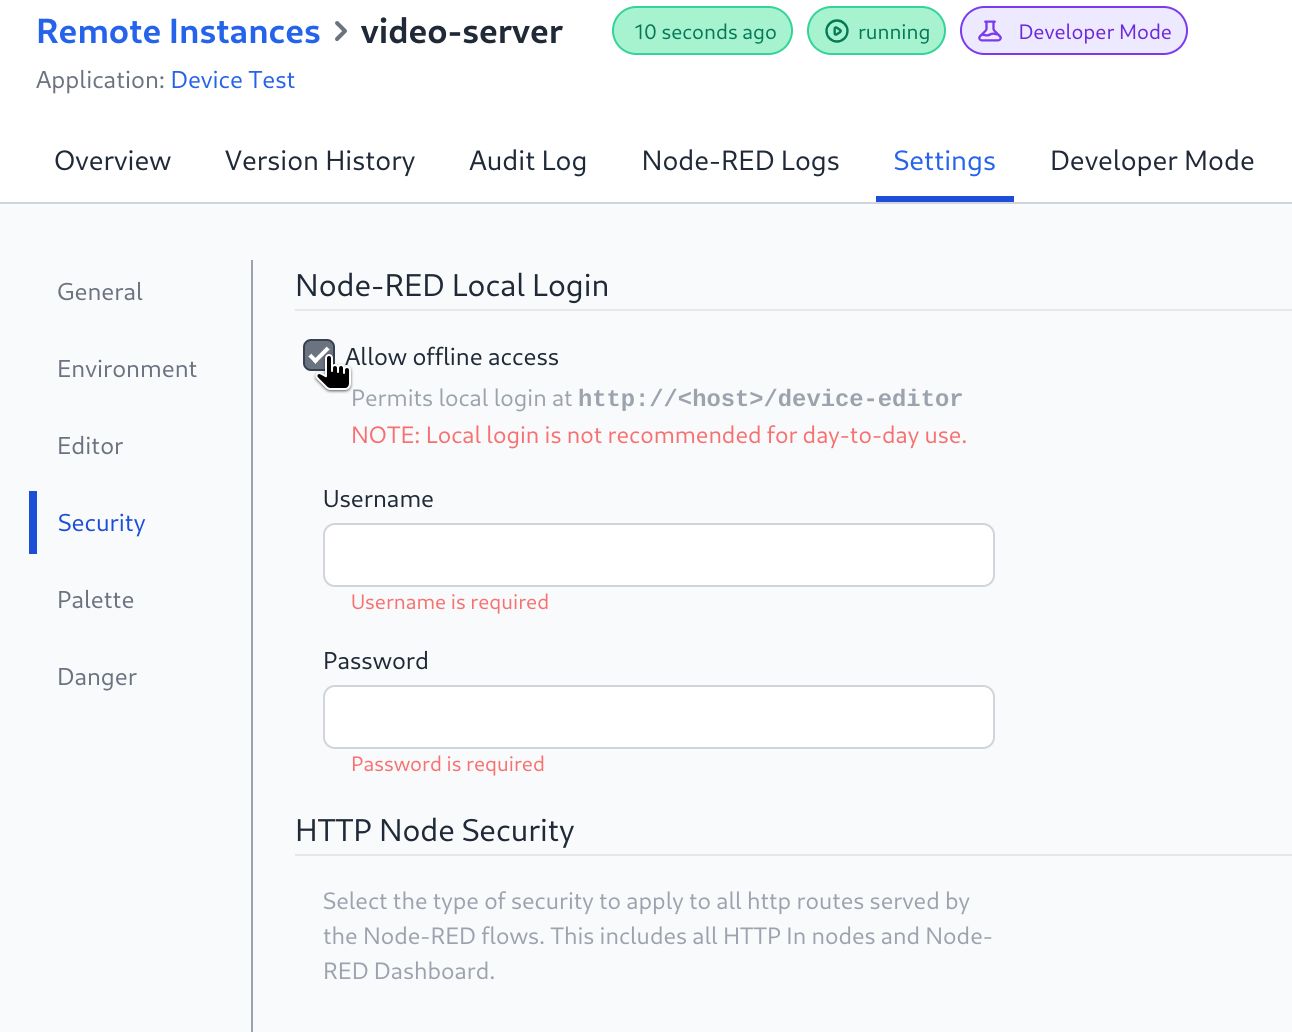
Or by adding the following to the device.yml file
localAuth:
    enabled: true
    user: user-name
    pass: $hashed-password
NOTE: The password should be hashed version generated using the Node-RED admin CLI. For example:
node-red admin hash-pwAlternatively, the password can be set in FlowFuse on the settings -> security tab of the Remote Instance.
Troubleshooting
If you have problems with the device agent the first thing to do is to enable the verbose logging mode.
To do this add a -v to the command line. This will present a lot more information about what the agent is doing. It will show that is has connected to the FlowFuse instance and every time it checks in, it will also log all the local HTTP requests made when accessing the Node-RED Editor via the FlowFuse application.
Table of Contents
- Single Remote Instance Registration
- Bulk Registration
- Connecting your Hardware
- Assign the Remote Instance
- Regenerating Configurations
- Deleting a Remote Instance
- Node-RED Settings
- Troubleshooting