Using MQTT with Node-RED
Getting devices to talk to each other in industrial environments isn't trivial. You're dealing with spotty networks, power constraints, and devices that need to share data without constant back-and-forth polling. MQTT solves these problems by keeping communication lightweight and flexible. This guide walks you through what MQTT is, why it works well for IIoT, and how to get it running with Node-RED.
Understanding MQTT
MQTT is a messaging protocol that's been around since 1999. It uses a publish-subscribe model, which is different from the request-response pattern you see with HTTP.
Here's the basic setup: devices/systems (clients) connect to a central server called a broker. When a device has data to share, it publishes a message to a specific topic. Other devices/systems subscribe to topics they care about and automatically receive messages when they're published. The broker handles all the routing.
This architecture means devices/systems don't need to know about each other or maintain direct connections. A temperature sensor can publish readings to enterprise/site/area/line/cell/temperature without caring who's listening.
Setting Up MQTT in Node-RED
Node-RED comes with MQTT nodes built in, so you don't need to install anything extra. You'll need access to an MQTT broker - you can use a cloud service, run your own with Mosquitto, use a public test broker for experimenting, or if you're using FlowFuse, it provides a built-in MQTT broker service.
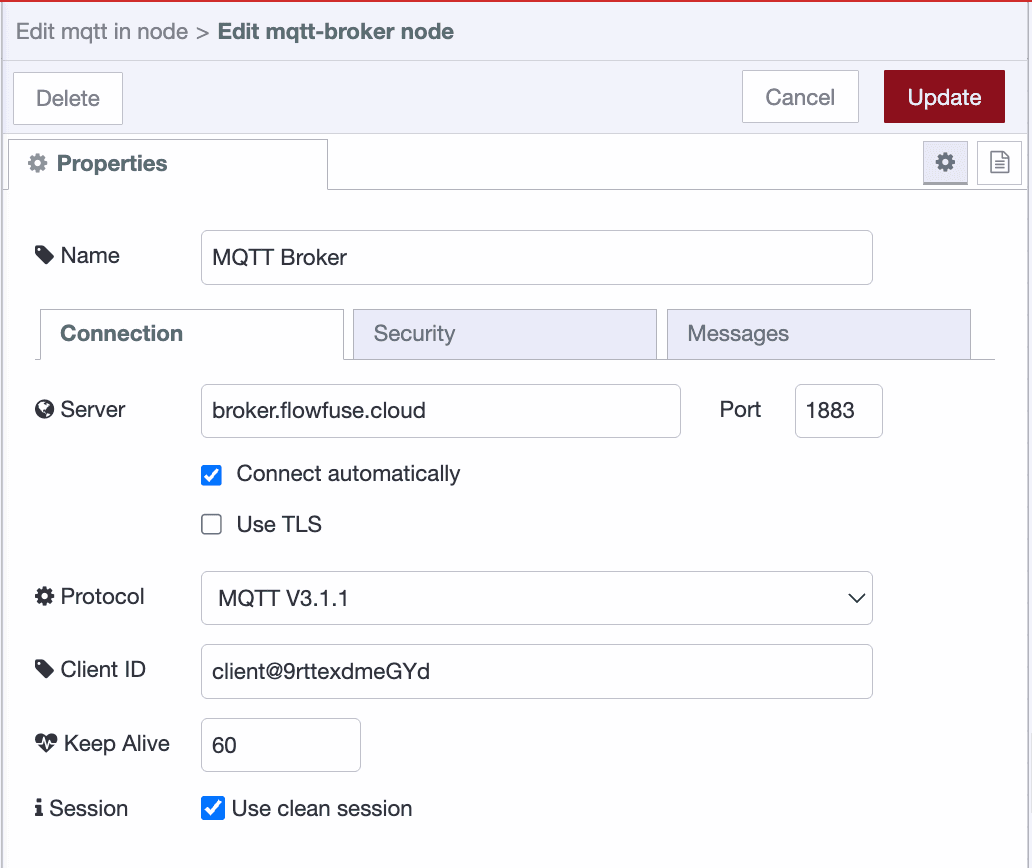
Configuring the MQTT Broker Connection
Before you can publish or subscribe to messages, you need to configure the broker connection. You only need to do this once - the same broker configuration can be reused across multiple MQTT nodes.
- Add either an MQTT out or MQTT in node to your canvas
- Double-click the node to open its configuration
- Click the pencil icon next to "Server" to add a new broker connection
- Enter your broker's address (e.g.,
broker.flowfuse.cloud) - Add the port (usually 1883 for unencrypted, 8883 for TLS)
- If your broker requires authentication, switch to the Security tab in the same configuration dialog by clicking on it "Security", then enter your username and password
- Give the connection a name and click Add
Once configured, this broker connection will appear in the Server dropdown for all MQTT nodes in your flow.
Publishing Messages to a Broker
Let's start by sending data to an MQTT broker.
- Add an MQTT Out node.
- Connect your data source node’s output (use an Inject node to simulate data if you don’t have one) to the MQTT Out node.
- Double-click the MQTT Out node.
- Select your configured broker from the Server dropdown (or create a new one by following the steps above).
- Enter a topic such as
enterprise/site/area/line1/cell/temperature(topics use forward slashes as separators, similar to file paths). - Set the QoS level if needed for message reliability, and enable Retain if you want the broker to store the last published message for new subscribers.
- Click Done.
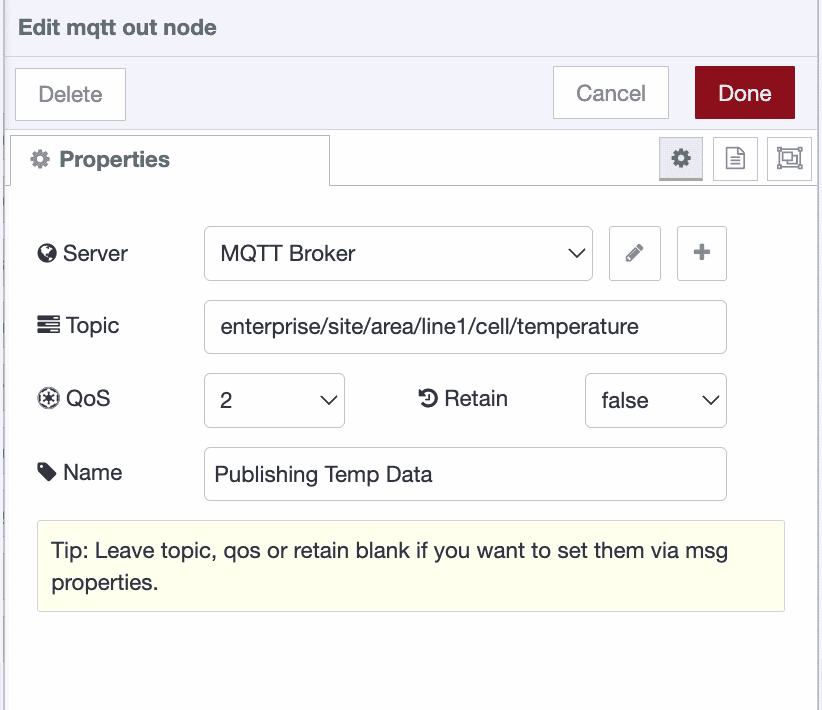
- Click Deploy
The MQTT out node should show "connected" with a green dot.

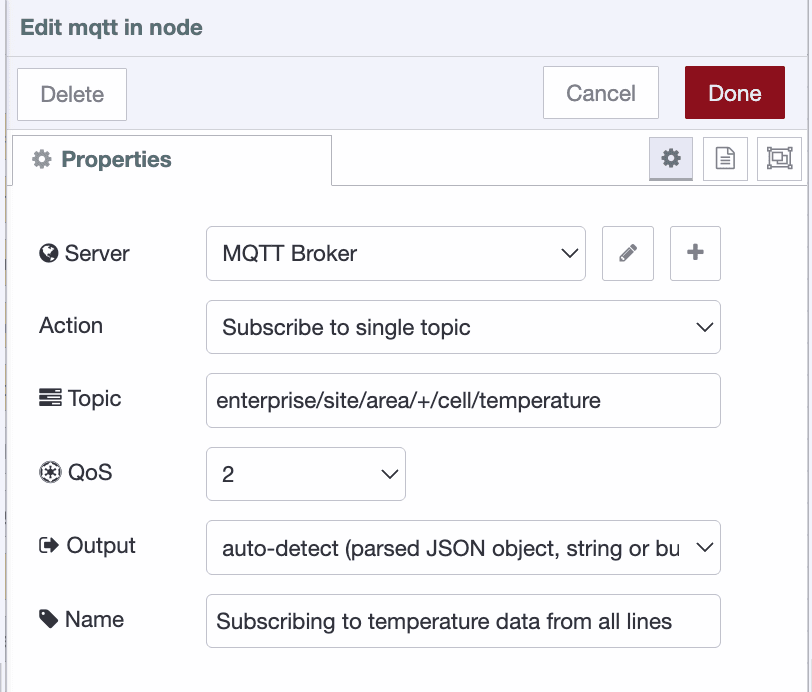
Subscribing to Messages from a Broker
Now let's receive messages from the MQTT broker.
- Add an MQTT In node to the canvas.
- Add a Debug node.
- Connect the MQTT In node to the Debug node.
- Double-click the MQTT In node.
- Select your configured broker from the Server dropdown (or create a new one if needed).
- Set the Action to Subscribe to a single topic.
- Enter the topic you want to subscribe to, for example:
enterprise/site/area/+/cell/temperature(the+symbol acts as a wildcard for one level). - Set the QoS level based on your reliability requirements.
- Click Done, then Deploy your flow.
Once deployed, you should see the messages appear in the Debug sidebar.
Using Wildcards in Topics
MQTT supports wildcards for subscribing to multiple topics at once:
-
Single-level wildcard (+): Matches one level.
enterprise/site/area/+/cell/temperaturematchesenterprise/site/area/line1/cell/temperatureandenterprise/site/area/line2/cell/temperaturebut notenterprise/site/area/line1/cell/station1/temperature -
Multi-level wildcard (#): Matches multiple levels.
enterprise/site/area/#matches everything under that area, includingenterprise/site/area/line1/cell/temperatureandenterprise/site/area/line1/cell/station1/pressure
When deployed you should again see the status bubble turn green, and have a timestamp appear in the sidebar every second!