Using LwM2M with Node-RED
IoT devices, especially those designed for low-power operation, can be difficult to manage due to their limited resources and the need for efficient communication and control. This is where LwM2M (Lightweight Machine-to-Machine) comes in. LwM2M is designed to help you monitor, update, and control your devices with minimal overhead, making it ideal for everything from smart sensors to industrial equipment. In this post, we'll explore how you can use LwM2M with Node-RED. It is ideal for anyone starting their journey with LwM2M or Node-RED.
What is LwM2M
LwM2M (Lightweight Machine-to-Machine) is a protocol specifically crafted to handle and interact with IoT devices, particularly those that consume less energy and have limited resources. LwM2M facilitates easy remote oversight, control, and administration by linking these devices to a central server.
In LwM2M, the server can send commands, gather data, and change device settings using the Constrained Application Protocol (CoAP), which is designed for environments with limited resources. LwM2M also includes security features like DTLS, making it a reliable choice for managing many devices in large IoT systems, such as smart cities and industrial applications.
Using LwM2M with Node-RED
In this section, I will demonstrate how you can monitor and control IoT devices using LwM2M with Node-RED. For demonstration purposes, I'll show you how to monitor and control an Ubuntu machine running Node-RED via the FlowFuse Device Agent. This setup will help you understand how to use LwM2M to manage your devices remotely.
Prerequisites
- node-red-contrib-lwm2m: Install the LwM2M contribution node via the Palette Manager in Node-RED.
- LwM2M Server: Ensure you have a running OMA LwM2M server available and have its configuration details on hand. For more information, refer to Eclipse Leshan.
Note: In this guide, we have used the Eclipse Leshan demo server for testing and demonstration purposes. It is not recommended for production use due to its security and scalability limitations
Configuring LwM2M Node
- Drag the LwM2M node onto the canvas in Node-RED.
- Double-click on the LwM2M node to open its configuration window.
- Click the "+" icon next to the Client field to add a new client.
- Enter a unique endpoint in URN format. This endpoint should be a unique identifier for your device, typically in the format
urn:uuid:<unique-id>,where<unique-id>is a UUID or custom string specific to your device. Ensure that each device has a distinct endpoint to avoid conflicts. - Enter the server host.
- Enter the server port:
- For plain UDP, use port
5683. - For DTLS (encrypted communication), use port
5684.
- For plain UDP, use port
- Check the "Enable DTLS" option to enable secure communication.
- Enter the PSK (Pre-Shared Key) details if DTLS is enabled.
- Add the object to the "Objects" field. This allows you to include custom objects and resources specific to your application that can be handled similarly to other objects, the id of this custom object should be in the range of 10241 - 32768. Below is an example object:
{
  "32764": {
    "0": {
      "0": {
        "type": "STRING",
        "acl": "RW",
        "value": "abcd"
      },
      "1": {
        "type": "INTEGER",
        "acl": "RW",
        "value": 123456
      },
      "2": {
        "type": "BOOLEAN",
        "acl": "RW",
        "value": true
      }
    }
  }
}- If you need to manage sensitive data, ensure you enable the "Hide Sensitive Data" option. This will prevent sensitive information about the device from being exposed.
- Click "Add" to save the configuration.
Once you've configured the LwM2M node with the server details, you can confirm that the client is connected by visiting the server's web UI. Navigate to <your-server-host>/#/clients and enter the endpoint of your client device in the search field. If the client appears in the list, it means it is connected. Alternatively, you can check the node's status in Node-RED, which will display "connected" if the connection is successful.
Reading Device Configuration and Data on the Server
- Navigate to your server’s clients section and select the device URN you registered.
- In the new window that opens, look at the top-left for information about your device, including registration and update details. You can also configure settings such as request timeout and data types for single and multi-value writes.
- Below this, you'll find the available objects that you can control for your devices and server.
- Click on the "Device" object option to read device realted information. In the instance 0 section click on the "R" for each object you want. Alternatively, you can click on the top "R" next to instance 0 or "Device-v1.0" to read all values at once. Note that this may not work if any values are unavailable for your device, it will return 404 not found.
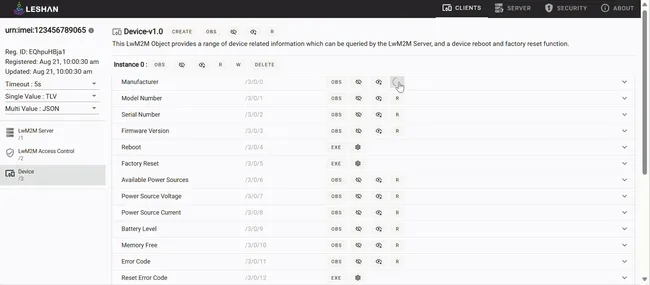
You can now read information such as device battery level, available memory, device manufacturer, timezone, device type, and a lot.
Writing Data and Executing Commands to a Device on the Server
- Navigate to your server’s clients section and select the device URN you registered.
- Click on the object to which you want to write data.
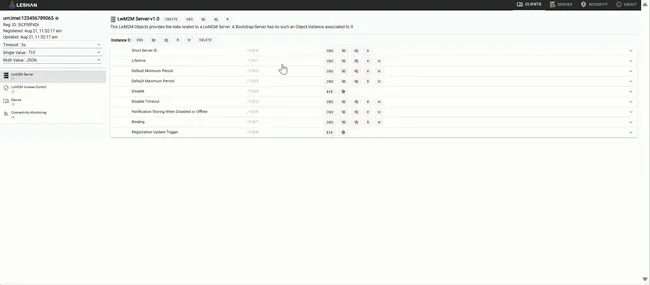
- In the list of resources, identify those with write permission and click on the "w" icon to initiate the write process.
- In the form that opens, enter the new value in the correct format.
- Click on "Write" to update the value for that resource.
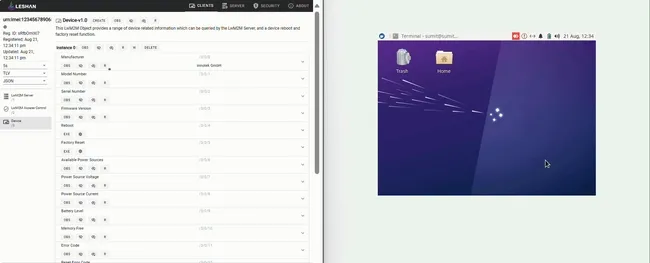
- Drag the lwm2m client node onto the canvas, select the correct configuration, and enable the "Subscribe LwM2M object events" option. This setting will trigger and send an event object when commands are executed on the server.
- Drag an exec node onto the canvas and add the command you want to execute. For example, you can add the "reboot" command.
- Connect the output of the lwm2m client node to the input of the exec node.
- To execute the commands, click on the 'exec' option next to resources such as Reboot.
Reading Data and Configuration from the LwM2M Server in Node-RED
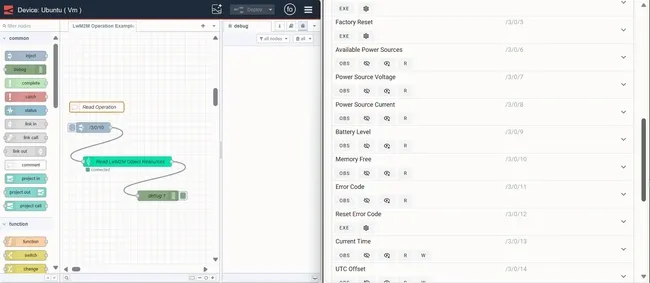
- Drag the lwm2m client node onto the canvas. Ensure that you have selected the correct configuration for it.
- Drag the inject node onto the canvas. Set the topic in the format
/ObjectID/ObjectInstanceID/ResourceID. For example, to read the manufacturer’s available free memory, which is in the Object3, Instance0, and has Resource ID10, set the topic to/3/0/10. - Add a debug node onto the canvas to display the read values in the debug panel for verification.
- Connect the output of the inject node to the input of the LwM2M client node, and connect the output of the lwm2m client node to the input of the debug node.
- Deploy the flow by clicking on the top-right "deploy" button.
Writing data and configuration to the LwM2M Server from Node-RED
- Drag an inject node onto the canvas.
- Double-click on it and set the
msg.payloadto the updated value. - Set the
msg.topicto the resource notion in the correct format/ObjectID/ObjectInstanceID/ResourceID - Drag the lwm2m client out node onto the canvas, and select the correct server configuration.
- Connect the inject node's output to the input of lwm2m client out node.
- Deploy the flow and click the inject button to perform the write operation.
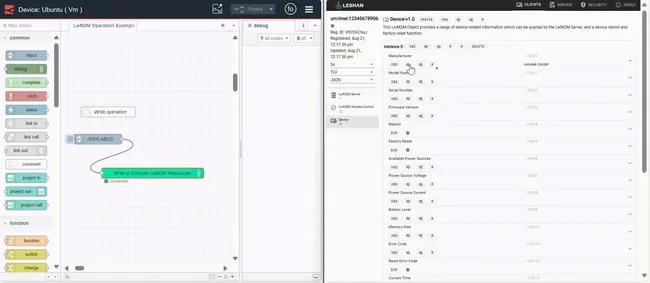
In the same way, you can execute commands from node-red. You have to replace the notion and end that notion with execute, like 0/0/4/execute. When executing the command, you will not have to specify the msg.payload.