Building a Custom Video Player in Dashboard 2.0
We've just released the latest version of Dashboard 2.0, with a fully featured UI Templates node which now allows for full definition of a Vue component, external JS dependencies and CSS.
Dashboard 2.0 just got a lot more powerful with our new updates to the ui-template node. New features added to the node include:
- Support for a full Vue component to be defined using the VueJS Options API.
- Running of raw JavaScript within
<script />tags - Loading of external dependencies through
<script />tags
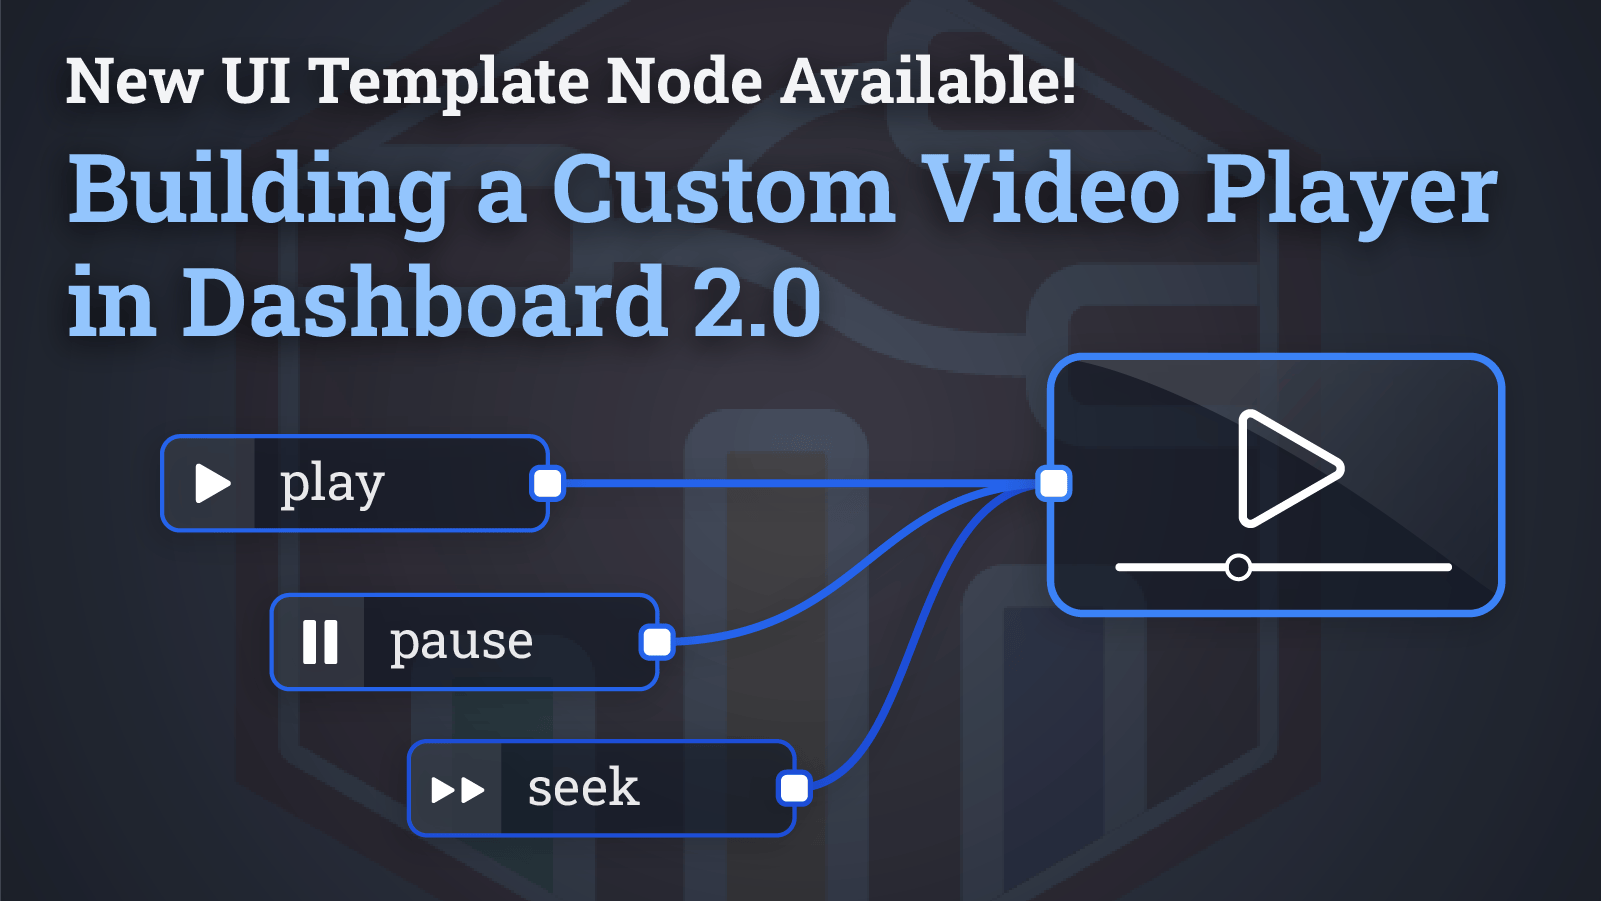
In this article we're going to deepdive into an example of how you can use this new functionality to build a custom video player.
We're going to aim for 3 key features:
- Emit events into Node-RED when a user plays/pauses the video
- Allow for the video to be played/paused from within Node-RED
- Allow the user to seek to a specific point in the video from within Node-RED
@flowfuse namespace, so you'll need to update to use @flowfuse/node-red-dashboard, and not @flowforge.Building a Vue Component
With Dashboard 2.0, we switched over our underlying front-end framework to VueJS. We're aware that not everyone coming into Dashboard 2.0 will be familiar with VueJS.
We have a more detailed guide here, but we'll also give a quick overview of the elements from Vue "component" that we'll use here:
<template>
    <!-- Our HTML content will go here -->
</template>

<script>
export default {
  name: 'MyComponent',
  methods: {
    // JS methods we want to use across our component will go here
  },
  mounted () {
    // Code we want to run when our component is loaded will go here
  },
  unmounted () {
    // Code we want to run when our component is unloaded will go here
  }
}
</script>

<style>
    /* We can define custom CSS here too */
</style>
Some quick gotchas to note:
<div>{{ msg }}</div>- is an example of how you render variables into the HTML.<div v-if="myVar"></div>- lets you conditionally show/hide content based on a variable.<div v-for="item in items"></div>- lets you loop over an array of items and render them into the HTML.<div @click="myMethod"></div>- lets you bind a method to an event, in this case, when the user clicks on the div.<div :class="{ 'my-class': isActive }"></div>-:is a way to define a "bound" property. In this case, the classmy-classwill be applied whenisActiveis true.console.log(this.myVar)- when you're writing code inside the<script />tags, you can access Component variables and methods usingthis.
Built-in Extras
In addition to building a component from scratch, we'll also utilize some built-in features of ui-template too. These will be:
- Variables:
id- The unique ID for this node in Node-REDmsg- The message that was most recently received into the node$socket- The underlying SocketIO connection to Node-RED. Use this to listen to any incoming events, and send new ones back.
- Functions:
send(payload)- Send a message back to Node-RED
As above, we have more detailed documentation on these features here.
Building the Video Player
Defining the Content (HTML)
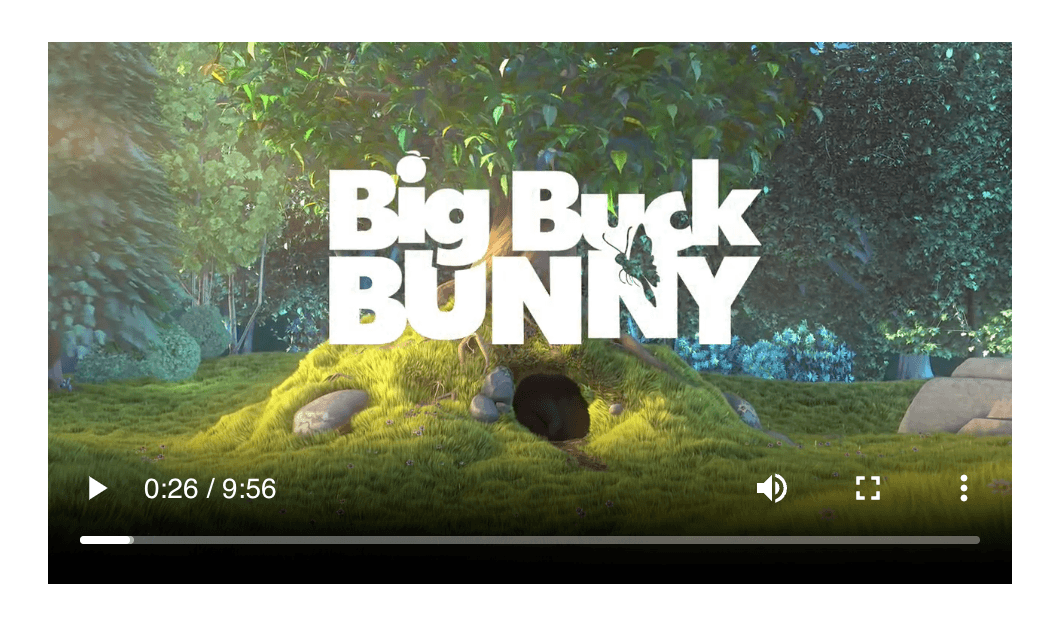
We're going to start by adding a basic HTML video player:
<template>
    <video ref="my-video" style="width: 100%" controls @play="onPlay" @pause="onPause">
        <source src="http://commondatastorage.googleapis.com/gtv-videos-bucket/sample/BigBuckBunny.mp4" type="video/mp4">
        Your browser does not support the video tag.
    </video>
</template>
A few things of importance to note here:
refis Vue's replacement fordocument.getElementById(). This is copied to each instance of the component, meaning we can callthis.$refs['my-video']to access the video element, and this doesn't break when duplicating the widget multiple times in Dashboard.style=""is required here to ensure the video fills the group/wrapper that it is contained within.@play=is Vue's way of binding onto the standardonplayevent listener available on HTML video players. We'll define theonPlaymethod in the next section.@pause=is our event listener for when the video is paused by the user. As withonPlay, we'll define this shortly.
With just the above defined, we end up with a standard video player rendered:
Defining the Behaviors (VueJS)
Now we begin to build our Vue component. Referring back to our earlier set of features, we'll tackle these one at a time.
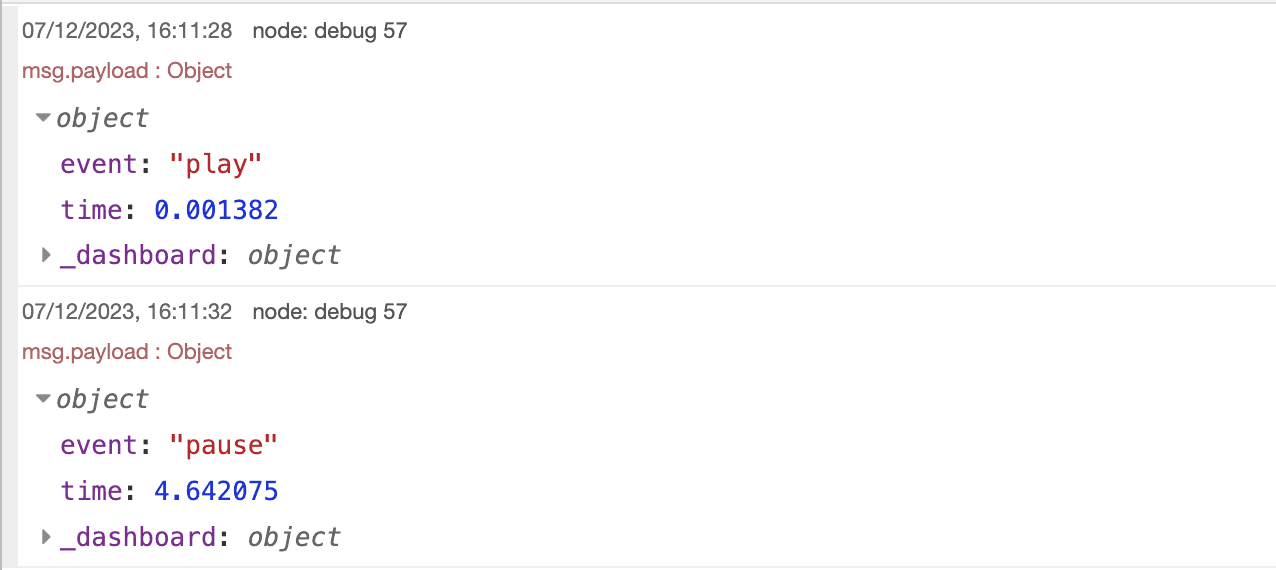
1. Emitting Events to Node-RED on Play/Pause
We can use methods to define our onPlay and onPause functions that are called @play/@pause respectively.
<script>
export default {
  name: 'MyVideoPlayer',
  methods: {
    capture (eventType) {
        // let's define our own function that can be called onPlay/onPause
        // this prevents duplicated code across the two methods

        // get the Video's DOM element
        const video = this.$refs['my-video']

        // send a msg to Node-RED using built-in "send" fcn
        this.send({
            // specify which action is taking place
            event: eventType,
            // use Vue's $refs to get the video's currentTime
            time: video.currentTime
        })
    },
    onPlay () {
        this.capture('play')
    },
    onPause () {
        this.capture('pause')
    }
  }
}
</script>
With this functionality in place, we can wire the ui-template node to a debug node, and see the following when we play/pause the video:
2. Remote control of play/pause from Node-RED
We can use the built-in $socket variable to listen for incoming events from Node-RED. When Dashboard 2.0's nodes receive a msg inside Node-RED, they send a msg-input:<node-id> event to the Dashboard client. We can listen for this event and then call the play() and pause() methods on the video element, depending on any properties of that message, in this case, the msg.payload.event value.
<script>
export default {
  name: 'MyVideoPlayer',
  methods: {
    // ...
  },
  mounted () {
    // listen for incoming msg's from Node-RED
    // note our topic is "msg-input" + the node's unique ID
    this.$socket.on('msg-input:' + this.id, (msg) => {
        // get the Video's DOM element
        const video = this.$refs['my-video']

        // if the event is "play", call the video's play() method
        if (msg.payload?.event === 'play') {
            video.play()
        }

        // if the event is "pause", call the video's pause() method
        if (msg.payload?.event === 'pause') {
            video.pause()
        }
    })
  },
  unmounted () {
    // make sure we remove our listeners when the widget is destroyed
    this.$socket.off(`msg-input:${this.id}`)
  }
}
</script>
3. Seeking to a specific point in the video from within Node-RED
With the on('msg-input') listener in place, we can now extend our handler to handle seeking to a specific point in the video.
<script>
export default {
  name: 'MyVideoPlayer',
  methods: {
    // ...
  },
  mounted () {
    // ...
    this.$socket.on('msg-input:' + this.id, (msg) => {
        // ... other handlers

        // if the event is "seek", call the video's currentTime() method
        if (msg.payload?.event === 'seek') {
            video.currentTime = msg.payload.currentTime
        }
    })
  },
  unmounted () {
    // ...
  }
}
</script>
and with that, we now have a Dashboard 2.0 widget to display a video, that can be controlled from Node-RED, and logs details of user activity back into Node-RED.
Other features available with the UI Template are detailed in the online documentation, and include:
Follow our Progress
You can also read the more comprehensive release notes for v0.10.0 release here:
As always, thanks for reading and your interest in Dashboard 2.0. If you have any feature requests, bugs/complaints or general feedback, please do reach out, and raise issues on our relevant GitHub repository.
Discuss your use case with our team
See how FlowFuse can support your architecture, integrations, and deployment needs.
About the Author
Joe Pavitt
Joe has been working with Node-RED for nearly 10 years, having worked with Nick O'Leary at IBM as a Master Inventor, and been one of the early developers working on the original Node-RED Dashboard. Since joining FlowFuse in 2022, Joe has become the lead for the FlowFuse Dashboard (Dashboard 2.0), created the Node-RED Academy and leads design and front-end development for FlowFuse.
Table of Contents
Like what you’re reading?
Add FlowFuse as a preferred sourceOn the page that opens, check the box next to flowfuse.com to see more of our articles in your Google Search results.