Calling a Python script from Node-RED
Guide on how to execute Python scripts from Node-RED

Python's robust data processing capabilities and extensive libraries are well-known in programming. When combined with Node-RED, these technologies can synergize to elevate data analytics and automation. This guide walks you through integrating Python scripts with Node-RED. You'll gain practical insights, troubleshooting tips, and effective techniques for executing scripts, enabling you to leverage this powerful combination for your IoT projects.
Why use python with Node-RED
Integrating Python and Node-RED can significantly enhance your IoT and automation initiatives by leveraging their distinct strengths. Node-RED excels in creating easy workflows, efficiently processing data streams, and integrating hardware, APIs, and. Meanwhile, Python offers a rich set of libraries for advanced tasks such as machine learning and AI, pivotal in realizing Industry 4.0 concepts.
This combination allows developers to build robust and flexible solutions. For instance, while Node-RED manages data flow and device communication, Python can perform complex analytics, and predictive modeling, or integrate with AI frameworks. This integration bridges the gap between data collection and actionable insights, enabling systems to make informed decisions autonomously.
Installing Python
When executing Python scripts, it's essential to have the Python runtime installed on your system. Before proceeding, make sure you have it installed. You can follow the official guide for instructions.
To verify if Python is installed, open your terminal and execute:
python --version
The above command displays the version of Python installed on your system as shown in the above image. If the above command doesn't work, try:
python3 --versionThe specific command to use depends on how Python was installed and configured on your system. However, make sure to use python <filename>.py if the first command works, or python3 <filename>.py if the second command works, while executing Python scripts.
Executing Python Script from Node-RED
Let's now see how to call a Python script from Node-RED. First, we'll create a basic script file that contains a function to print text in the console based on input. Currently, the function uses hardcoded input. To create this file using Node-RED, import the following flow, deploy it, and press the inject button:
Now, let's execute this Python script from Node-RED. To do that, we will use Node-RED's Exec node, which allows running commands on your system.
- Drag an Inject node onto the canvas.
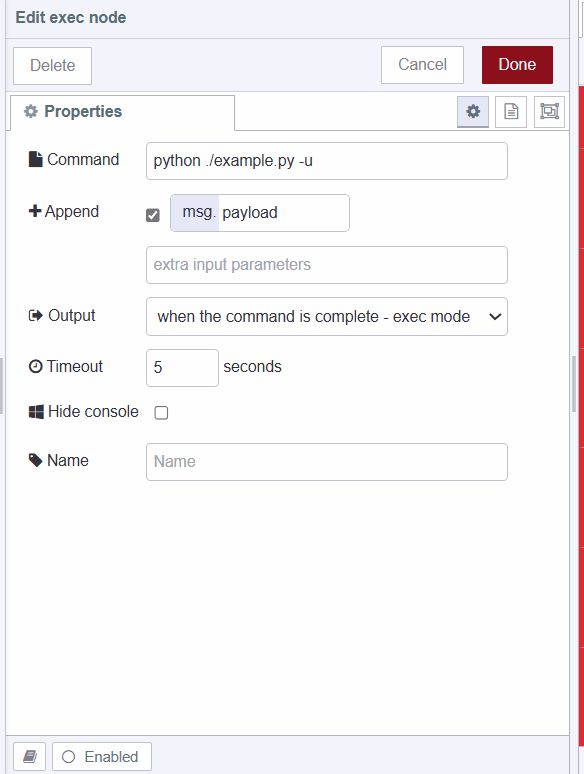
- Drag an Exec node onto the canvas and Configure the command to
python ./example.py -u. The -u flag prevents potential output buffering issues when executing Python scripts via exec.

- Drag a Debug node onto the canvas.
- Connect the output of the Inject node to the input of the Exec node, and the output of the Exec node to the input of Debug node.
Now, when you deploy this flow and click on the inject node to execute the file, you should see the text 'Positive number entered' and { code: 0 }, which indicates your script has been successfully executed.
Reading Temperature Sensor using Python script
Having explored how to run a Python script within Node-RED with the basic practical example, let's move to a real-world scenario. We'll demonstrate how to read sensor data using Python, despite Node-RED providing numerous community-built nodes for this purpose. This approach provides deeper insights into integrating external scripts, showcasing the flexibility of Node-RED for custom solutions.
Before proceeding, ensure that Node-RED is running on a device connected to a temperature sensor. For detailed instructions, refer to Setting Up Node-RED on Different Hardware, In this case, we are running Node-RED on a Raspberry Pi 5 with a DHT11 sensor connected to it.
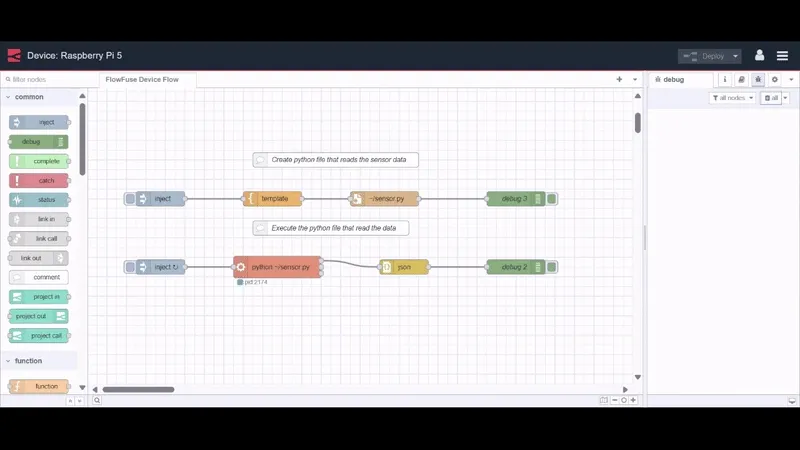
- Drag an Inject node onto the canvas, and set repeat to 1 seconds of interval.
- Drag an Exec node and set the path to
python <filename>.py, replace the filename with the name of the file which reads the sensor data, and make sure the python file doesn't contain the loop. - Drag the JSON node onto the canvas and set the action to "Always convert to JSON object".
- Drag the Debug node onto the canvas.
- Connect the output of the Inject node to the input of the Exec node and output of the Exec node to the input of the JSON node, and finally the JSON node's output to the input of the Debug node.
Below is the complete flow which creates the Python file to read the DHT11 sensor and executes that file after 1 second of interval. After deploying the flow you should able to see the sensor data on the debug sidebar as shown in the below image.

Note: The Python script uses the adafruit-circuitpython to read the sensor data so make sure to install it. Additionally, the code contained in the template node in the following flow considers that your sensor's signal pin is connected to GPIO 4.
Executing Python Script with Arguments from Node-RED
Now, let's revisit our first example. In that example, we executed a simple Python file with a hardcoded value. Now, we'll learn how to pass arguments or inputs to the Python script when executing from Node-RED. For this, we'll need to update the file. Import the following flow, deploy it, and click on the inject button to create the file.
- Drag the Inject node onto the canvas.
- Drag the Exec node onto the canvas, set the command to
python -u ./example.py <arg>, and replace the<arg>with your argument. - Now Drag the Debug node onto the canvas.
- Connect the output of the Inject node to the input of the Exec node, and the output of the Exec node to the input of the Debug node.
If you examine the Python file we've created, you'll notice the use of the 'sys' module, which allows us to read command-line arguments. In our context, we execute the command python ./example.py -30. By accessing sys.argv[1], we retrieve the argument -30. The index 1 is used because sys.argv[0] provides the filename of the script being executed. Additionally, Python supports passing multiple arguments, so that you can pass as many arguments as you want.
Conclusion
In this guide, we've demonstrated how to seamlessly execute Python scripts from Node-RED, along with troubleshooting tips and instructions on passing arguments to scripts. By leveraging Python's extensive libraries for data processing, machine learning, and other tasks in conjunction with Node-RED, developers can build powerful IoT solutions with ease.
Simplify Node-RED management and deployment with FlowFuse. Optimize, scale, secure, collaborate effortlessly, and access your instance remotely.
Sign Up for FlowFuse Now to Get StartedAbout the Author
Sumit Shinde
Technical Writer
Sumit is a Technical Writer at FlowFuse who helps engineers adopt Node-RED for industrial automation projects. He has authored over 100 articles covering industrial protocols (OPC UA, MQTT, Modbus), Unified Namespace architectures, and practical manufacturing solutions. Through his writing, he makes complex industrial concepts accessible, helping teams connect legacy equipment, build real-time dashboards, and implement Industry 4.0 strategies.
Related Articles:
- MCP and Custom AI Models on FlowFuse!
- EtherNet/IP Integration with FlowFuse: Communicating with Allen-Bradley PLCs
- Monitoring and Optimizing Node-RED Flows with Open Telemetry.
- FlowFuse Dashboard vs UI-Builder: A Comprehensive Comparison
- How to Set Up SSO SAML for Node-RED