Displaying logged in user on Node-RED Dashboard 2.0
Step-by-Step Beginner's Guide to Displaying logged in User on Node-RED Dashboard 2.0

About a month ago, a powerful solution became available to the Node-RED community to deal with users and allow multiple to interact with the same dashboard in a personalized manner. It's called the Multli user Dashboard for Node-RED. In this guide, we will provide a step-by-step guide to show you how to secure your dashboard and access and display logged in user information on Dashboard 2.0.
If you're new to Dashboard 2.0, refer to our blog post Getting Started with Dashboard 2.0
Enabling FlowFuse User Authentication
Before we display logged-in user data on the dashboard, first we need to set up a login mechanism with FlowFuse for the dashboard. This simplifies securing Node-RED Dashboards and provides contextual user data within the Dashboard itself for who is logged in.
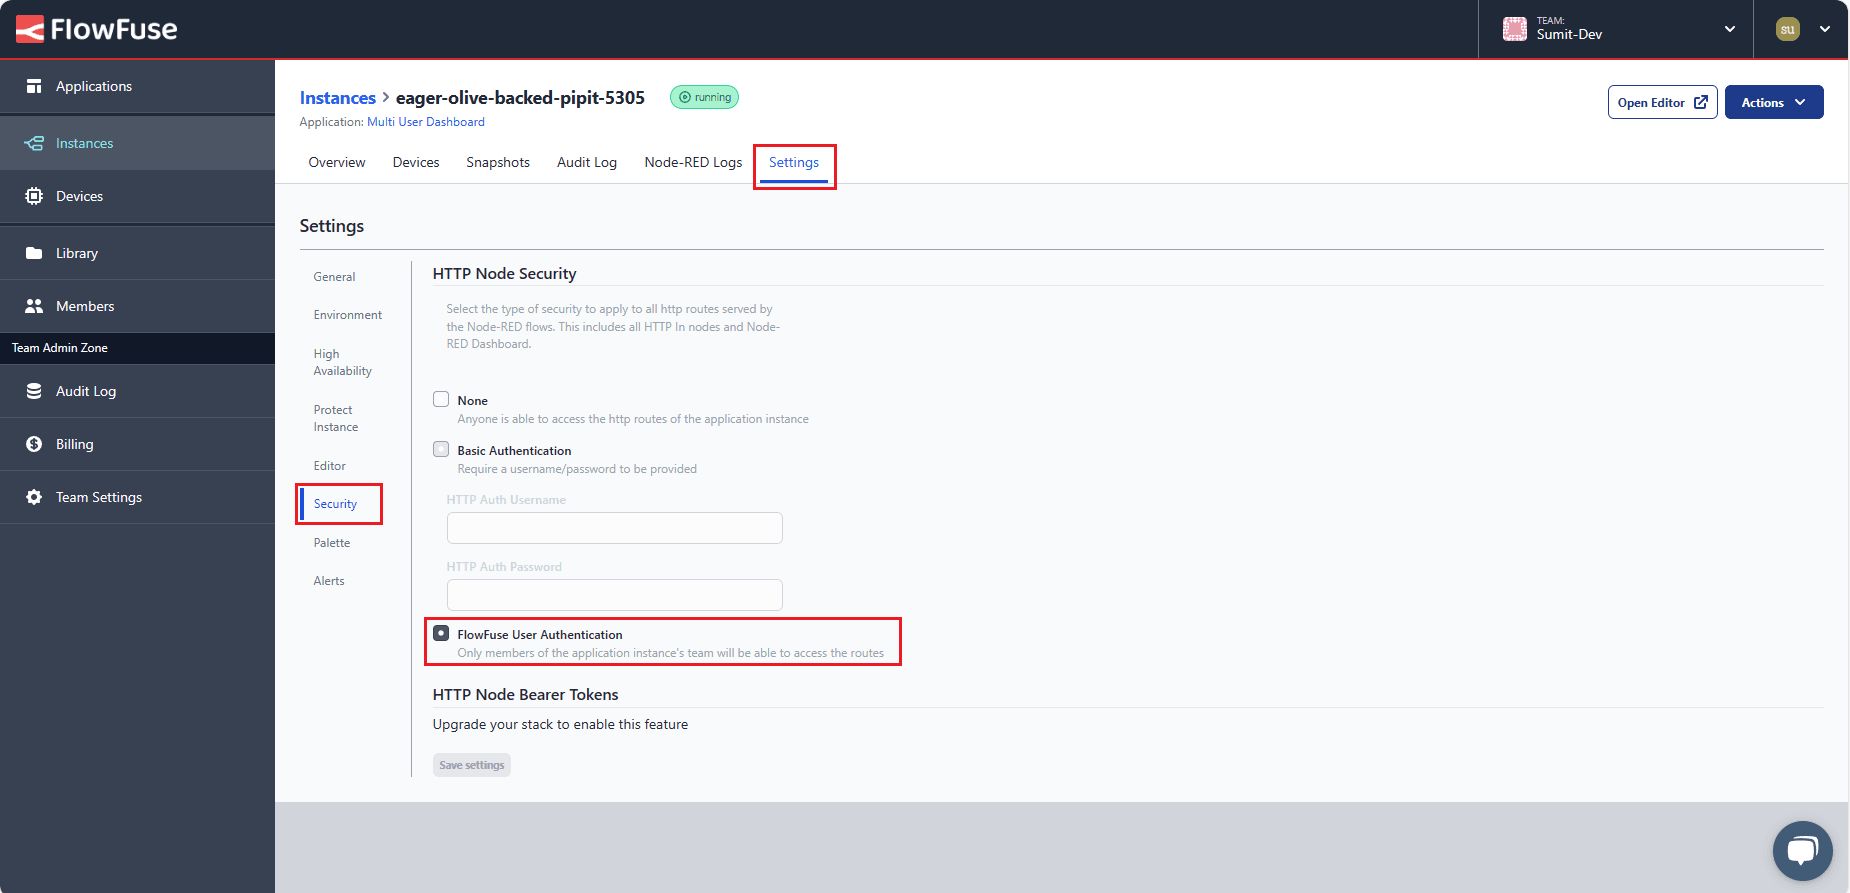
- Navigate to the Instance "settings".
- Select the "Security" tab.
- Enable “FlowFuse User Authentication”
Now, the first time you visit the dashboard, you'll need to log in with your registered FlowFuse username and password

Exploring the FlowFuse User Addon
The FlowFuse User Addon is a plugin developed for Dashboard 2.0, leveraging the FlowFuse API to retrieve information about logged in user.
Installing Flowfuse user addon
- Click the Node-RED Settings (top-right)
- Click "Manage Palette"
- Switch to the "Install" tab
- Search for
@flowfuse/node-red-dashboard-2-user-addon - Click "Install"
How it Works
In this addon, user information is attached to the msg emitted by Dashboard 2.0 nodes. This user information object is attached as msg._client.user. Below is an example of how that object looks:
{
   "userId": "", // unique identifier for the user
   "username": "", // FlowFuse Username
   "email": "", // E-Mail Address connected to their FlowFuse account
   "name": "", // Full Name
   "image": "" // User Avatar from FlowFuse
}
Behind the scenes, the user addon is appending the user object to the msg, via the SocketIO auth option. We make the socketio object available via a computed setup object, this means that we can also access user data in any ui-template widget with ``, in the <template>, or this.setup.socketio.auth.user, in the JS.
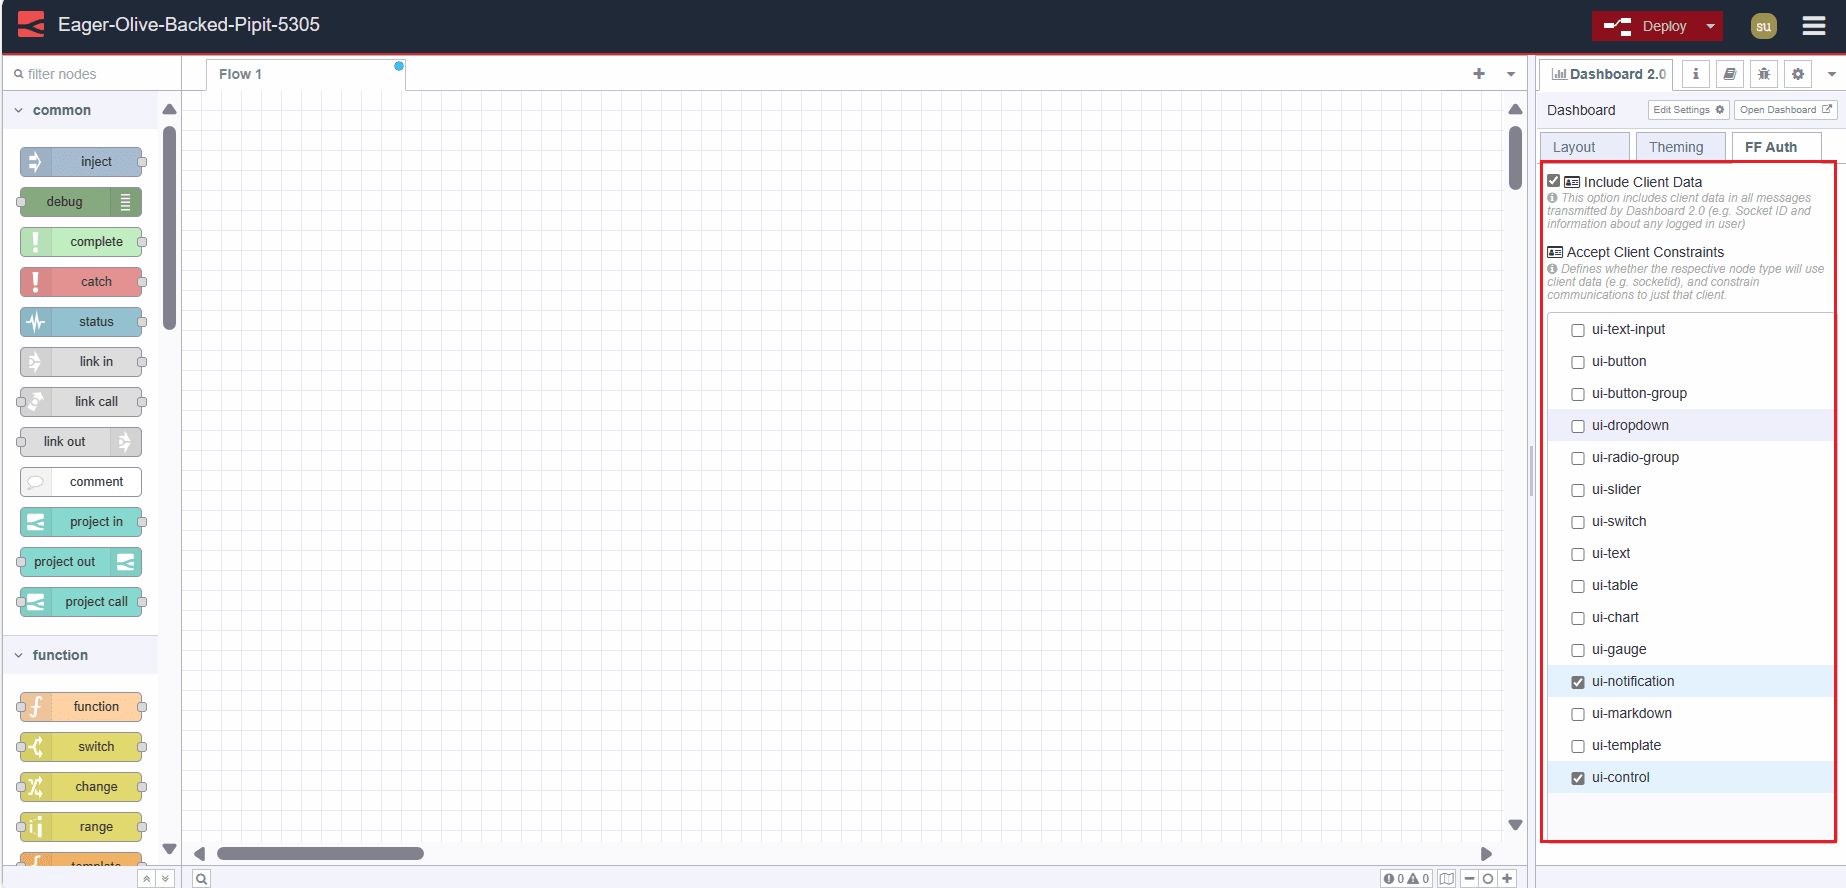
When running Node-RED Dashboard 2.0 on FlowFuse, you'll have a new tab available in the "Dashboard 2.0" sidebar in the Node-RED Editor, you just have to navigate to the "FF Auth" tab and you’ll see two options.
Option 1: Include Client Data
By default, this option is enabled. When this option is enabled, an object with user information will be added to the “msg” emitted by any widget of the Node-RED Dashboard 2.0.
Option 2: Accept Client Constraints
A feature that ensures messages are specifically targeted to individual clients, which enhances the precision and security of data transmission within the platform. It determines by enabling the nodes option in the FF Auth tab whether the enabled node type will utilize client data, such as socketid, and restrict communications to only that client.
For example, consider a manufacturing facility where each production line has its own monitoring system. With this feature enabled, data from sensors on Production Line A will only be sent to the monitoring system designated for Production Line A. This ensures that data remains isolated and relevant to each specific area of operation, maintaining organizational efficiency and security.
Note: Please note that Multi-User Addons can only be used by our Teams and Enterprise Self-Hosted customers. Upon request, we provide all required configurations to get started.

Displaying logged in user on Dashboard 2.0
Now you know how the user add on works, you are all set to display logged in users on Dashboard 2.0. To confirm this you can use a debug node that receives the msg object emitted by the Dashboard 2.0 widgets.
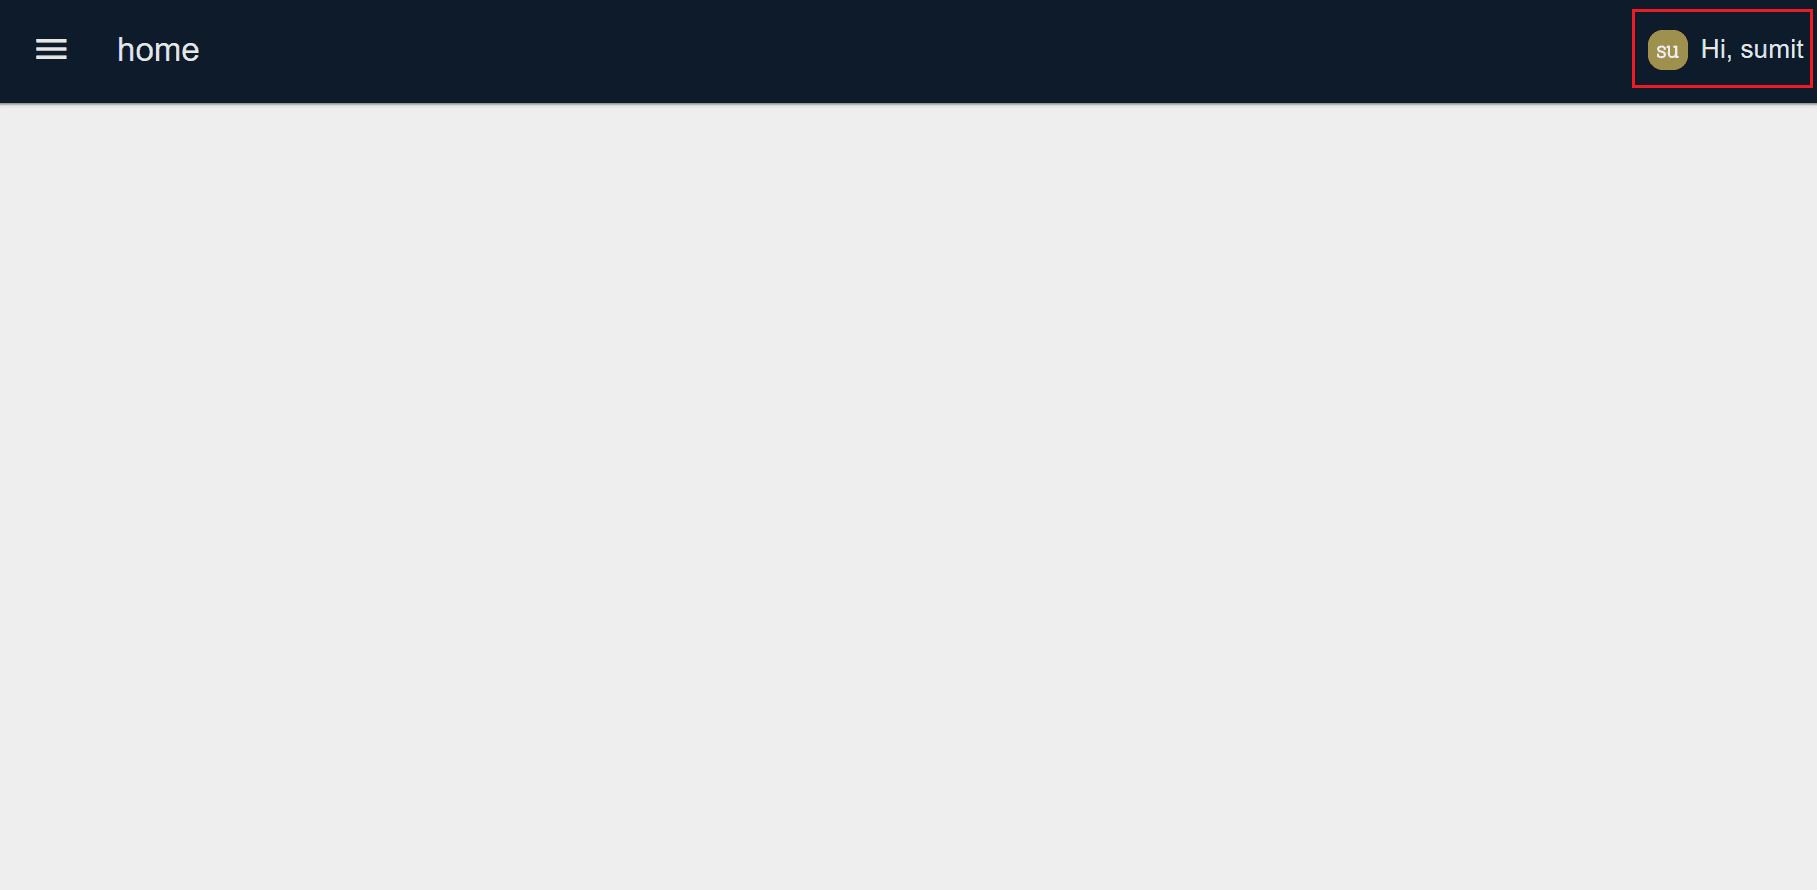
To display user information on the dashboard we will use Vue’s Teleport feature to render content to a specific location in the DOM, we will display user information at the action bar’s right-hand side.
- Drag a
ui-templatewidget onto the canvas. - Click on that node, and select type as “Widget (Ui-Scoped)”. ( this allows us to render this ui-template at ui scoped which means I will not required to add separate ui-templates for different pages )
- Copy the below vue snippet and paste that into the ui-template.
<template>
    <!-- Teleporting user info to #app-bar-actions, which is the ID of the action bars' right corners area -->
    <Teleport v-if="loaded" to="#app-bar-actions">
        <div class="user-info">
            <!-- Displaying user image -->
            <img :src="setup.socketio.auth.user.image" />
            <!-- Greeting the user -->
            <span>Hi, {{ setup.socketio.auth.user.name }}</span>
        </div>
    </Teleport>
</template>

<script>
export default {
    data() {
        return {
            // Flag to indicate if the component is loaded
            loaded: false
        };
    },
    mounted() {
        // This function is called when the component is inserted into the DOM.
        // Setting loaded to true here ensures the component is ready to access #app-bar-actions,
        // as it's now part of the same DOM structure.
        // Accessing it before mounted() would cause an error because the component wouldn't be initialized in the DOM yet.
        this.loaded = true; // Setting loaded to true to indicate that the component has been mounted successfully
    }
}
</script>

<style>
/* Styling for user info display */
.user-info {
    display: flex;
    align-items: center;
    gap: 8px;
}
/* Styling for user avatar image*/
.user-info img {
    width: 24px;
    height: 24px;
}
</style>
Deploying the flow
- With your flow updated to include the above, click the "Deploy" button in the top-right of the Node-RED Editor.
- Navigate to
https://<your-instance-name>.flowfuse.cloud/dashboard.

Next step
If you want to learn more about the FlowFuse Multiuser addon and Personalize Multiuser Dashboard. we do have many other resources, please refer to them to learn more.
- Webinar - This webinar provides an in-depth discussion of the Personalised Multi-User Dashboards feature and offers guidance on how to get started with it.
- Personalised Multi-user Dashboards with Node-RED Dashboard 2.0 - This article explores the process of building multi-user Dashboards secured with FlowFuse Cloud.
- Multi-User Dashboard for Ticket/Task Management blueprint, which allows you to quickly utilize templates to develope Personalize multi-user dashboard.
Conclusion
In this guide, we have demonstrated how to secure your dashboard and how to retrieve and display logged in user data on Dashboard 2.0. Additionally, we have discussed the functionality of the FlowFuse multi-user addon.
Looking to build a multi-user dashboard, deploy it in seconds, scale and manage Node-RED efficiently, and enable seamless remote access for your entire team?
Sign Up for FlowFuse Now to Get StartedAbout the Author
Sumit Shinde
Technical Writer
Sumit is a Technical Writer at FlowFuse who helps engineers adopt Node-RED for industrial automation projects. He has authored over 100 articles covering industrial protocols (OPC UA, MQTT, Modbus), Unified Namespace architectures, and practical manufacturing solutions. Through his writing, he makes complex industrial concepts accessible, helping teams connect legacy equipment, build real-time dashboards, and implement Industry 4.0 strategies.
Related Articles:
- Comprehensive guide: Node-RED Dashboard 2.0 layout, sidebar, and styling
- How to Build an Admin Dashboard with Node-RED Dashboard 2.0
- CAN Bus Tutorial: Connect to Dashboards, Cloud, and Industrial Systems
- FlowFuse 2.27: Integrated Editor in Remote Instances & Context-Aware FlowFuse Expert
- Event-Driven Architecture: 99% of Your System Requests Are Worthless