Node-RED Tips - Dashboard Edition
Save yourself time when working with Node-RED Dashboards with these three tips.

There is usually more than one way to complete a given task in software, and Node-RED is no exception. In each of this series of blog posts, we are going to share three useful tips to save yourself time when working on your flows.
In this Node-RED Tips article, we are going to focus on Node-RED Dashboard. Dashboard is a great tool for creating HMI (Human Machine Interfaces), it's also the most popular custom node for Node-RED with thousands of downloads per week.
1. Responsive layouts (almost)
Responsive design is the ability for a webpage to change its content to best fit the features of a device used to view the page. For example, when viewing a graph on a mobile phone or a laptop the available screen space differs significantly in size as well as aspect-ratio.
Dashboard doesn't offer the feature to change graph sizes based on the screen of a viewing device. That being said, there is one trick you can use to make your dashboards a lot more useful on small and large screens alike.
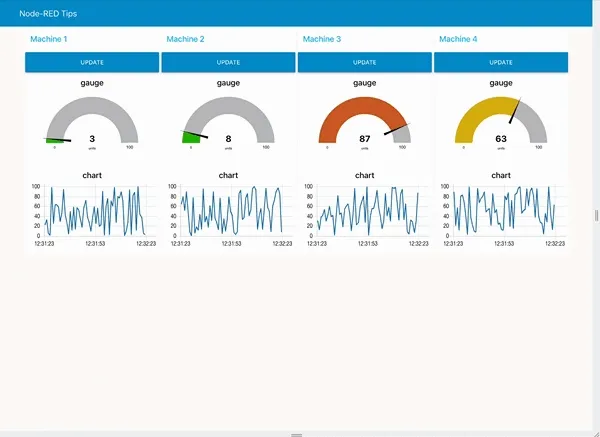
Place your content into Dashboard 'groups', those groups can make use of wider screens by sitting side by side where the screen is big enough while stacking vertically on smaller devices.
The image below shows what happens when you change the screen size for this dashboard.

If you'd like to try this out on your own Node-RED, you can import the flow below.
2. Add more than one series of data to a line chart
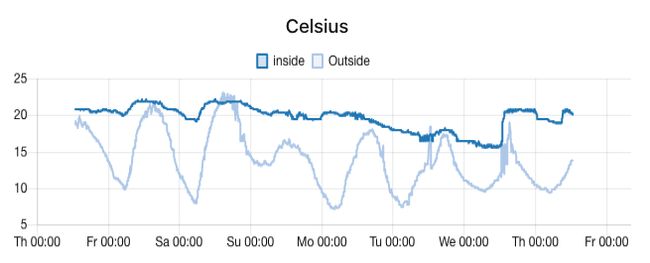
Being able to add more than one series of data to a single chart can make the data far more useful. One great way to use this is to compare the same data from different sensors. In this example I'm going to show the external and internal temperature at a location on the same chart.

To do this you need to give a different msg.topic to each series, you can add that using a change node before passing the data to the chart.
If you'd like to view this chart on your own Node-RED, you can import the flow below.
3. Using sliders and persisting the current value
Sliders are a really useful user-interface element. Where you need to control the speed of a piece of machinery, having the ability to use a slider rather than manually typing in a value is a much better fit for shop-floor HMIs.
When using sliders in your dashboards, it's important to consider how you will persist the state of the slider. If you don't persist the state, you will find that a redeploy of your dashboard will set the slider back to the default value. That would also change the speed of your machine.

To retain the current value of the slider we can use Node-RED's context. Each time the slider value is updated, we store the value in context. Each time we deploy the flow, we can now load the value back from context.
If you'd like to view this slider and the flow which makes it work on your own Node-RED, you can import the flow below.
We hope you found these tips useful, if you'd like to suggest some of your own tips which you think we should share in our future blog posts please get in touch. You can also read some of our previous Node-RED tips using the links below.
Node-RED Tips - Subflows, Link Nodes, and the Range Node
Node-RED Tips - Importing, Exporting, and Grouping Flows
Node-RED Tips - Smooth, Catch, and Maths
Node-RED Tips - Exec, Filter, and Debug
Node-RED Tips - Deploying, Debugging, and Delaying
Node-RED Tips - Wiring Shortcuts
About the Author
Rob Marcer
Head of Professional Services
Rob is the Head of Professional Services at FlowFuse, he helps FlowFuse customers plan, build, and deploy large scale Internet of Things projects. He has worked with customers in various industries including automotive, life sciences, logistics, utilities, and smart buildings.