How to Connect Industrial Edge Devices to AWS IoT Core
Send industrial data from the edge to AWS securely over MQTT
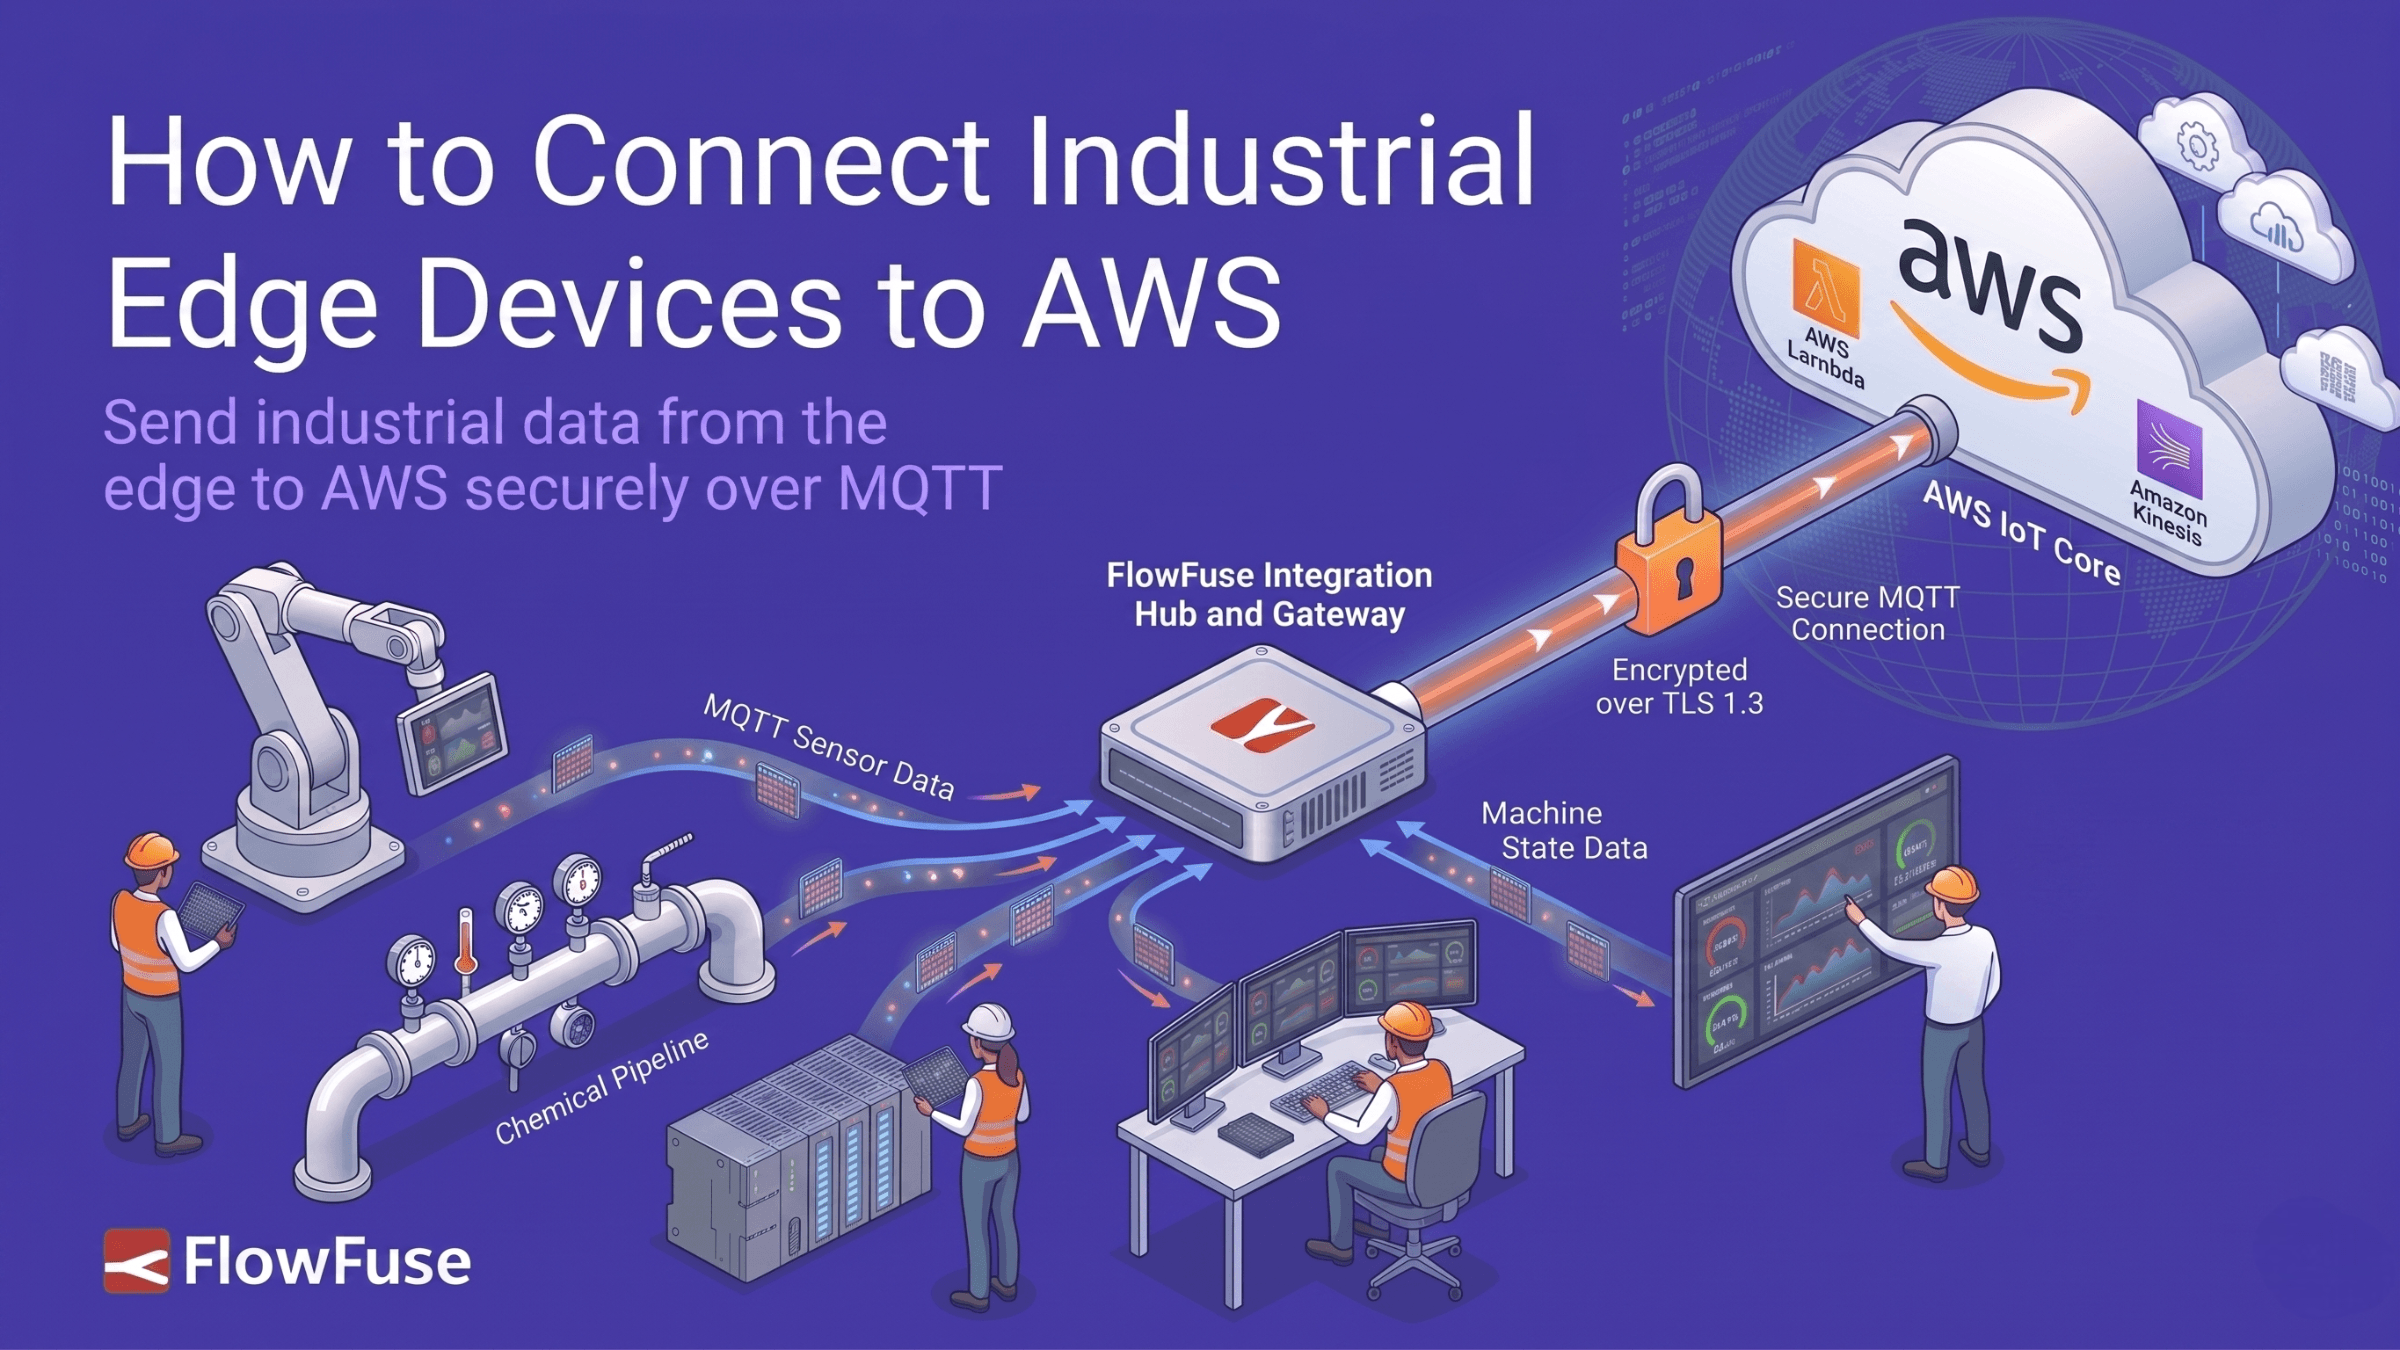
This step-by-step guide walks through connecting FlowFuse to AWS IoT Core using MQTT over mutual TLS with X.509 certificates. It covers creating an IoT Thing, generating and downloading certificates, configuring the MQTT broker in Node-RED, and verifying that messages arrive in AWS. Once connected, industrial data from any protocol OPC-UA, Modbus, or others can be routed to any AWS service via IoT Core rules.
Every industrial site generates data. Getting it to AWS securely is where most teams get stuck.
AWS IoT Core is Amazon's managed service for connecting edge devices to the cloud over MQTT. It handles secure device authentication, message routing, and fan-out to any AWS service in your stack: Lambda, DynamoDB, S3, and more. No broker to manage, no infrastructure to maintain.
FlowFuse is an industrial application platform that connects machines, collects data across any protocol, and builds and deploys industrial applications at scale. In this guide, we'll use FlowFuse as the edge platform to connect to AWS IoT Core.
We'll walk through the full setup from scratch: creating an IoT Thing in AWS, generating X.509 certificates, configuring the right policy, publishing your first message from the edge, and verifying it live in the AWS console.
If you're new to MQTT and want to understand how it works before diving in, this guide covers the fundamentals.
Prerequisites
Before you begin, make sure you have the following in place:
- A FlowFuse account with a running instance. If you don't have one yet, sign up.
- An AWS account with access to the IoT Core service.
- Basic familiarity with the AWS console.
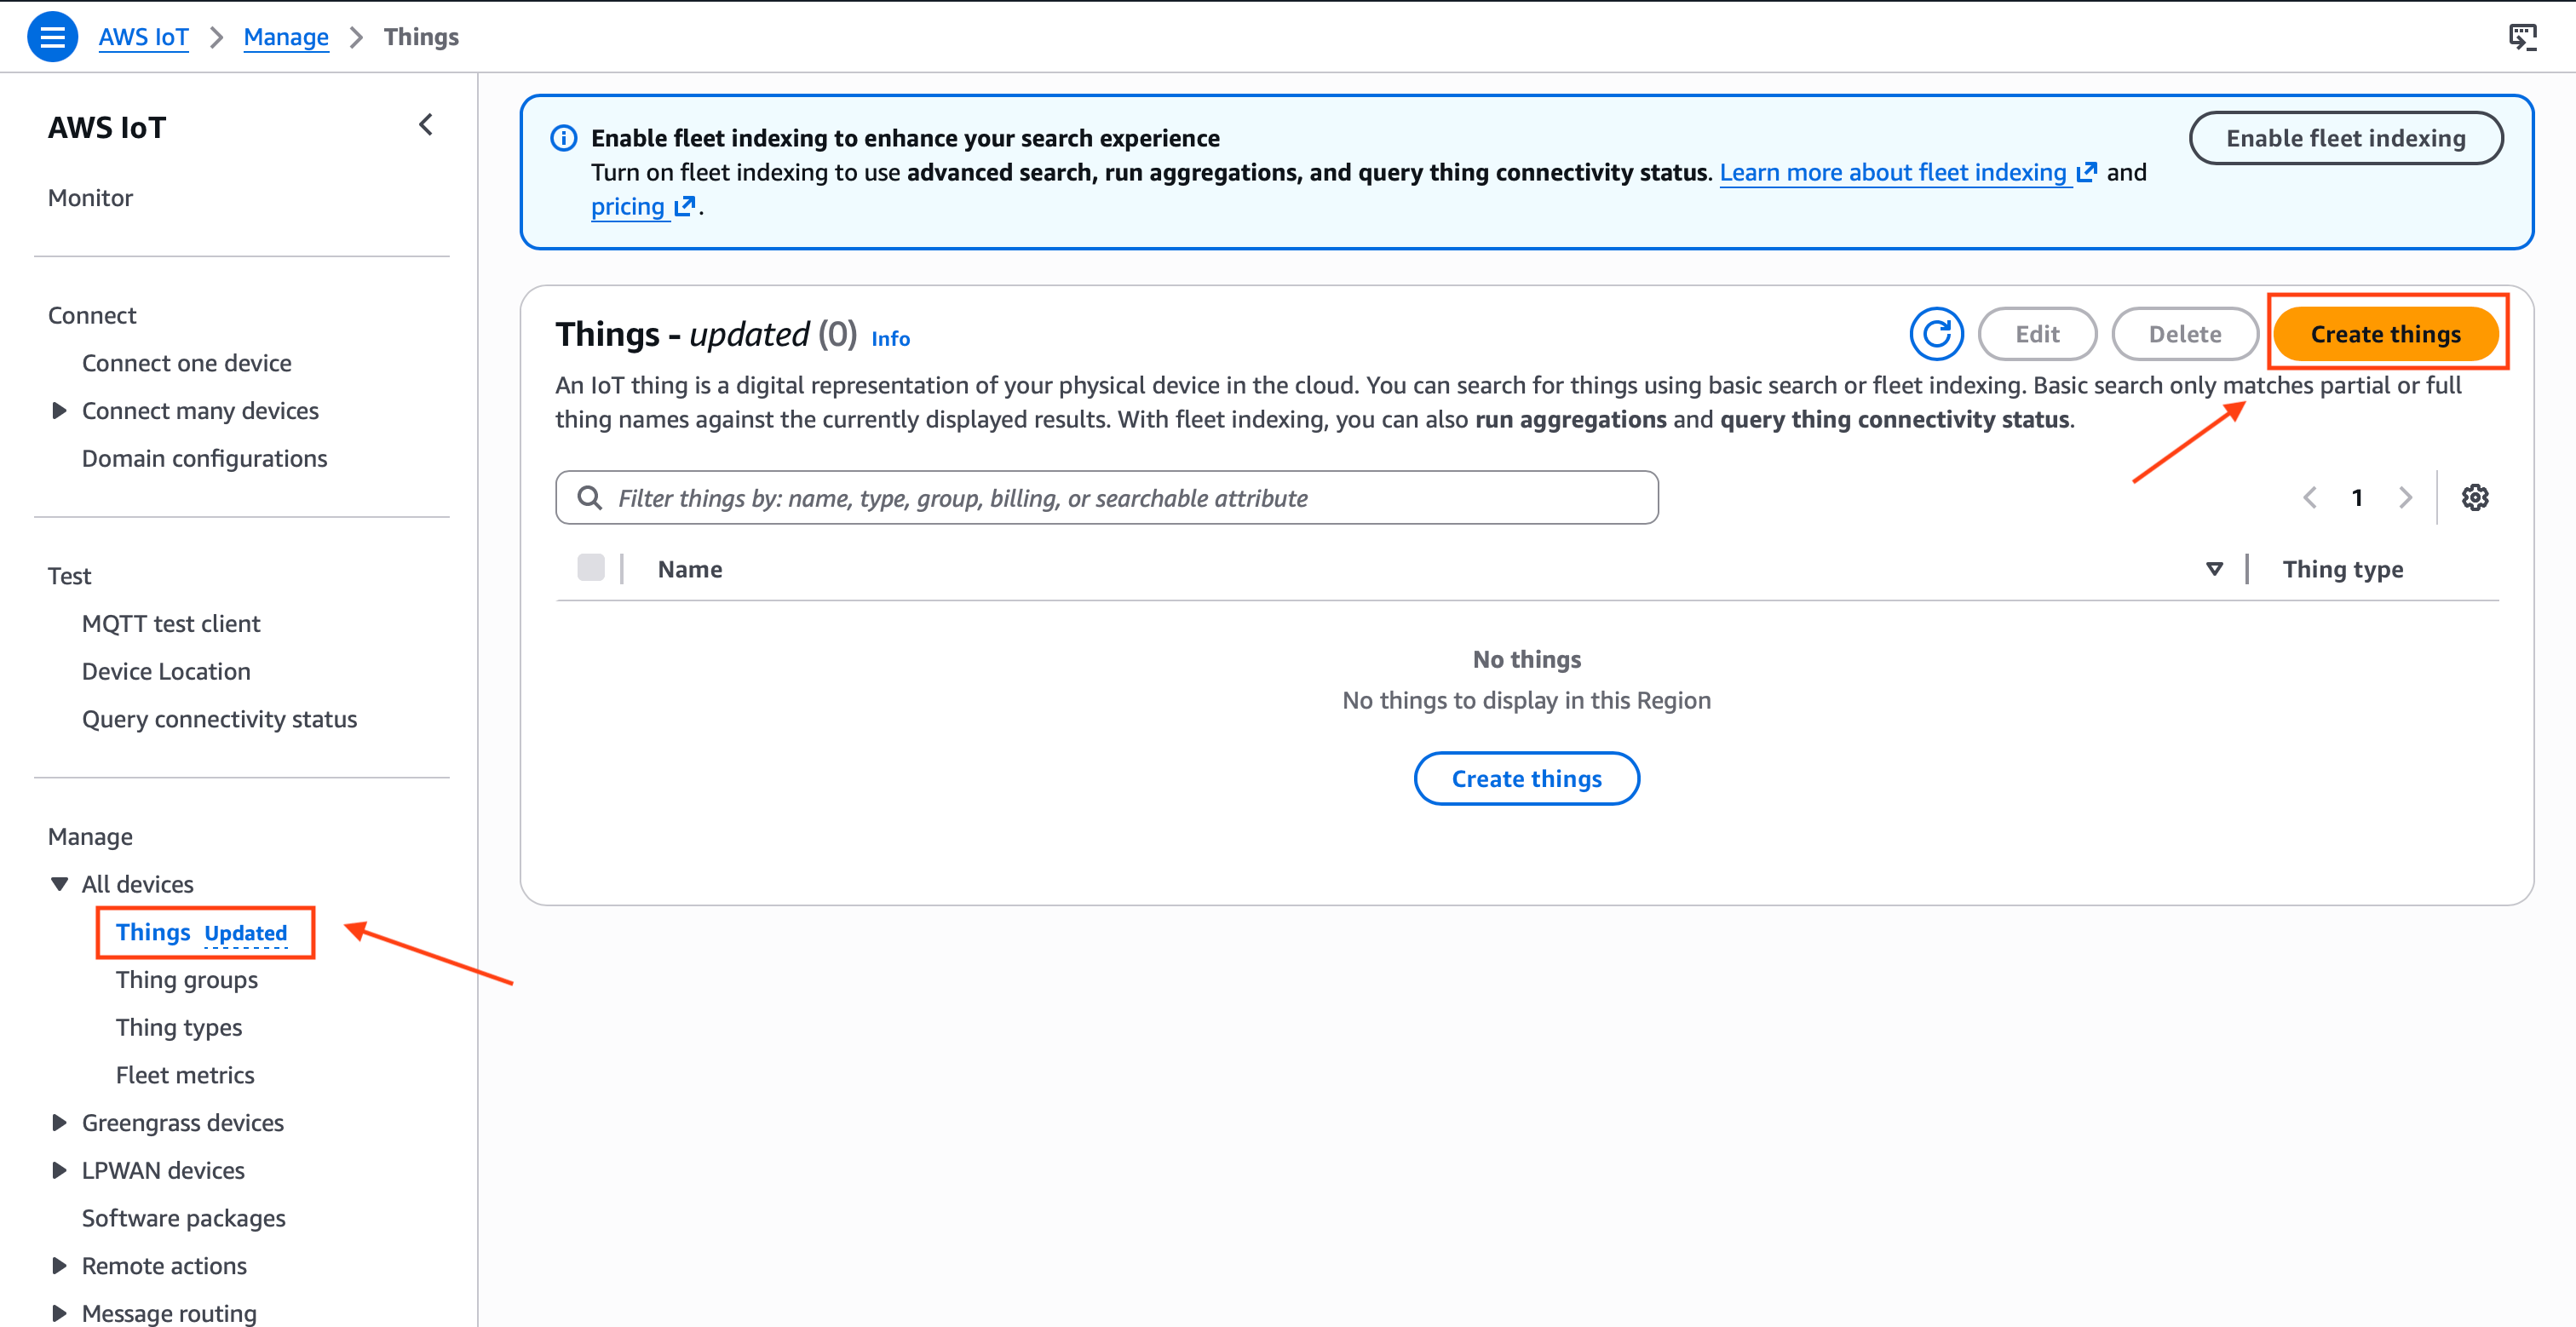
Step 1: Create an IoT Thing in AWS
A Thing is how AWS IoT Core represents a device. Every connection you make from FlowFuse will be tied to a Thing.
- Open the AWS IoT Core console.
- In the left sidebar go to Manage > All devices > Things.
- Click Create things.
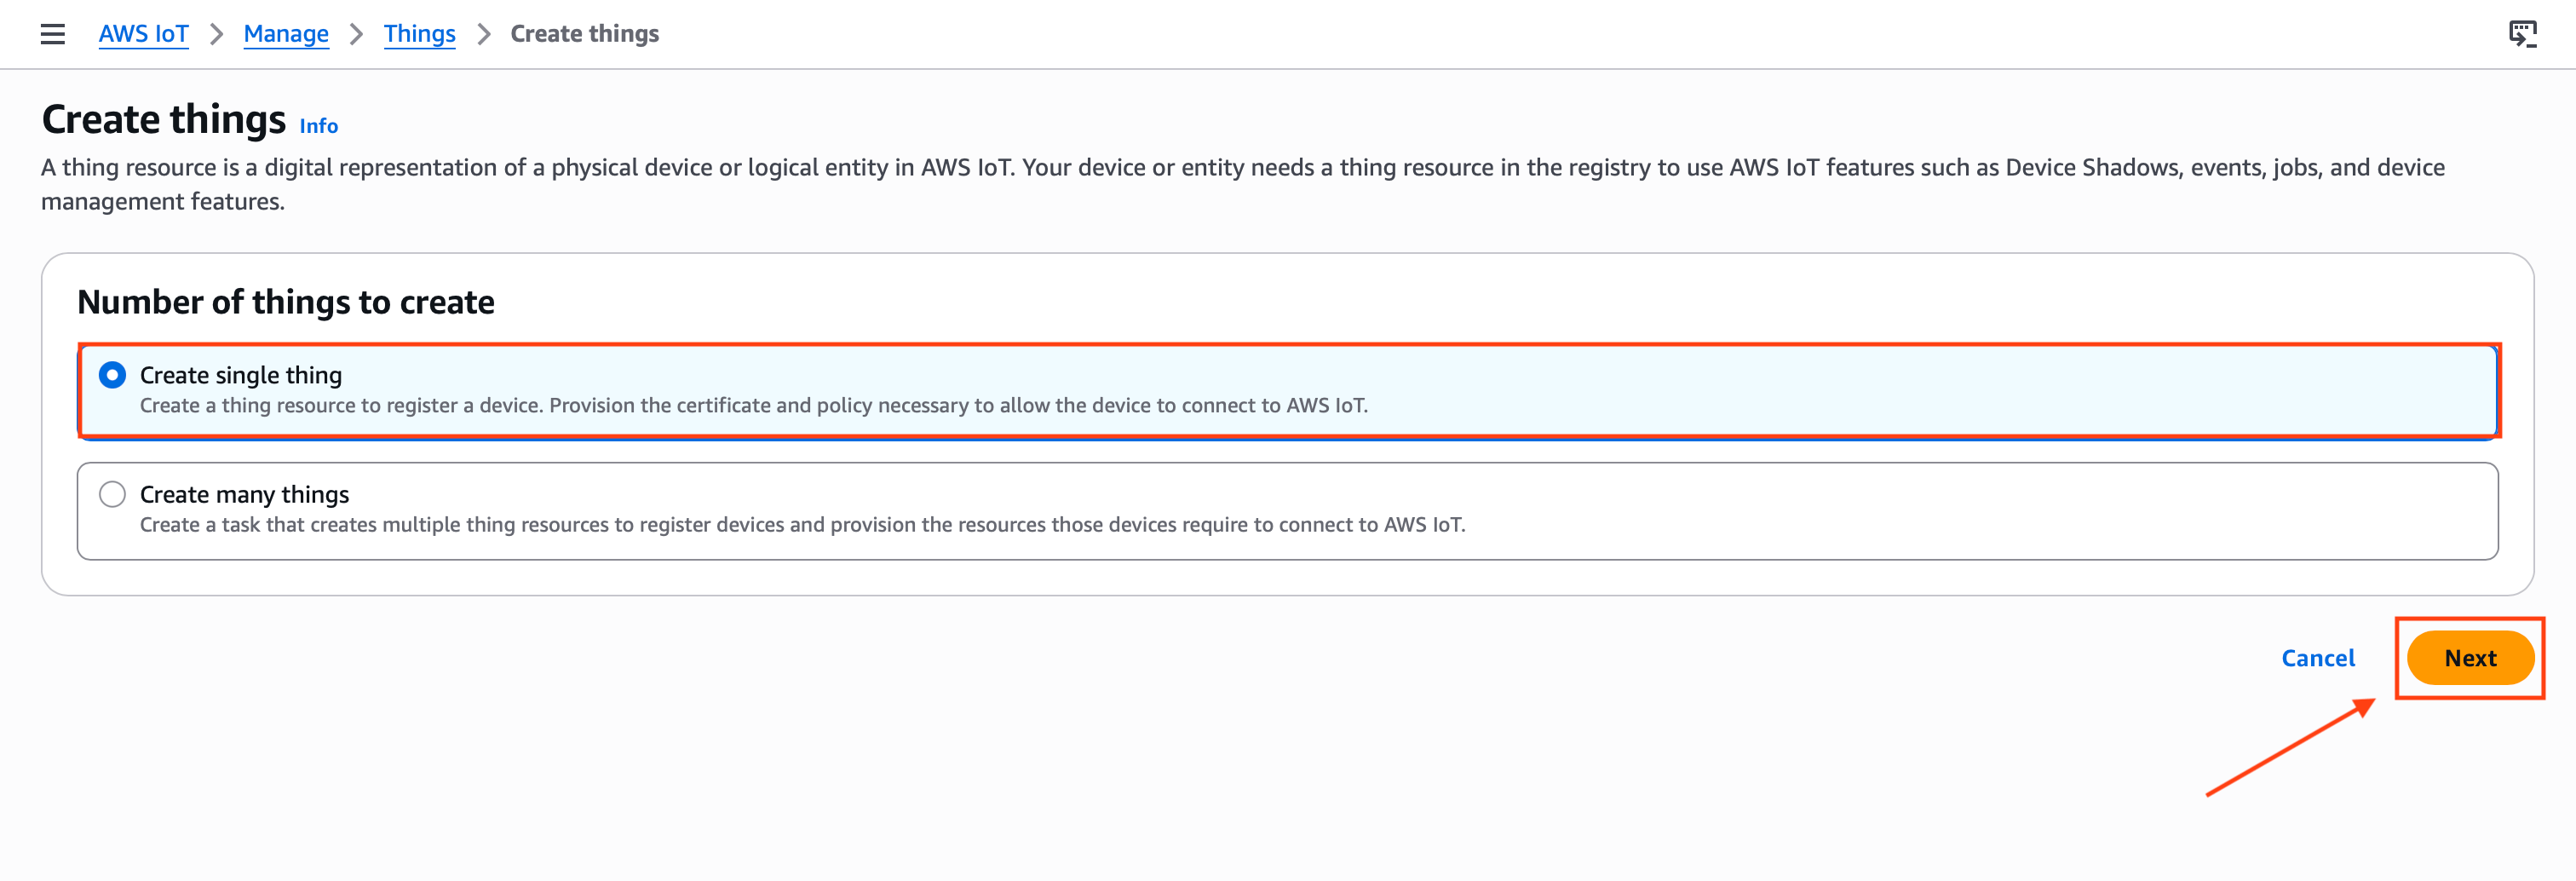
- Select Create a single thing and click Next.
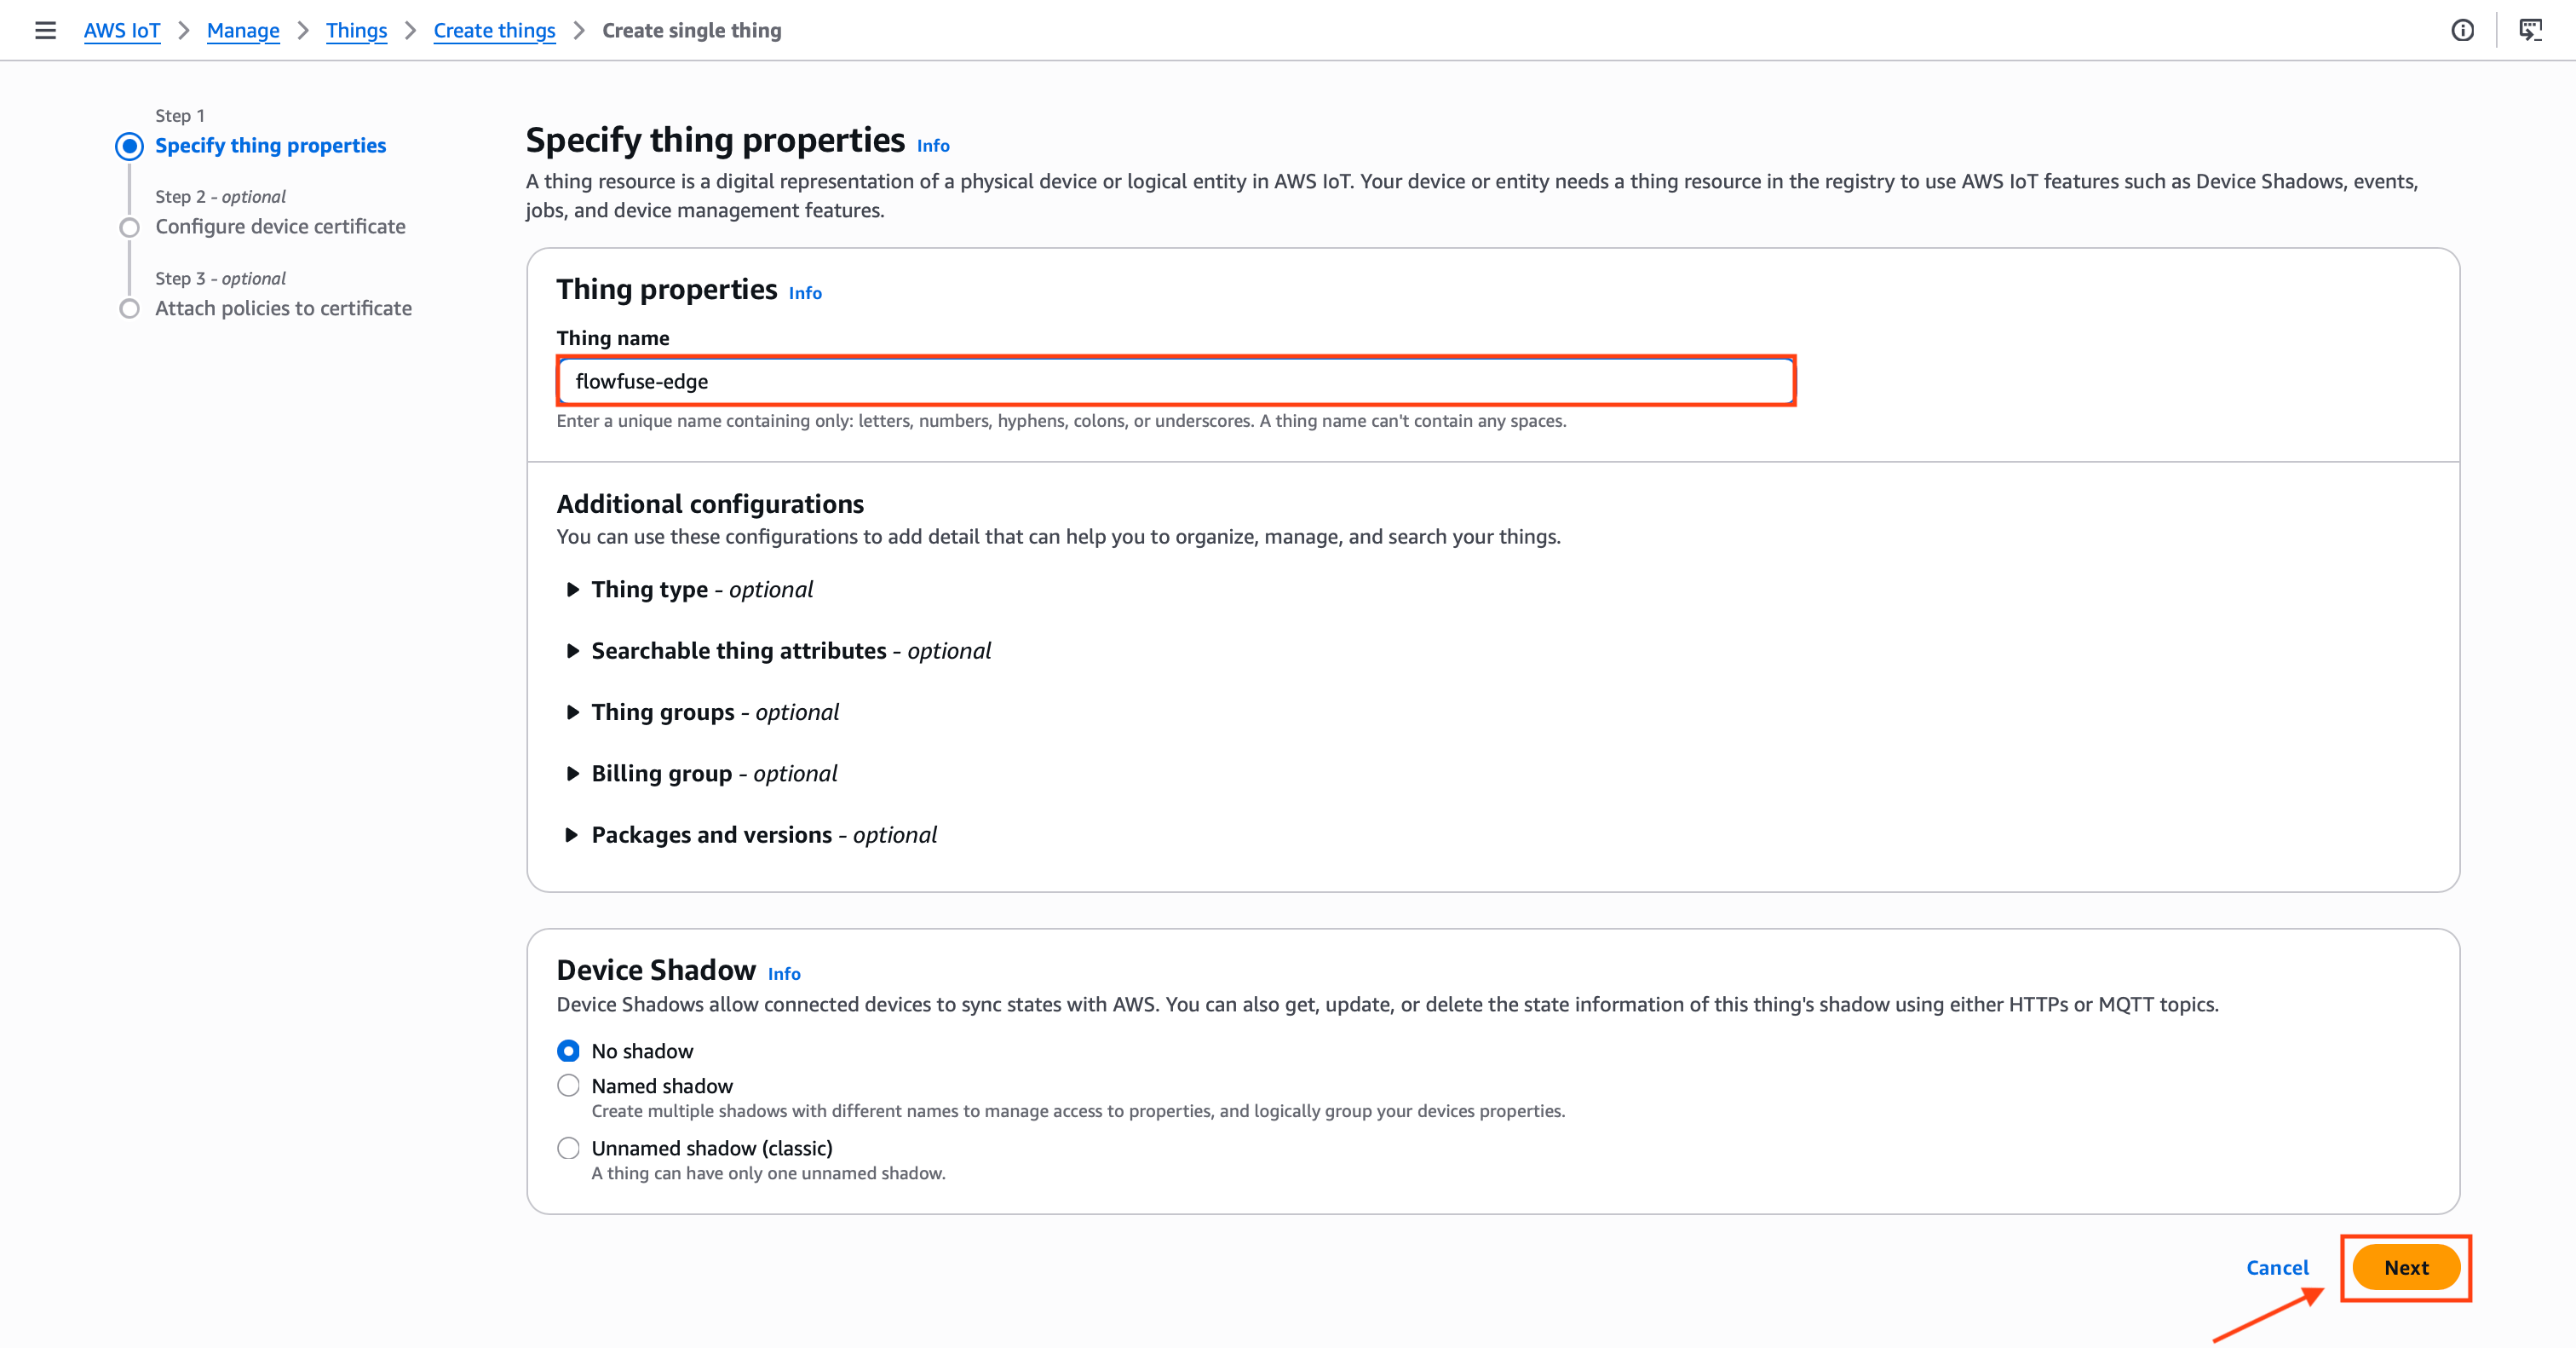
- Give your Thing a name, for example
flowfuse-edge. This name will be used as the MQTT Client ID later. Leave everything else as default and click Next.
- Select Auto-generate a new certificate and click Next.
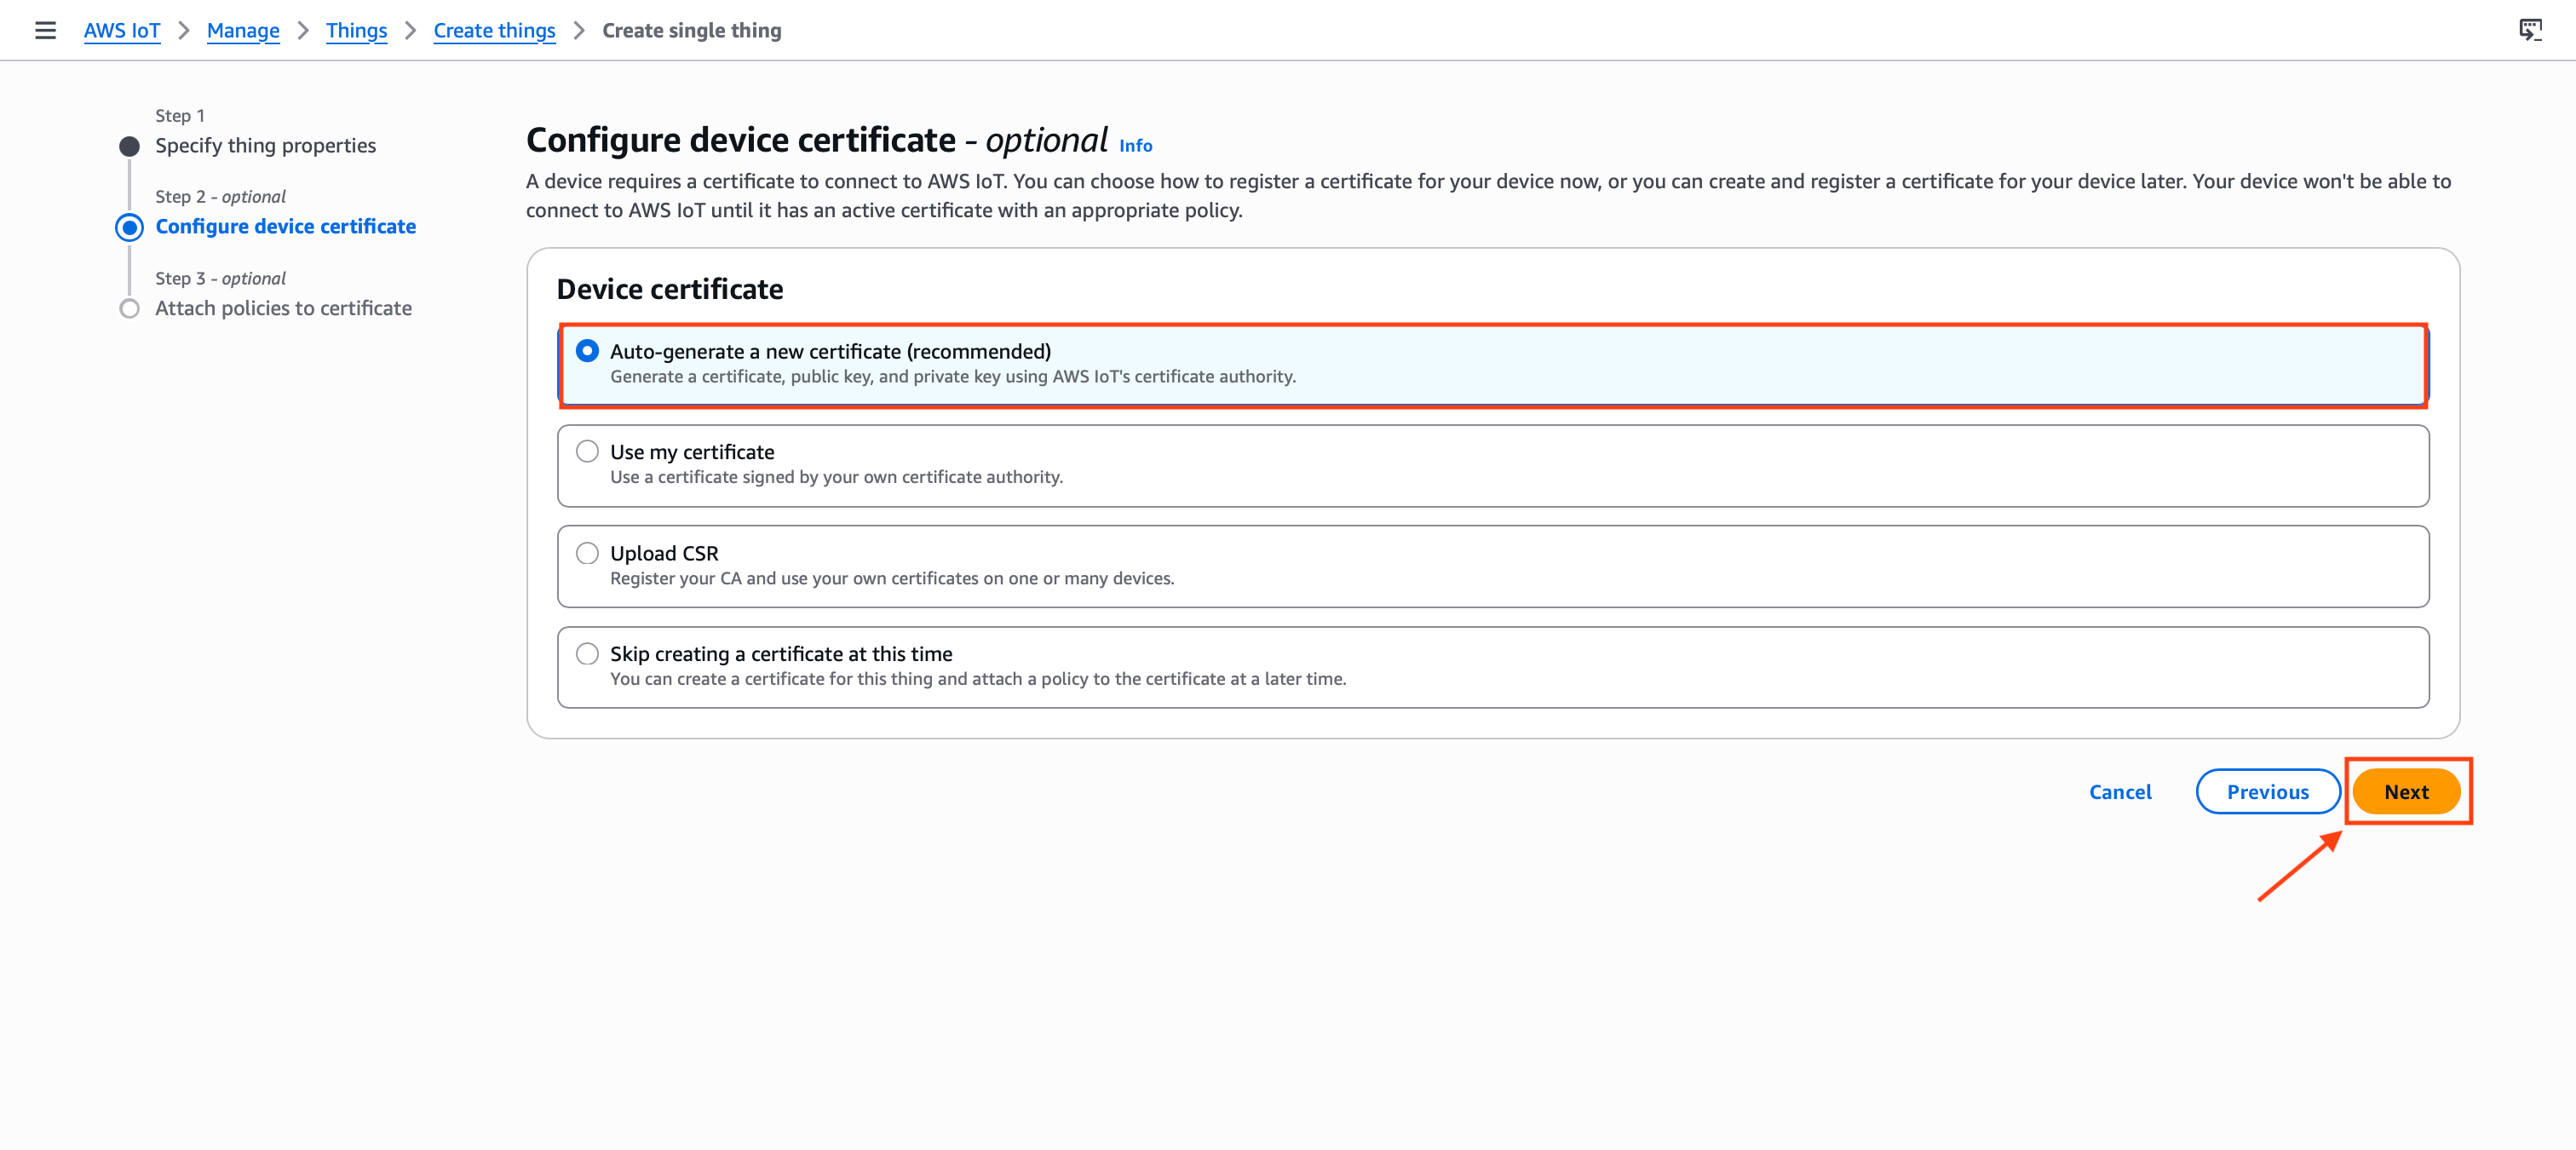
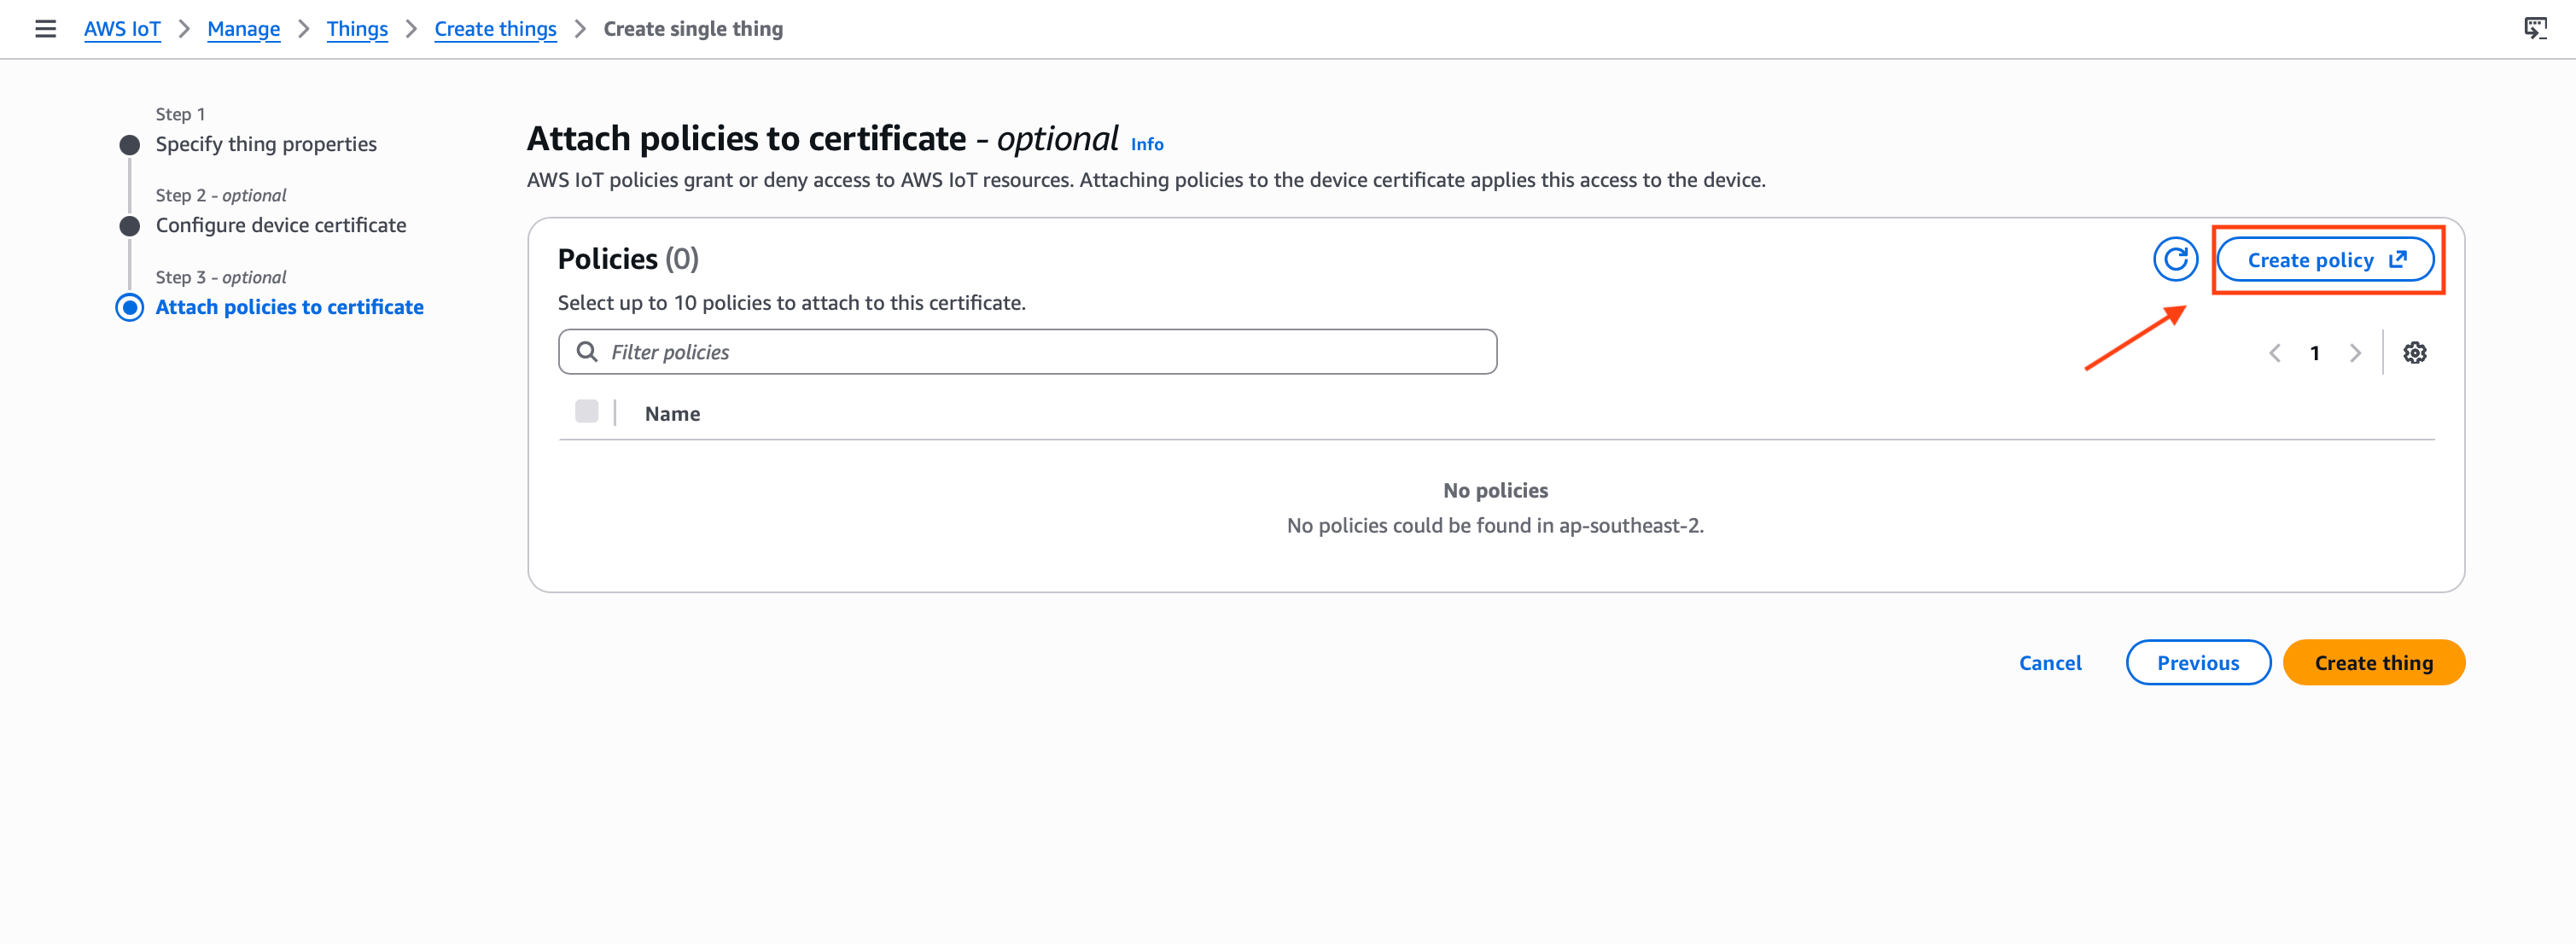
- The next screen asks you to attach a policy. A policy defines what your device is allowed to do: connect, publish, subscribe, or receive. Without one, AWS will reject every connection even if the certificate is valid. Click Create policy in the top right. A new tab opens.
- Give it a name like
flowfuse-policy, switch to the JSON editor and paste the following:
{
  "Version": "2012-10-17",
  "Statement": [
    {
      "Effect": "Allow",
      "Action": [
        "iot:Connect",
        "iot:Publish",
        "iot:Subscribe",
        "iot:Receive"
      ],
      "Resource": "*"
    }
  ]
}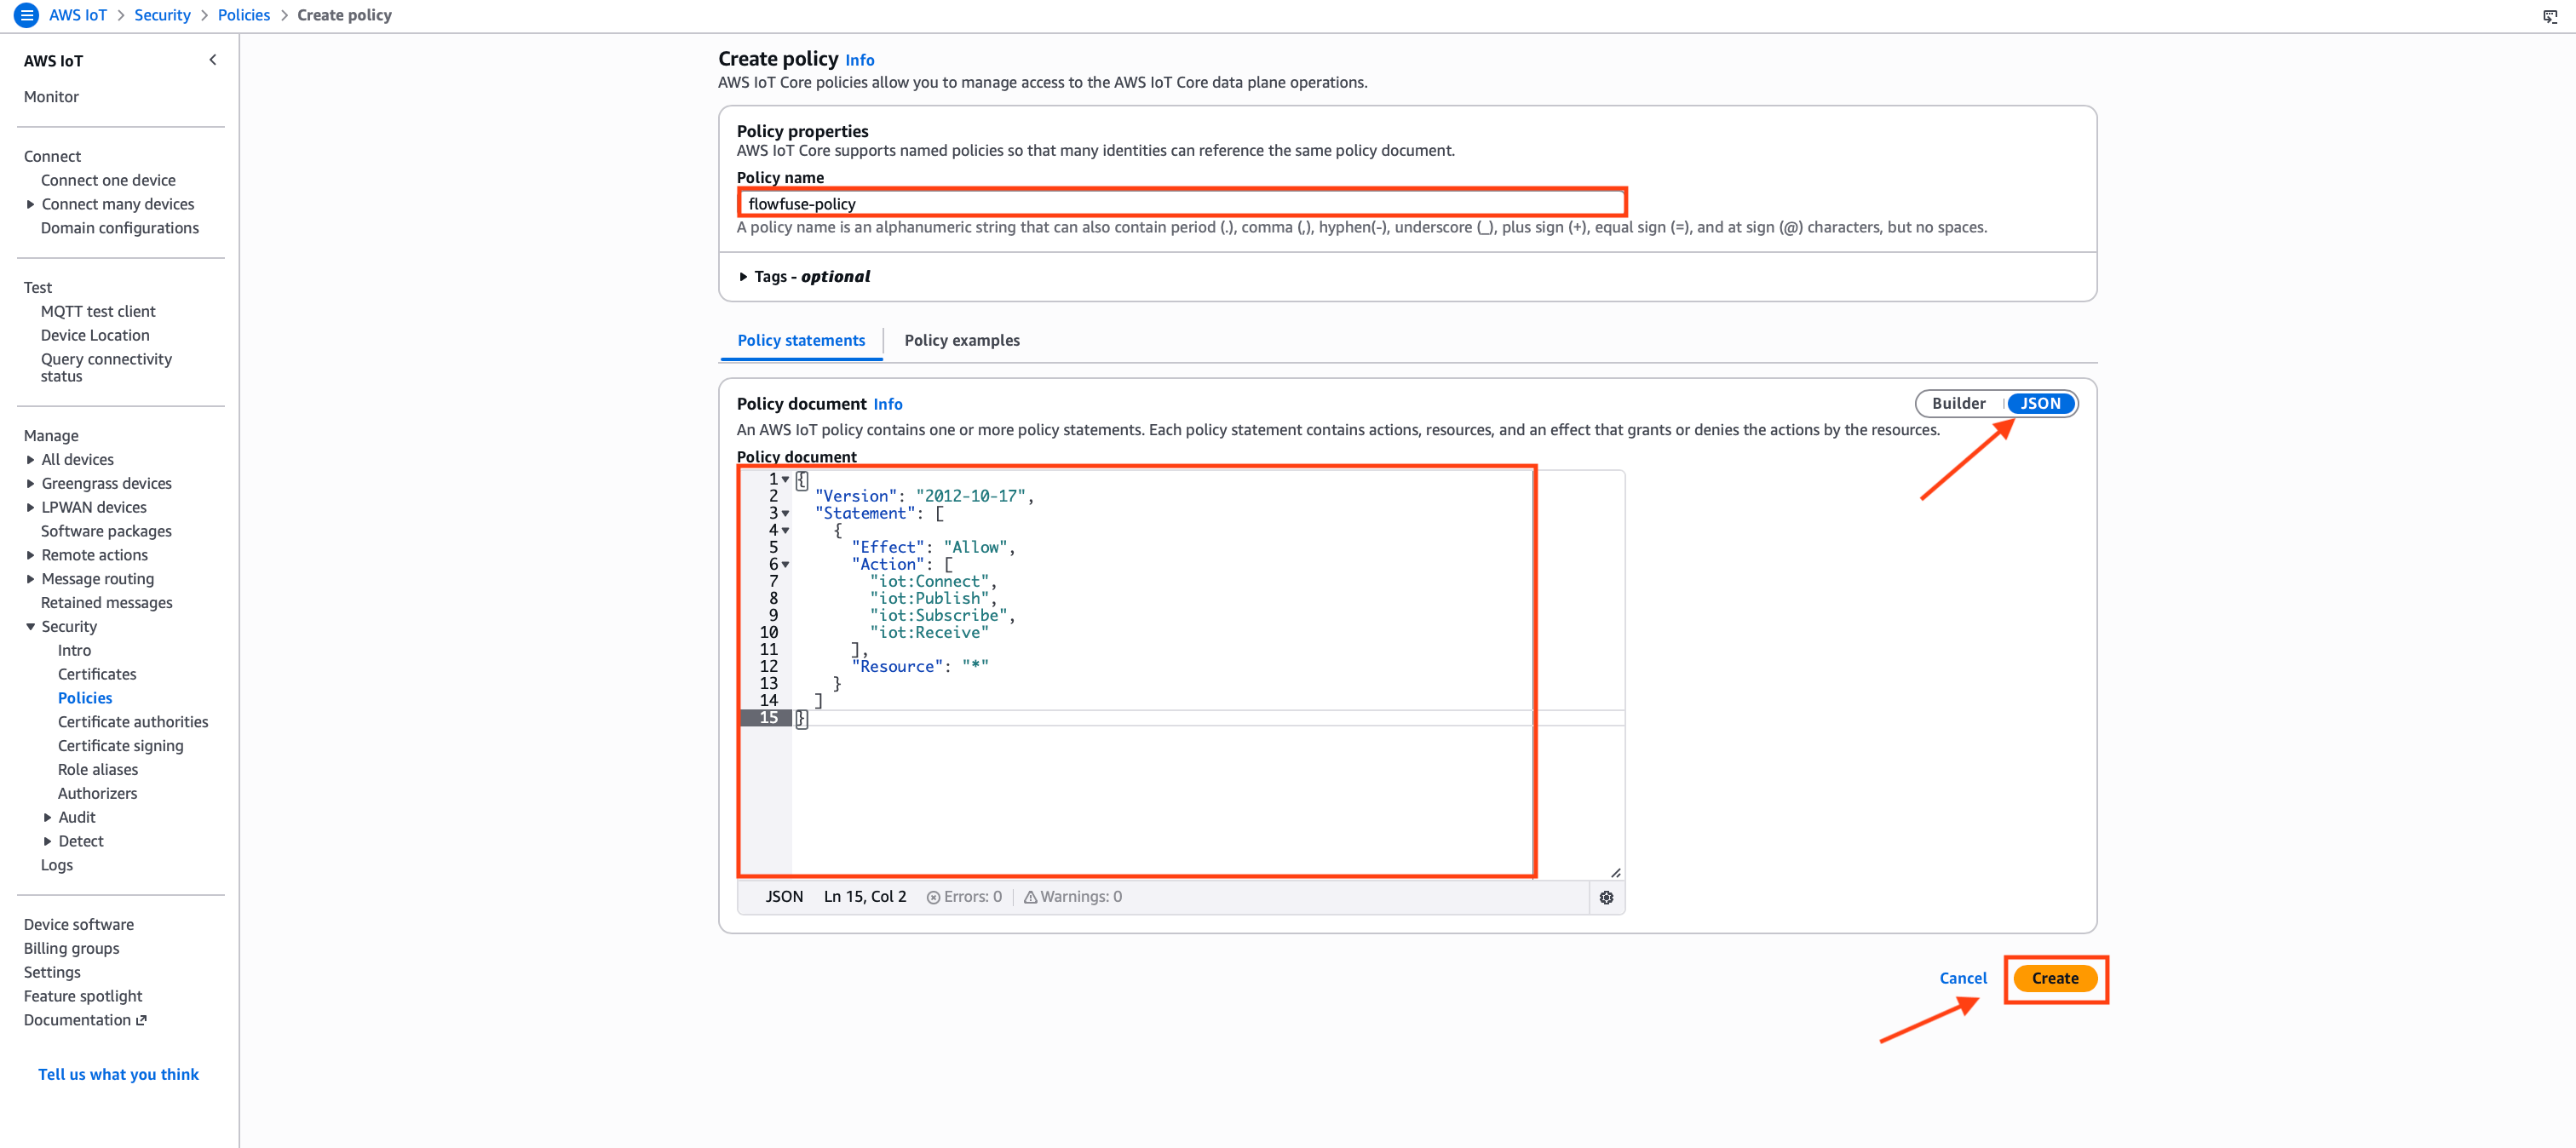
This wildcard policy works for initial setup. In production, replace
*with specific ARNs for your Thing, topics, and client ID to follow least-privilege principles.
- Click Create and close the tab.
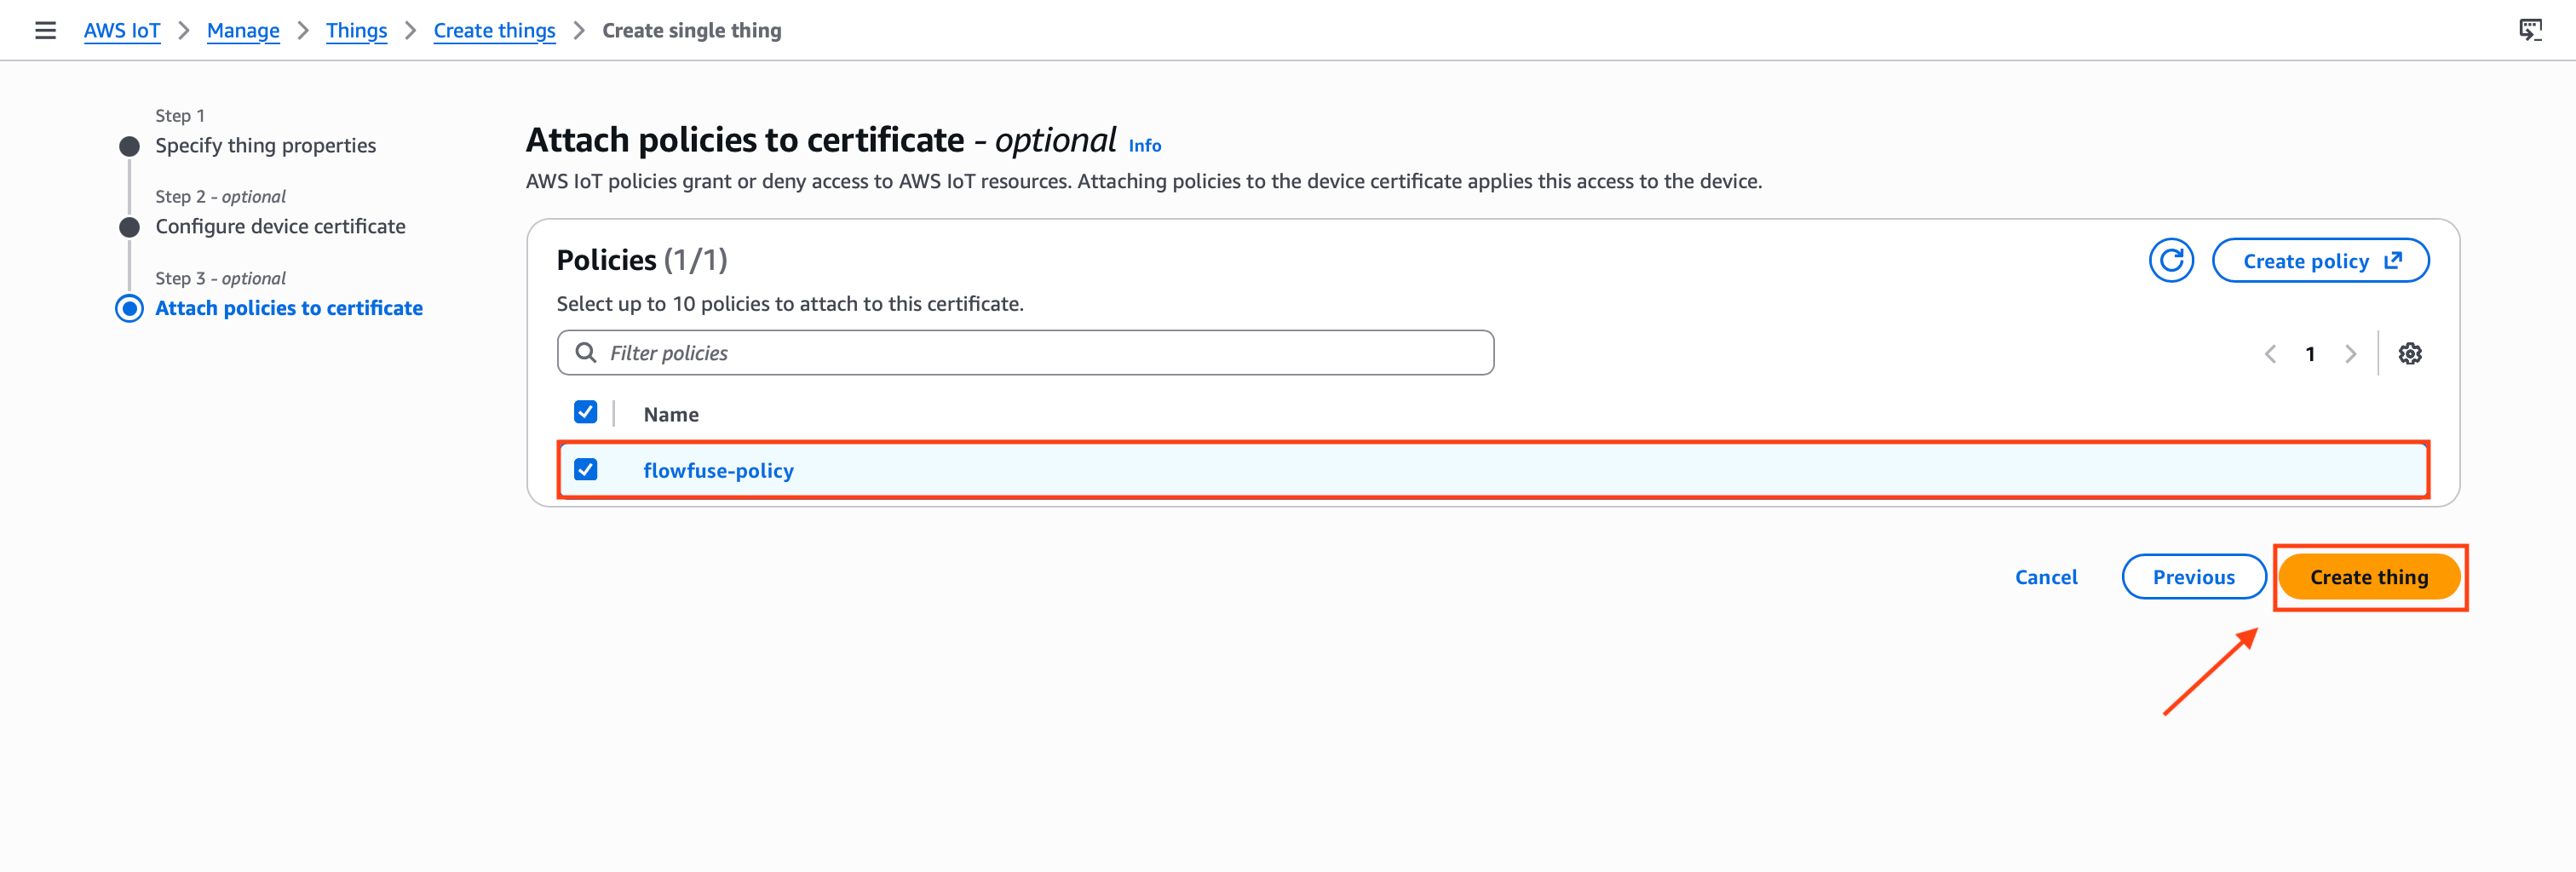
- Back on the policy attachment screen, refresh the policy list, select
flowfuse-policy, and click Create thing.
Step 2: Download Certificates
Before leaving the confirmation screen, download all three certificate files. You cannot retrieve the private key again after this point.
| File | What it is |
|---|---|
| Device certificate | Identifies your FlowFuse instance to AWS |
| Private key | Paired with the certificate, never share this |
| Root CA certificate | Verifies AWS IoT Core on your side |
Click Download next to each file. Also download the Amazon Root CA 1 from the link provided on the same page.
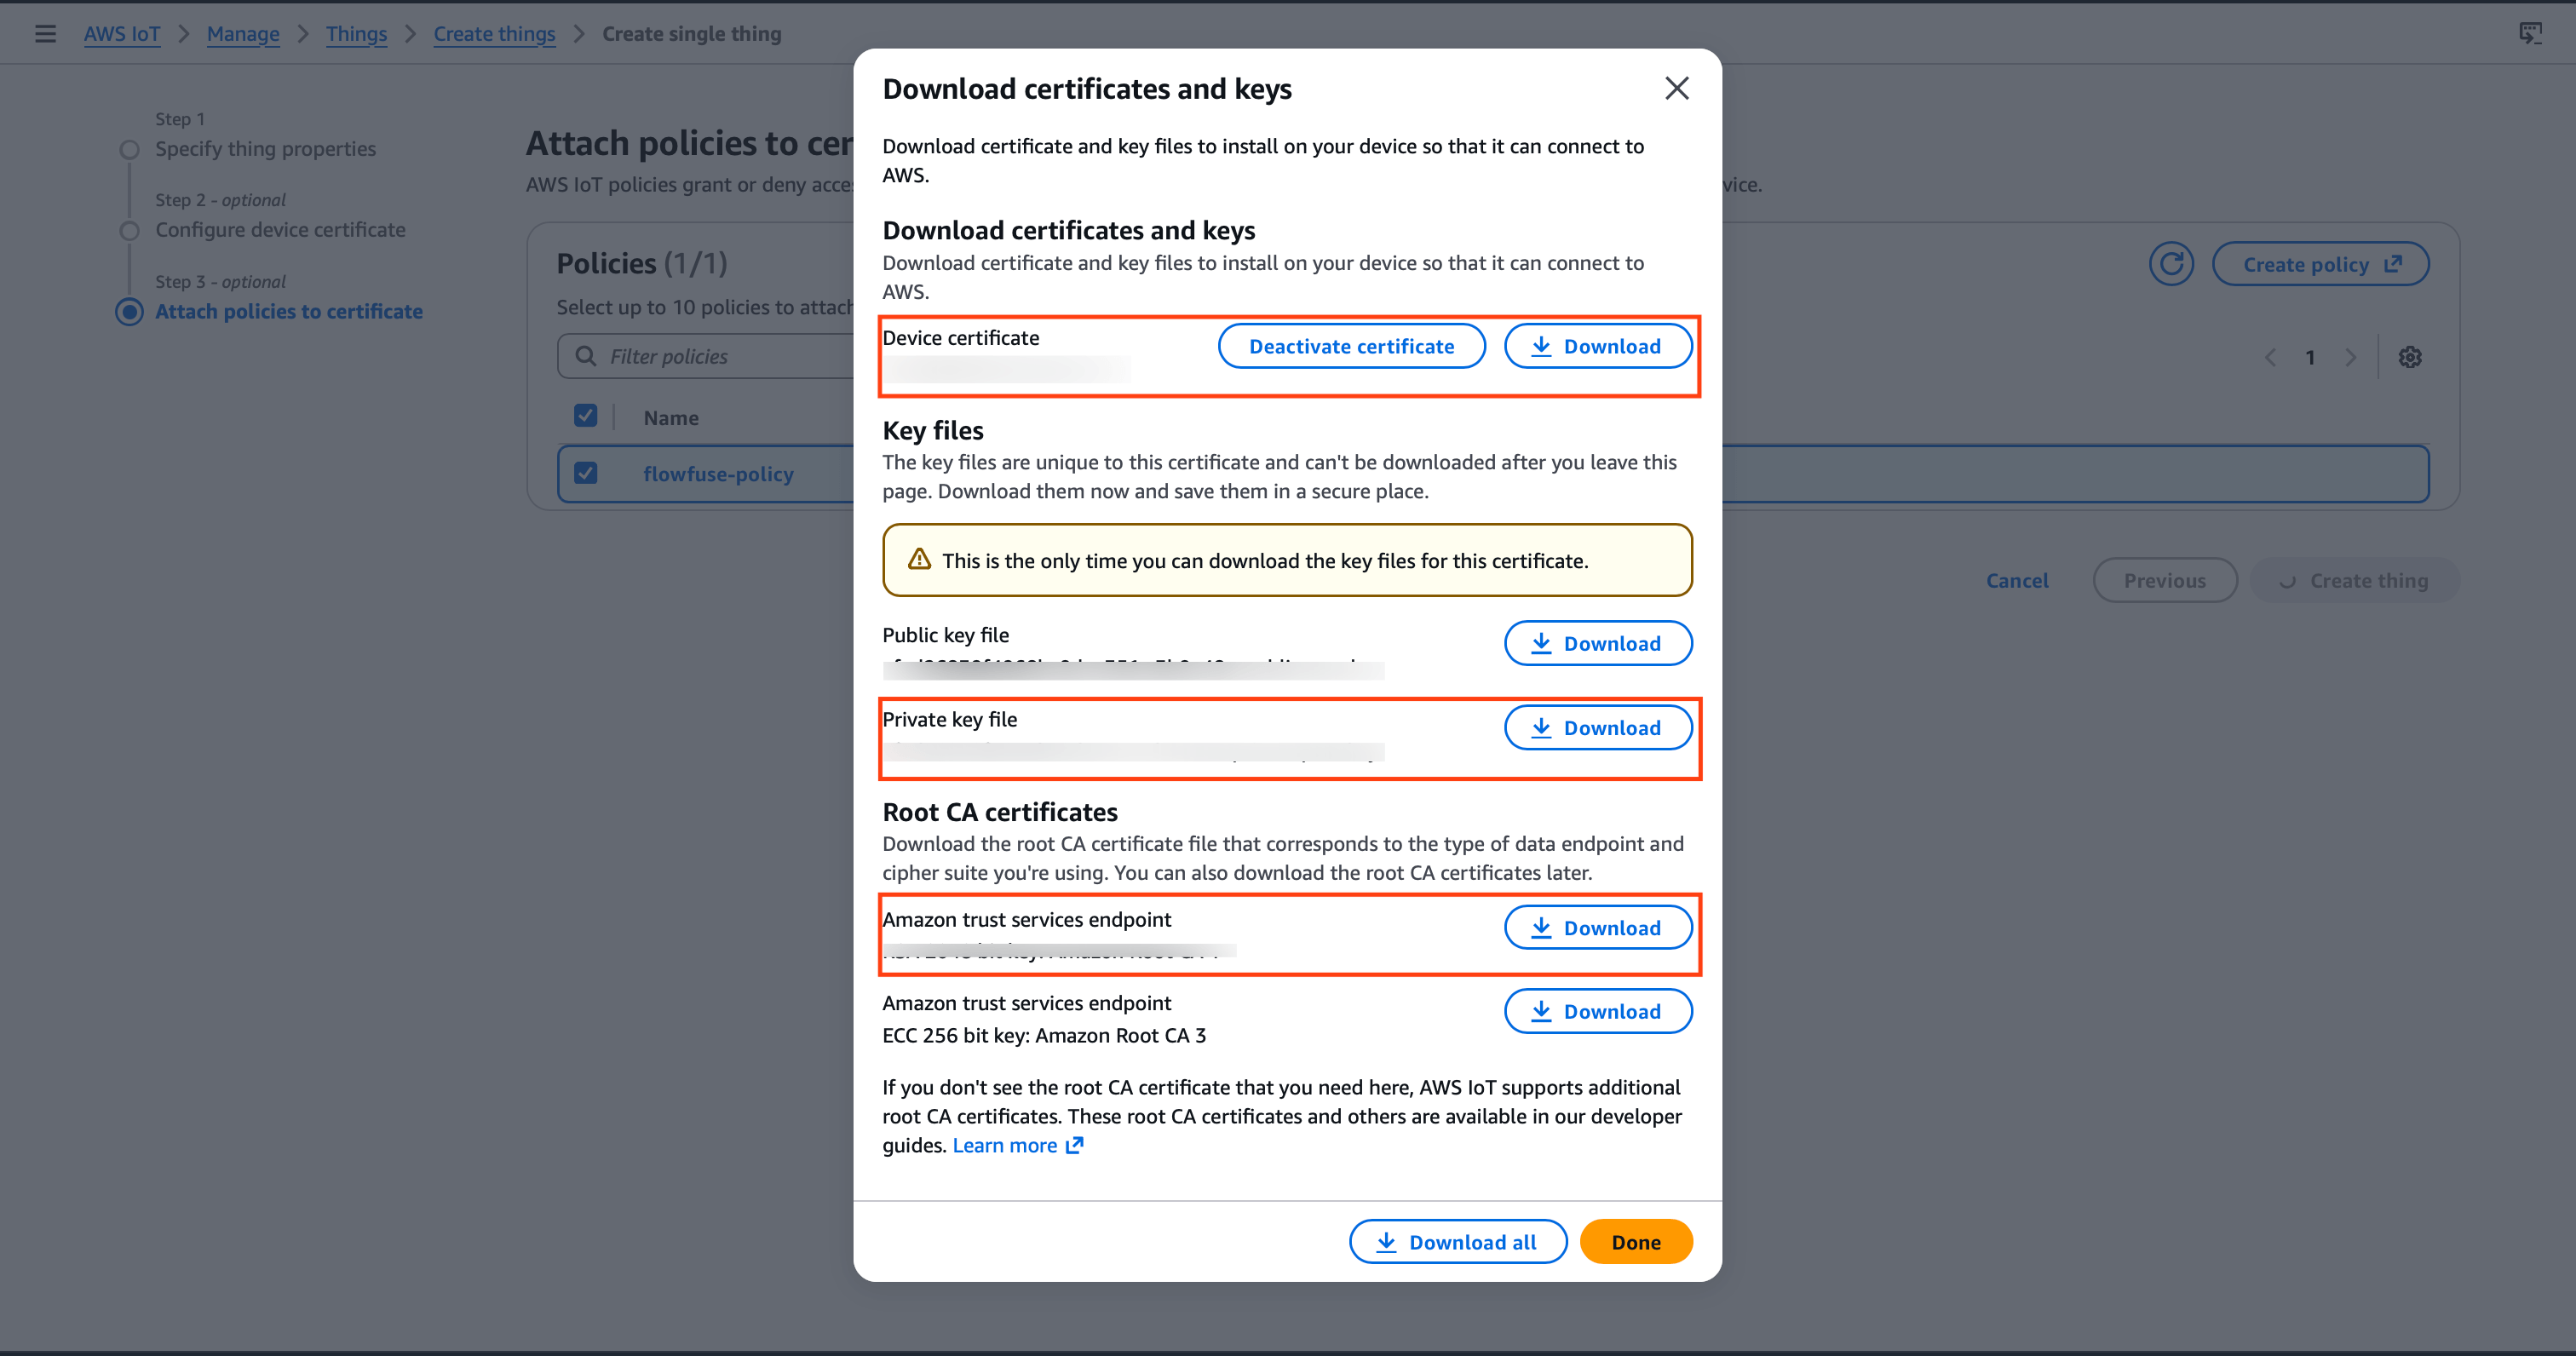
Keep these files safe. You cannot download the private key again after leaving this page. If you lose it, you will need to create a new certificate.
Step 3: Find Your AWS IoT Endpoint
Every AWS account has a unique IoT Core endpoint. This is the host address you will use in FlowFuse.
- In the left sidebar go to Connect > Domain configurations.
- Click on the default domain configuration to open it.
- Copy the Endpoint. It looks like this:
xxxxxxxxxxxxxxx-ats.iot.us-east-1.amazonaws.com
Rather than pasting this endpoint directly into the Node-RED broker configuration, store it as a FlowFuse environment variable — for example, SERVER. You can then reference it as ${SERVER} in the Server field. This keeps the endpoint out of your flow JSON and means the same flow snapshot deploys across multiple edge instances pointing at different AWS accounts or regions without any edits.
Step 4: Configure the MQTT Connection in FlowFuse
With your certificates downloaded and your endpoint copied, open your FlowFuse instance and go to the Node-RED editor.
First, upload your certificates so Node-RED can use them for the TLS handshake.
- Drag an mqtt out node onto the canvas and double-click it to open its settings.
- Click the pencil icon next to the Server field to create a new broker configuration.
- Set the following on the Connection tab:
| Field | Value |
|---|---|
| Server | ${SERVER} — set via FlowFuse environment variable |
| Port | 8883 |
| Client ID | ${CLIENT_ID} — set via FlowFuse environment variable |
| Keep alive | 60 |
Define SERVER and CLIENT_ID under your instance's environment settings in FlowFuse. See FlowFuse Environment Variables for how to configure them. Keeping these values out of the flow JSON means you can deploy the same flow to multiple edge instances — each with its own Thing name and endpoint — without touching the flow itself. The Client ID must still match your Thing name exactly, so each instance gets its own variable value.
- Check Enable TLS. A TLS configuration field appears.
- Click the + icon next to it to add a new TLS config.
- Upload each of the three certificate files you downloaded in Step 2:
| Field | File to upload |
|---|---|
| Certificate | Device certificate (.pem.crt) |
| Private Key | Private key (.pem.key) |
| CA Certificate | Amazon Root CA 1 (.pem) |
- Enable Verify server certificate.
- Click Update to save the TLS config, then click Update again to save the broker config.
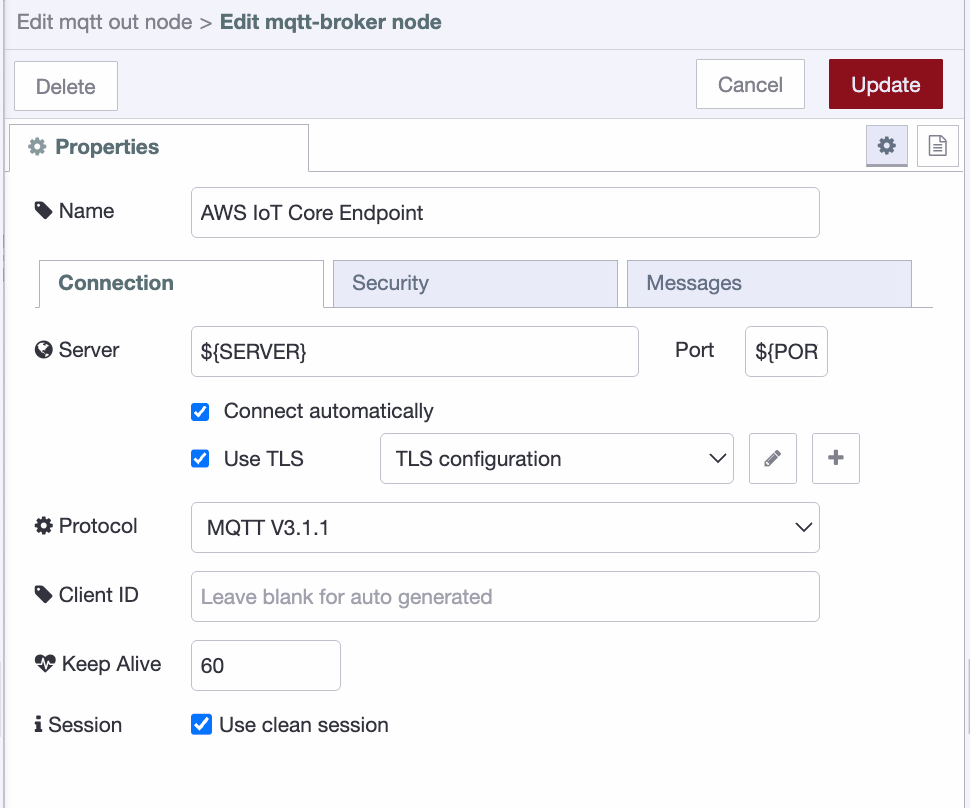
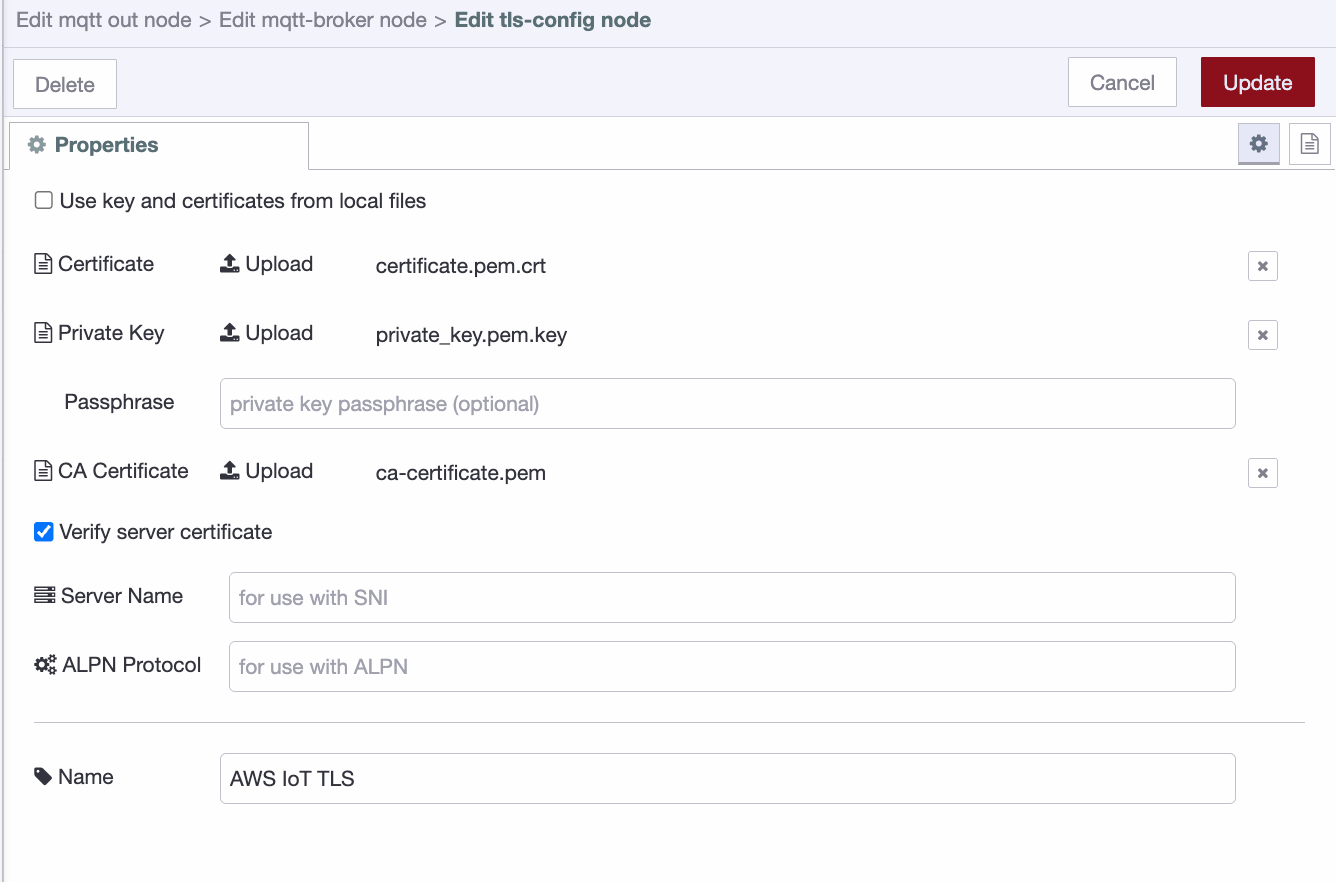
AWS IoT Core requires mutual TLS: both sides authenticate each other. Port 8883 is the standard MQTT over TLS port. Connecting on port 1883 without TLS will be rejected.
Step 5: Build a Flow and Publish Your First Message
With the broker configured, build a simple flow to publish a test message.
For this demo we'll use an inject node as the data source. In a real deployment, this would be any node reading live data: an OPC-UA reader, a Modbus poll, a database query, or a sensor feed.
- Drag an inject node onto the canvas and connect it to the mqtt out node.
- Double-click the inject node and set the payload to a JSON object, for example:
{ "temperature": 22.5, "unit": "celsius", "source": "flowfuse-edge" }- Double-click the mqtt out node and set the Topic to
flowfuse/telemetry. This is the topic AWS will receive messages on. - Click Done, then click Deploy to apply the flow.
Once deployed, the mqtt out node should show a green connected status indicator beneath it. If it shows red or is in a reconnecting state, double-check the endpoint, port, client ID, and certificate files.
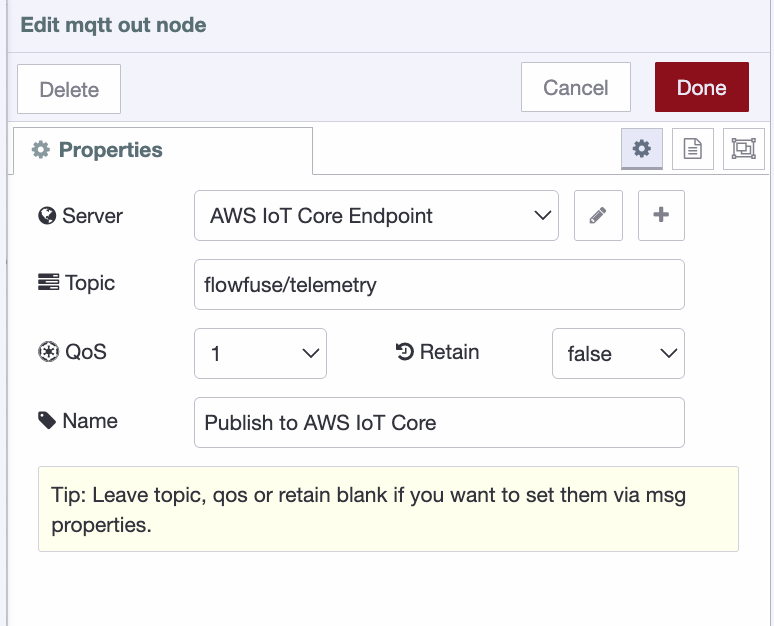
- Click the button on the inject node to trigger a manual publish.
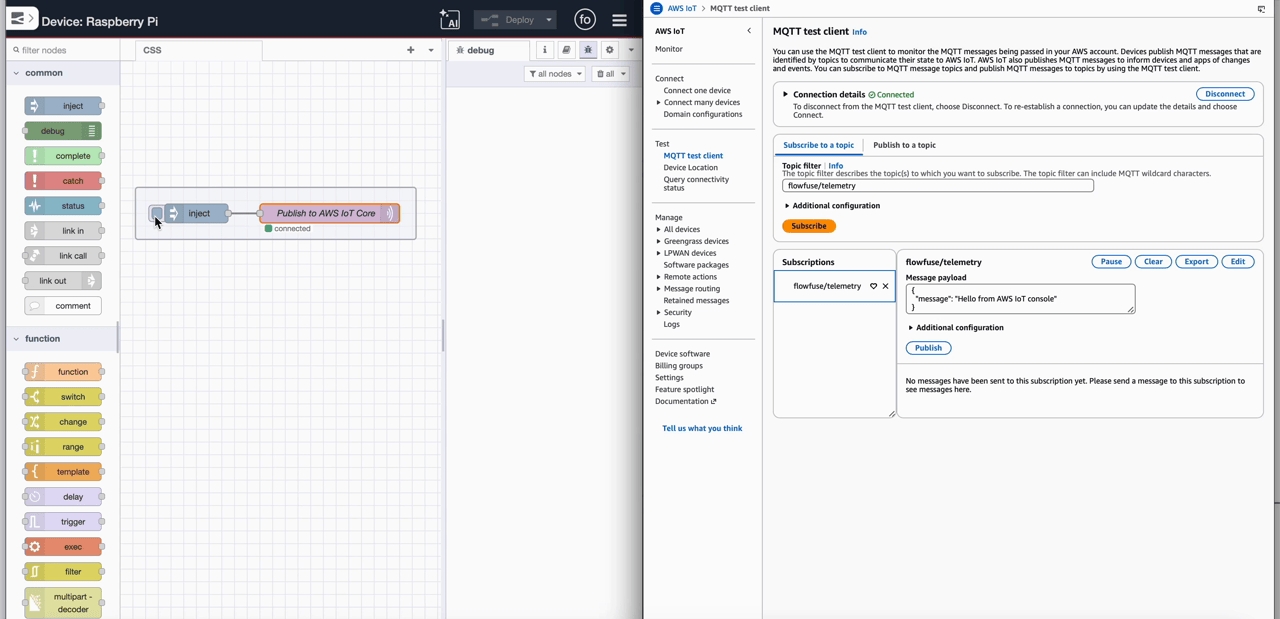
Step 6: Verify the Message in AWS
Confirm the message arrived in AWS using the built-in MQTT test client.
- In the AWS IoT Core console, go to Test > MQTT test client in the left sidebar.
- Under Subscribe to a topic, enter
flowfuse/telemetryand click Subscribe. - Go back to FlowFuse and click the inject button again.
- The message appears in the AWS test client within seconds.
You've successfully connected FlowFuse to AWS IoT Core. Data published from your FlowFuse instance now flows securely into AWS over mutual TLS, ready to be routed to Lambda, DynamoDB, S3, or any other service in your stack via IoT Core rules.
What's Next
You've got a working edge-to-cloud pipeline. FlowFuse is publishing data. AWS IoT Core is receiving it.
From here, the real work begins: routing that data somewhere useful. In AWS IoT Core, go to Message Routing > Rules to forward your flowfuse/telemetry messages to DynamoDB for storage, Lambda for processing, or S3 for archiving — no extra infrastructure needed.
On the edge side, swap the inject node for a live data source. An OPC-UA reader, a Modbus poll, a database query. The broker configuration stays the same. Only the source changes.
A few things worth doing before you go to production:
Tighten your policy. The wildcard policy from Step 1 is fine for testing. Replace the * resource with specific ARNs scoped to your Thing, your topics, and your client ID.
Rotate certificates on a schedule. AWS IoT Core supports certificate rotation without downtime. Build that into your operations plan now.
Monitor connection state. Add a status node in Node-RED connected to your mqtt out node. If the connection drops, you'll want to know immediately — not when someone notices missing data an hour later.
Industrial data pipelines aren't complex. They just have a lot of small steps that have to be right. You've done the hard part.
For more on how FlowFuse connects PLCs and edge devices — via OPC UA, EtherNet/IP, Siemens S7, and Modbus — to cloud and enterprise systems, see the FlowFuse PLC integration overview.
Edge to cloud, without the complexity
FlowFuse connects your industrial machines to AWS IoT Core — securely, at scale, without managing infrastructure.
Frequently Asked Questions
About the Author
Sumit Shinde
Technical Writer
Sumit is a Technical Writer at FlowFuse who helps engineers adopt Node-RED for industrial automation projects. He has authored over 100 articles covering industrial protocols (OPC UA, MQTT, Modbus), Unified Namespace architectures, and practical manufacturing solutions. Through his writing, he makes complex industrial concepts accessible, helping teams connect legacy equipment, build real-time dashboards, and implement Industry 4.0 strategies.
Table of Contents
Like what you’re reading?
Add FlowFuse as a preferred sourceOn the page that opens, check the box next to flowfuse.com to see more of our articles in your Google Search results.
Related Articles:
- Software-Defined Manufacturing: Improve Without Hardware Changes
- Build a Machine Downtime Tracking Application
- Why Manufacturing Needs GitOps
- Control and Track Machines on the Factory Floor
- FlowFuse 2.32: Certified Redis, Git Pipelines for Any Server, Insights on Remote Instances, and Dark Mode