How to create and use Subflow in Node-RED
A Practical Guide to Implementing Subflows in Node-RED for Efficient Workflow Management

In traditional programming, managing complex and repetitive tasks can quickly lead to a tangled mess of code that’s hard to maintain and update. To tackle this issue, developers use libraries or modules—reusable chunks of code that help organize functionality, minimize duplication, and keep codebases clean and manageable.
Node-RED brings a similar solution to its visual programming environment with Subflows. Imagine Subflows as the visual counterpart to libraries. In this guide, we will explore what Subflows are, how to create them, and how to use them effectively to enhance your Node-RED experience.
What Exactly Are Subflows?
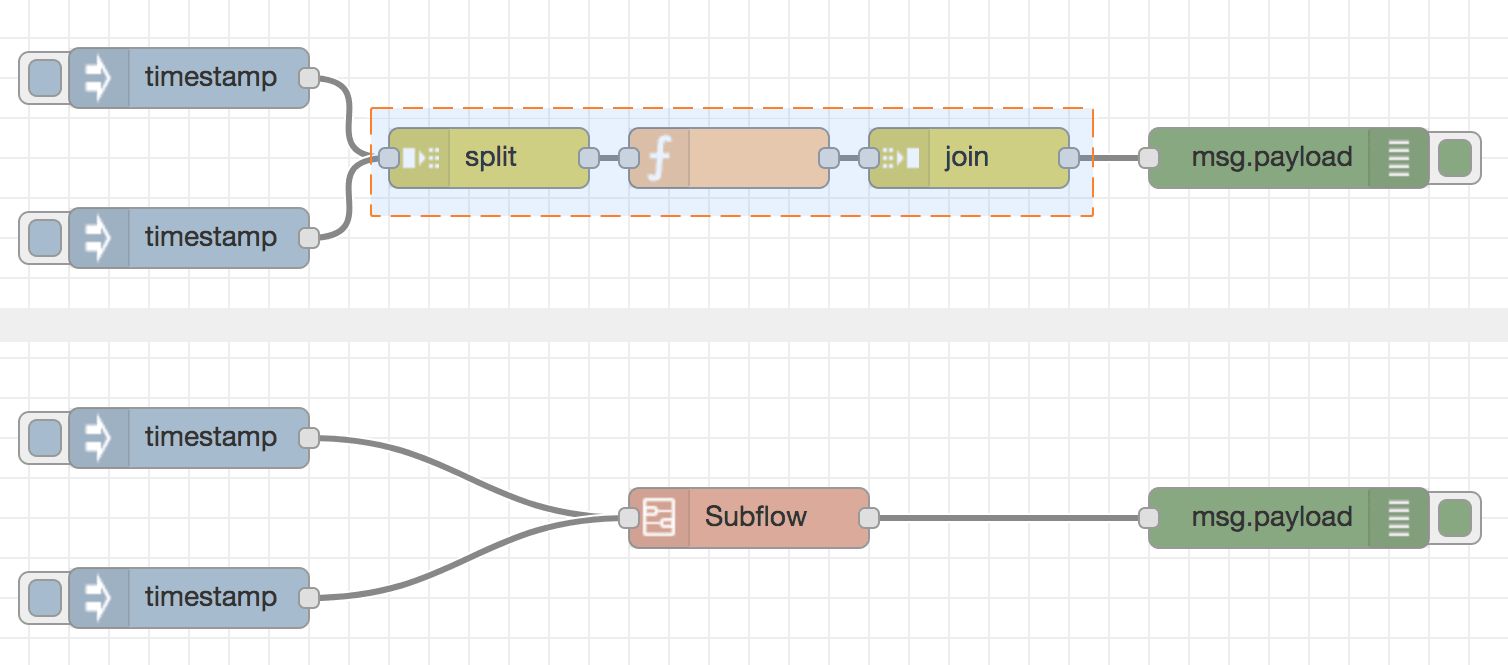
Subflows in Node-RED are a way to group together a set of nodes and reusable flows into a single, reusable node. This helps you manage and organize complex workflows by encapsulating repetitive or complex logic into a modular unit. You can think of Subflows as custom nodes that you create and use within your flows to simplify your design and reduce redundancy.
Creating a Subflow in Node-RED
In this section, we will create a Subflow for a flow that sends requests to an API and returns results. If the request faces an issue, it retries until it reaches the maximum retry limit. Let's assume we need to use this flow in multiple places, for different APIs, each with different retry timeouts. To avoid duplicating the flow logic, we can create a Subflow.
To follow along, import the following flow into your Node-RED instance.
Creating subflow of selection

- Select the flow you want to convert into a Subflow.
- Open the main menu by clicking the top-right menu icon, and select "Selection to Subflow" under the Subflows option.
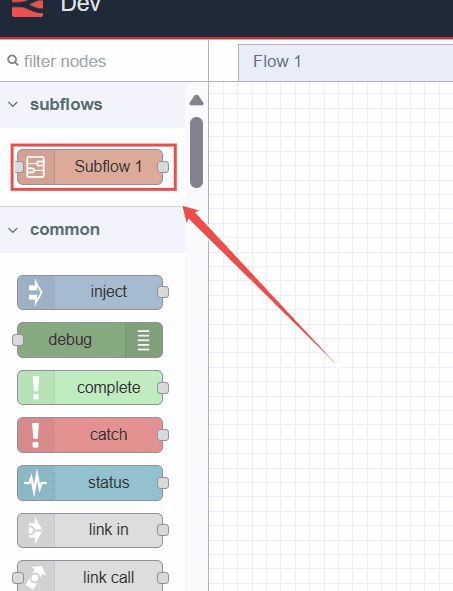
Once selected, the Subflow will be added to the node palette like other nodes. The selected flow will also be converted into a single node representing the Subflow.
Adding Properties to the Subflow
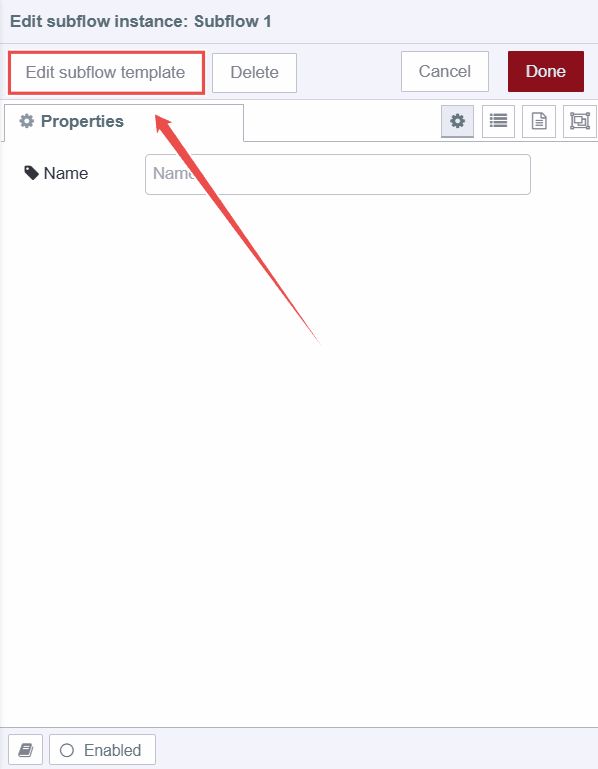
- Double-click on the Subflow, then click on "Edit Subflow template".
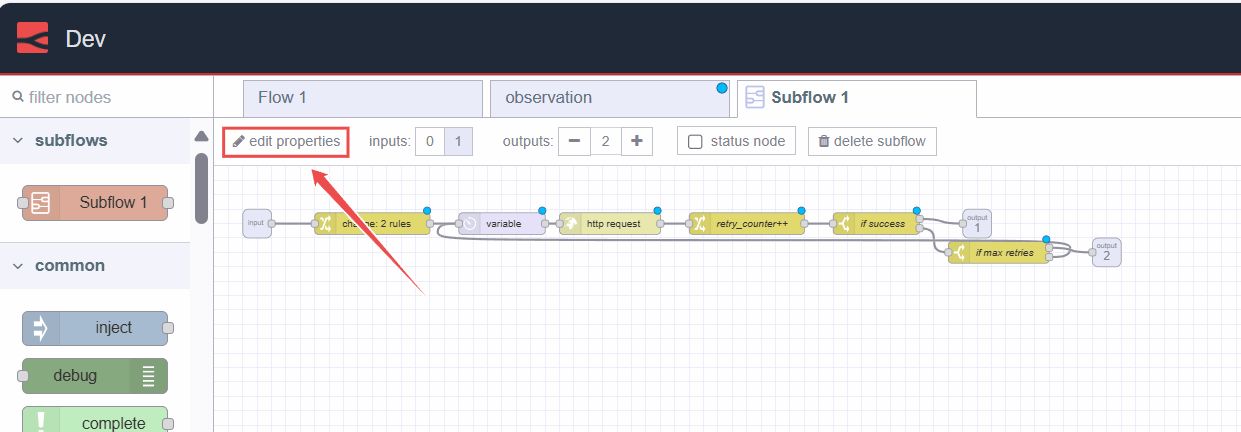
- A new flow tab for the Subflow will open. Click on "Edit Properties" in the top-left corner.
- To add environment properties, click on the "+ add" button located at the bottom-left.
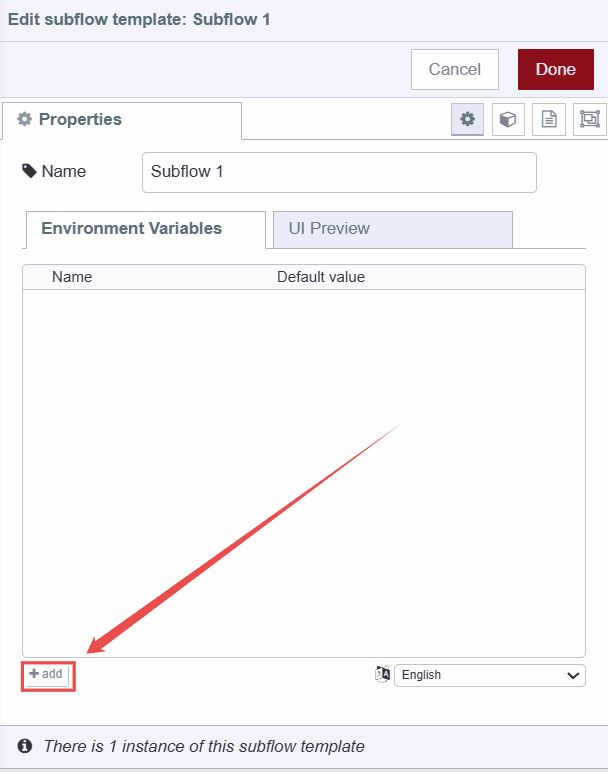
- In the field that opens, give the property a name and set its default value.
- Once you have added all your properties, you can view a preview by switching to the "UI PREVIEW" tab.
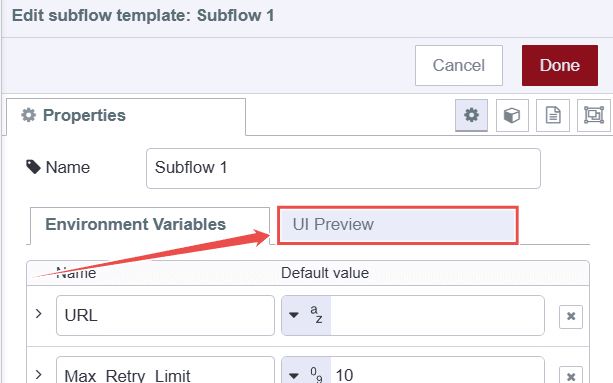
- Click "Done" to save.
Setting Added Environment Variables in the Nodes
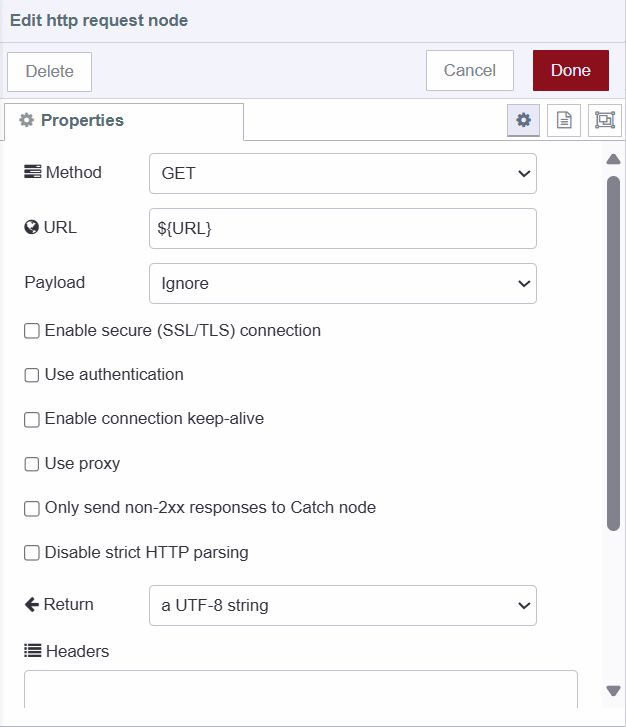
Now that we have added properties for the Subflow (which are environment variables), we need to use them in the relevant nodes, such as the HTTP request node, which will require an API and the max-retry setting.
- Double-click on the HTTP request node, set the environment variable as
${your_env_name}into the URL feild, and click Done to save.
- Next, double-click on the switch node named "if max retries," update the hardcoded max retry condition value to the environment variable you set for it, and click Done to save.

Managing Subflow Input and Output Ports
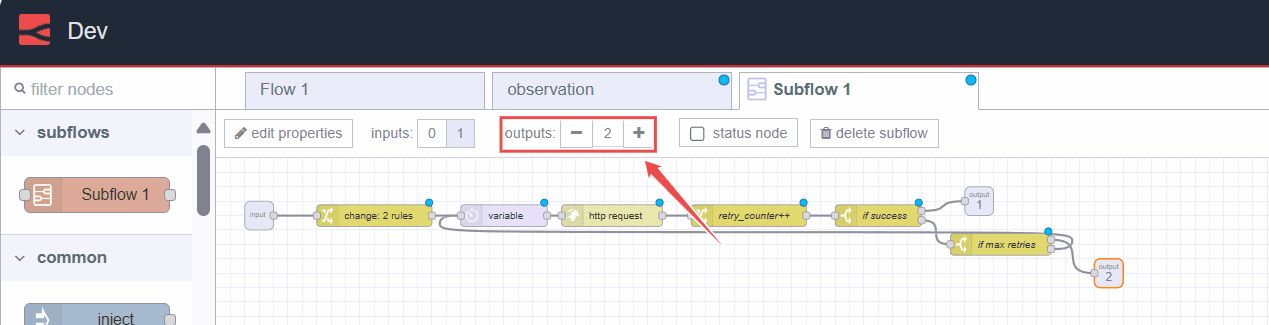
As we know, any node in Node-RED requires input and output ports to manage its data flow. Similarly, a Subflow node requires these ports to function correctly. In our Subflow example, it needs to be triggered and therefore requires at least one input port and one or more output ports. Specifically, our Subflow has two outputs: one for successfully fetched data and another to indicate when the maximum retry limit has been exceeded.
- In the Subflow tab, at the top, you will see an option for inputs with values 0 and 1. Click on 1 to add an input port (as a any Node-RED node can have only one input port). Once set to 1, you will see an input port added in the Subflow tab. Connect it to the appropriate node; in our example, it should be connected to the first change node.
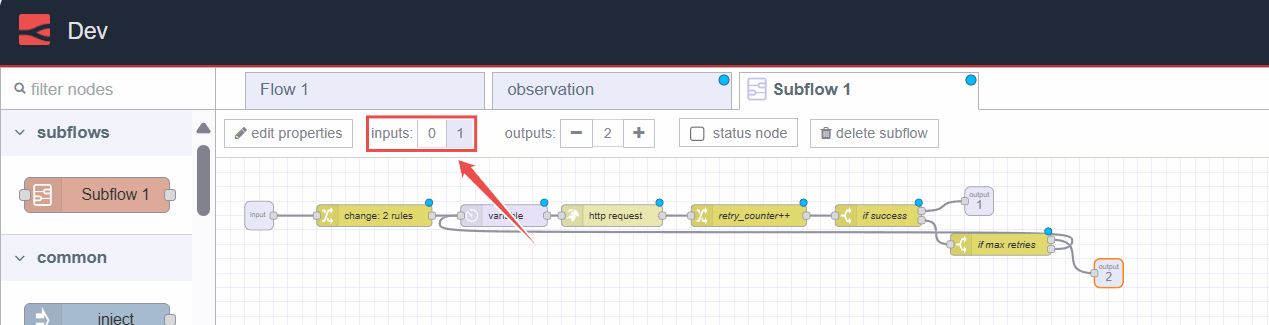
- Next, right after the inputs option, you will see an option for outputs. Unlike inputs, you can add as many outputs as you need. Once you've added the outputs, connect them to the appropriate nodes. In our example, the first output should be connected to the first input of both switch nodes.
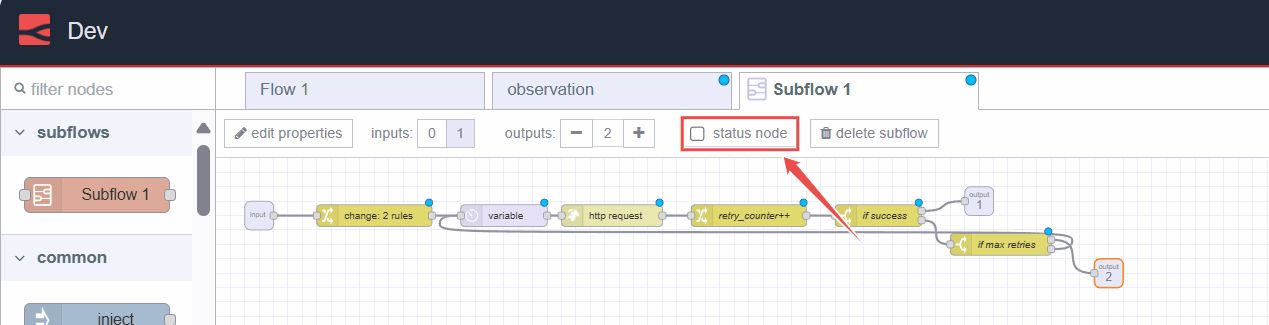
Adding Status for Subflow Nodes
To effectively manage and monitor the execution of Subflows, you can add status indicators to your Subflow nodes. This allows you to see if the Subflow is functioning correctly and helps in debugging if something goes wrong. To add a status indicator:
- In the Subflow flow tab at the top, click on the Status node option to add a status node. This status node can be connected to the Node-RED status node to capture and display all statuses, or you can configure it to use
msg.payload.
In our example, we need two indicators: one to display when the flow is retrying to request and another to indicate that the fetch operation has successfully completed.
- Drag two Change nodes onto the Canvas. Connect one Change node to the if success switch node's first output and set the
msg.payloadto"completed". Connect the other Change node to the if max retries switch node's first output and set itsmsg.payloadto"retrying". Then, connect both Change nodes to the input of the Subflow status node.
Customizing the Appearance of a Subflow Node
Node-RED allows you to customize the appearance of Subflow nodes, including setting the color, icon, port labels, and selecting the category in which it will be visible in the node palette.
- In the Subflow flow tab, click on the "Edit Properties" option in the top-left corner and switch to the "Appearance" tab.
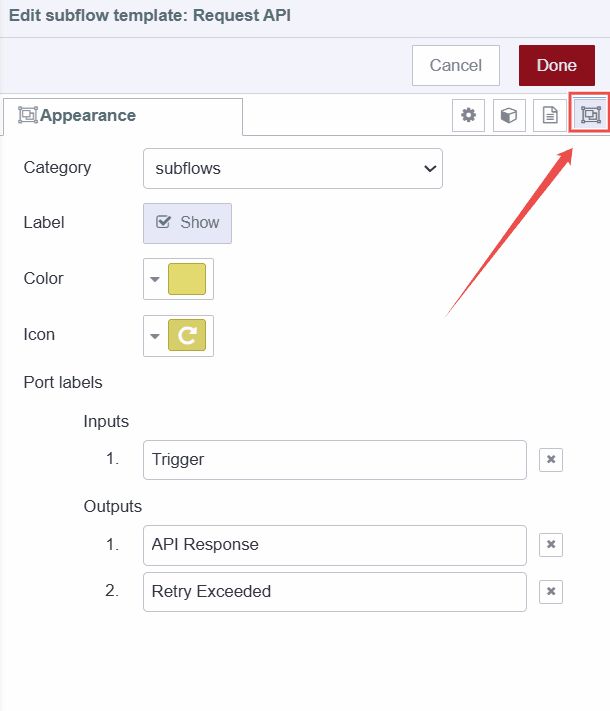
- Select a category from the available categories or add a new one by clicking on "Add new".
- Choose a color for the Subflow node and select an icon.
- Provide labels for the ports so that when someone hovers over the Subflow input or output ports, they can quickly understand their purpose.
Adding Documentation for a Subflow Node
Node-RED allows you to add documentation for Subflow nodes, providing guidance on how to use them. This documentation will be rendered in the help sidebar, similar to other nodes.
- In the Subflow flow tab, click on the "Edit Properties" option in the top-left corner and switch to the "Description" tab.
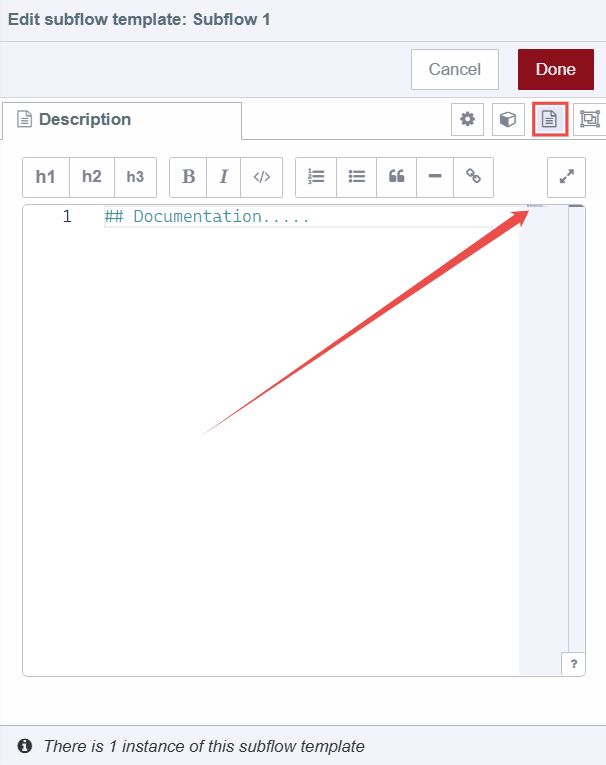
- Enter the documentation content in markdown format that provides guidance on how to use the Subflow node effectively.
- Click Done to save.
Once saved, the documentation will be displayed in the help sidebar when users click on the Subflow node in the Node-RED palette or hover over and select the help option for that node.
Now, just like regular Node-RED nodes, you can effectively use this Subflow node in your projects. With its added documentation, customized appearance, and status indicators, it integrates seamlessly into your Node-RED environment, enhancing both usability and functionality.
Benefits of using subflows.
- Modularity: Subflows allow you to group related nodes into a single, reusable unit, making complex flows easier to manage.
- Code Reuse: They help avoid duplicating similar logic across different parts of your flow, saving time and effort.
- Simplified Design: Subflows can simplify your main flow by hiding complexity within a single node.
- Easier Maintenance: Updating a Subflow automatically updates all instances where it is used, making maintenance quicker.
Conclusion
In this guide, we explored the concept of subflows in Node-RED, including their definition and purpose. We walked through the steps to create and configure subflows, demonstrating how to integrate them into your main flow. Additionally, we discussed how to edit and update existing subflows, and provided best practices for managing and organizing them effectively.
Build and Reuse Node-RED Flows Across Your Team
FlowFuse gives you version control, team collaboration, and centralized deployment — so your subflows and reusable logic stay consistent across every instance and every engineer.
About the Author
Sumit Shinde
Technical Writer
Sumit is a Technical Writer at FlowFuse who helps engineers adopt Node-RED for industrial automation projects. He has authored over 100 articles covering industrial protocols (OPC UA, MQTT, Modbus), Unified Namespace architectures, and practical manufacturing solutions. Through his writing, he makes complex industrial concepts accessible, helping teams connect legacy equipment, build real-time dashboards, and implement Industry 4.0 strategies.