Run Node-RED as a service on Windows
Step by step guide to run FlowFuse device agent as a Windows service
FlowFuse's device agent allows you to manage and run your Node-RED instances on your own hardware such as a Raspberry Pi or Windows computer. This can be very useful where an application you've written needs to run flows with direct access to hardware sensors.
In this article, we're going to explain the steps to configure our device agent to run as a service in Windows using the nssm utility.
Why run the device agent as a service?
The standard process for running FlowFuse's device agent is to start it on the command line using the command flowfuse-device-agent. This works fine for testing but for long-term installations it's useful to run the device agent as a service. Once running as a service, the device agent will continue to run even if you log off or the computer is restarted and no user is logged in.
Summary
The aim of this how-to is to install the FlowFuse device-agent as a service on a Windows computer.
There will be two main parts to this:
- Install the device-agent
- Setup the device-agent to run as a Windows service
Additionally, two user accounts will be needed for this configuration:
- A user account that will be used to run the device-agent (typically, non-admin account)
- An admin account that can run elevated commands and will be used to setup the service
We will create a directory for the device-agent files and set the permissions on that directory so that the user account can read and write files in that directory.
This will be c:\opt\flowfuse-device
To make the device-agent run as a service, we will (in this example), use nssm but you are free to choose an alternative tool to run the device agent as a service.
Finally, we set the service to run under the service account.
NOTE: The instructions in this how to were written on Windows 11 Pro 22H2
TIP: Using domain accounts
If the account is a domain account, append the domain name to the user e.g. user@domain whenever the user name is used in the instructions below.
TIP: Launching an elevated command prompt window (e.g. as the admin user)
powershell -Command "Start-Process 'cmd' -Verb runAsTIP: Launching an elevated powershell prompt window (e.g. as the admin user)
powershell -Command "Start-Process 'powershell' -Verb runAsPre-requisites
Install Node.js
The device-agent requires Node.js to be installed. You can download the latest version from https://nodejs.org/en/download/.
It is recommended to install the LTS version and to check the "Automatically install the necessary tools" option. This is especially important if you intend on using any nodes that require native modules (like serialport).
Create a New Windows User
If you need to create a new user account follow these instructions.
Prepare the device-agent files directory
As the admin user, open an elevated command prompt, create the files directory and setup access permissions.
# In an elevated command prompt
mkdir c:\opt
mkdir c:\opt\flowfuse-device
# grant full access to the service account that will run the device-agent
icacls c:\opt\flowfuse-device /grant "user":F /T
where "user" is the service account (not the admin account)
Install nssm
nssm can simply be downloaded and executed from any path. We will download it to the c:\opt directory, extract the files and copy the 64 bit version to the current directory.
cmd version elevated command prompt
# starting in the device-agent files directory
cd c:\opt
# download the nssm zip file
curl -LJO https://nssm.cc/release/nssm-2.24.zip
# extract the files
tar -xf nssm-2.24.zip
# copy the 64 bit version to the current directory
copy nssm-2.24\win64\nssm.exe .
# clean up
del nssm-2.24.zip
rmdir /s /q nssm-2.24
powershell version elevated powershell prompt
If you don't have cURL installed, then powershell can be used to download the file. Here is how to do it:
# starting in the device-agent files directory
cd c:\opt
# download the nssm zip file
Invoke-WebRequest -Uri https://nssm.cc/release/nssm-2.24.zip -OutFile nssm-2.24.zip
# extract the files
Expand-Archive -Path nssm-2.24.zip .
# copy the 64 bit version to the current directory
Copy-Item -Path .\nssm-2.24\win64\nssm.exe -Destination .
# clean up
Remove-Item -Path nssm-2.24.zip
Remove-Item -Path nssm-2.24 -Recurse
Manual download
If you prefer, you can download the nssm zip file manually from https://nssm.cc/release/nssm-2.24.zip and extract the files to the c:\opt directory. Then copy the 64 bit version to the current directory.
Ultimately, you should end up with a file named nssm.exe in the c:\opt\ directory.
Install and configure the device-agent
As the service account, to do so open a command prompt window and run the following and authenticate:
runas /user:{serviceuser} cmd
# e.g. runas /user:winserv cmd
where {serviceuser} is the service account (not the admin account)
Check the users npm global path is set in the Users Environment Variables
NOTE: The recommended flowfuse-device-agent instructions will result in the flowfuse-device-agent being installed in the NPM global directory. And the instructions to launch the device-agent expect the NPM global directory to be in your user path. This section will instruct you to a) find the NPM global path, then b) check the user’s path setting and, if necessary c) add the NPM global path to your user path.
First, make a note of the path currently set for npm global. You can do this by running the following command:
npm config get prefixNext, ensure the Path Variable under the "User variables for user" contains the npm global path that we obtained in the previous step. Use the below command, to check the user’s Path setting. If it is not present, edit the path to include it.
# This commands opens the environment variables editor,
# look for the "Path" variable under "User variables for user",
# and ensure it contains the npm global path
rundll32 sysdm.cpl,EditEnvironmentVariables
If you did have to add the npm path to the users Path variable, you will need to restart the command prompt for the change to take effect and relogin as user.
Install the device agent
Note: you may have already installed the device-agent, however, we strongly recommend you do this step again as the service account and ensure that account has the latest version.
npm i -g @flowfuse/device-agentLink the device-agent to your flowfuse team
First, we must run the device-agent and link it to our FlowFuse team. This will generate a "device configuration" details that we will use to configure the device-agent. Below is how to run the device-agent with the UI enabled. This will allow you to configure the device-agent via its web UI.
flowfuse-device-agent --ui --ui-port 8080 --ui-user admin --ui-pass admin -d c:\opt\flowfuse-device -p 1880The device-agent will now be running and you can access the UI at http://127.0.0.1:8080 with the user and password both "admin" (you can change these in the command line if required). NOTE: These credentials are temporary and only valid during the device setup
Proceed to configure the device-agent and link it to your flowfuse team. Full instructions can be found here. Once you have linked the device-agent to your team, you can stop it by pressing ctrl+c in the command prompt window.
Create the device-agent service
As the admin user, open an elevated command prompt see TIP above
Install device-agent as a service
cd c:\opt
.\nssm.exe install flowfuse-device-agent "flowfuse-device-agent.cmd"
.\nssm.exe set flowfuse-device-agent AppDirectory "c:\opt\flowfuse-device"
.\nssm.exe set flowfuse-device-agent Description "FlowFuse Device Agent"
# set the AppParameters (cli options) to tell the agent where its home directory is
# in our case, this is c:\opt\flowfuse-device and is set with the -d option
.\nssm.exe set flowfuse-device-agent AppParameters "-d c:\opt\flowfuse-device -p 1880"
Check the service is installed
Run the following command to check the service is installed:
services.msc(look for a service named `flowfuse-device-agent').
Alternatively, you can use the sc command:
sc query flowfuse-device-agentSet the user account that will run the service
Some things are easier to edit in the UI, so we will edit the service via the NSSM UI.
nssm edit flowfuse-device-agent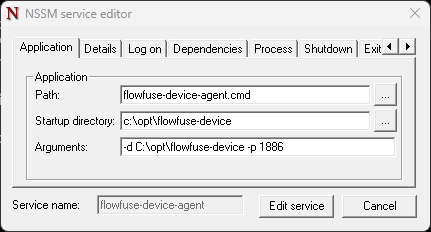
In the UI, you can edit the service name, description, startup type, etc. The most important thing to check is the Application tab. This includes the path to the flowfuse-device-agent.cmd and its arguments. Select the "Log on" tab, select "This account" and enter the service account name and password that will run the device-agent. Click the "Edit Service" button to save the changes.
Now you have a service that will run the device-agent as the service account 🎉
Controlling the service
You can start the service with the command:
sc start flowfuse-device-agentYou can check the current status with the command:
sc query flowfuse-device-agentYou can stop the service with the command:
sc stop flowfuse-device-agentFurther reading
If you'd like to learn about windows services via the sc command you can access the help text by running sc from a command prompt.
Discuss your use case with our team
See how FlowFuse can support your architecture, integrations, and deployment needs.
About the Author
Steve McLaughlin
Senior Software Developer
Steve is a Senior Software Engineer at FlowFuse. Prior to joining FlowFuse, he worked as an Engineer in the Automotive Industry and has extensive production environment experience. Steve is also a Node-RED core contributor and has written several popular contribution nodes for Node-RED including drivers for communicating with PLC Hardware
About the Author
Rob Marcer
Head of Professional Services
Rob is the Head of Professional Services at FlowFuse, he helps FlowFuse customers plan, build, and deploy large scale Internet of Things projects. He has worked with customers in various industries including automotive, life sciences, logistics, utilities, and smart buildings.
Table of Contents
Like what you’re reading?
Add FlowFuse as a preferred sourceOn the page that opens, check the box next to flowfuse.com to see more of our articles in your Google Search results.
Related Articles:
- Node-RED Buffer Parser Guide: Decode Modbus and Industrial Device Data (2026)
- Node-RED Serial Port Tutorial: Connect RS232/RS485 Manufacturing Equipment (2026)
- How to Generate PDF Reports Using Node-RED in FlowFuse (2026)
- How to Read and Write Siemens S7 PLC Data — A Node-RED Guide (2026)
- Run FlowFuse Device Agent as a service on MacOS using Docker