Node-RED Serial Port Tutorial: Connect RS232/RS485 Manufacturing Equipment
Learn how to bring serial-connected equipment online using Node-RED and FlowFuse

Many factories rely on machines, both new and old, that communicate via traditional serial interfaces such as RS-232, RS-422, or RS-485. These machines remain reliable but can be challenging to integrate with modern systems due to their connectivity style.
This guide shows you how to use FlowFuse (Node-RED with enterprise capabilities) to connect manufacturing equipment, collect data, and enable real-time monitoring—without modifying your original hardware.
Making Sense of Serial Communication
Before diving into the wiring and flow configuration, it helps to understand how serial communication works—and why it is still relevant in industrial settings.
Serial ports move data one bit at a time, like passing beads on a string. This may sound old-fashioned, but it remains one of the most reliable and predictable ways to connect machines.
Data Direction: Which Way Does It Flow?
Not all serial connections behave the same. The direction of data flow is defined by its duplex mode:
- Simplex: One-way only. Like a speaker giving a lecture—the machine talks, you just listen. This is common for devices like weight scales or scanners that only output data.
- Half-Duplex: Data can flow in both directions, but only one side can transmit at a time. This is like using a walkie-talkie. It is the most common operational mode for RS-485 (using two wires), where multiple devices share the same communication line.
- Full-Duplex: Two-way, simultaneous communication. This is like a phone call—both sides can talk and listen at once. This is the typical mode for RS-232 (using separate transmit and receive lines) and RS-422, which is designed for full-duplex, multi-drop scenarios (one sender, multiple listeners).
Across industrial environments, serial interfaces like RS-232, RS-422, and RS-485 remain prevalent for device communication, depending on the wiring and number of connected devices.
Data Format: How Is It Structured?
Machines are picky—they expect data to arrive in a specific format. Here are the key pieces that make up a serial data frame:
| Setting | What It Means |
|---|---|
| Baud Rate | Speed of transmission (e.g., 9600 or 115200) |
| Data Bits | The actual data, usually 7 or 8 bits |
| Parity | Optional error check—even, odd, or none |
| Stop Bits | Marks the end of each message |
Interface Types: How Devices Physically Connect
Different machines use different physical standards. The most common are:
- RS-232: Typically full-duplex and one-to-one. Good for short-distance device communication.
- RS-422: Full-duplex, multi-drop (one sender, multiple receivers). Used for longer distances than RS-232.
- RS-485: Typically half-duplex and multi-device. Ideal for networks and even longer cable runs.
- USB (via adapter): Most modern PCs and gateways use USB-to-Serial adapters to talk to RS-232/422/485 devices.
Setting Up Serial Communication with FlowFuse
Now that you understand how serial communication works and what kind of interfaces your machine might use, the next step is to put that knowledge into practice.
Using FlowFuse, you can easily establish serial communication, process the data, and integrate it into dashboards or automated workflows, all without modifying the original hardware.
Let's walk through how to set this up.
Prerequisites
Before we start, ensure the following prerequisites are met:
- Hardware Connection: The machine must be physically connected to your system using a serial interface.
- Node-RED Instance: Make sure you have an instance of Node-RED up and running. The quickest way to do this is via FlowFuse. If you don't have an account, check out our free trial.
- Serialport Node: Install the node-red-node-serialport package if it is not already available in your palette.
Configuring the Serial Port Node
After installing the node-red-node-serialport package, follow these steps to configure serial communication in your Node-RED flow:
-
Drag a Serial In node from the Node-RED palette onto the canvas.
-
Double-click the node to open the configuration dialog.
-
Click the pencil icon next to the Serial Port field to add a new port configuration.
-
Enter the serial port path (e.g.,
/dev/ttyUSB0on Linux orCOM3on Windows). You can also click the search option to list available ports.

-
Set the baud rate, data bits, stop bits, and parity according to your machine’s specifications. These values must match the device exactly, or communication will fail or result in corrupted data.
-
Optionally, define an input delimiter, such as
\nor\r, to segment incoming messages if your device sends data in lines or chunks. If the output is fixed-length, you can configure it to wait for a specific number of characters. You can also set a timeout to receive data at regular intervals. Later in the output section, you can choose to add characters back to the message, such as restoring the line break.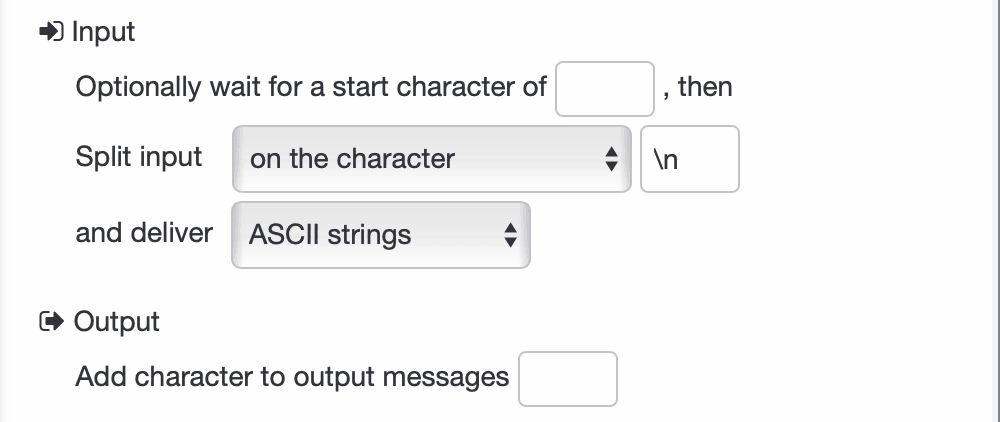
-
Click Done to save the configuration.
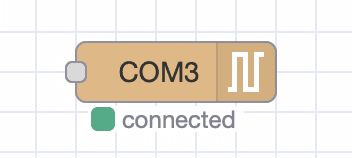
Once the serial port is correctly configured and the device is connected, the serial in node will show a "connected" status below the node with a small green square.
Writing to Serial Port
To send data to a machine, use the serial out node in Node-RED. This is often necessary to trigger actions such as starting a process, requesting a reading, or changing an internal state.
Follow these steps to send a command:
- Drag an inject node onto the canvas.
- Set the payload type appropriate to your machine’s requirements. This could be a string, number, raw buffer, or JSON object.
- Add a serial out node and select the configured serial port.
- Connect the inject node to the serial out node.
Once deployed, clicking the inject button will send the specified data to the machine via the serial interface.
In this guide, we are using a real machine connected via a serial interface. The machine is programmed to simulate a production process when it receives the "START" command (sent as a string). Once triggered, it begins incrementing the count of good and defect products and sends this data back over the same serial connection.
The next section demonstrates how to read and process this simulated production data using the serial in node.
Reading and Processing Serial Data
Follow these steps to read and handle the serial data:
- Drag a serial in node onto the canvas and configure it to use the same serial port.
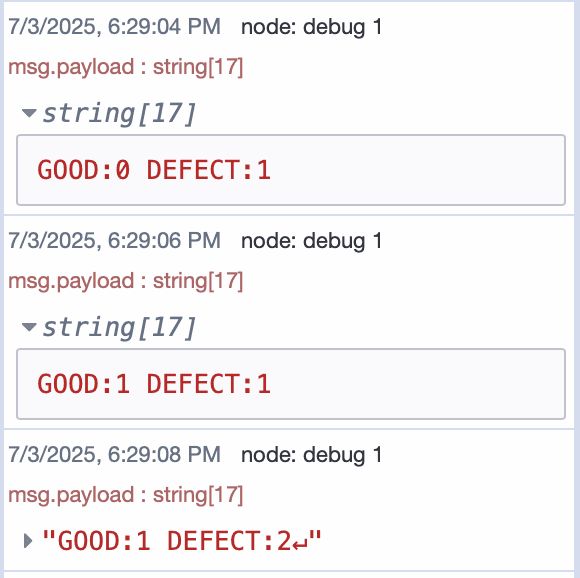
- Add a debug node and connect it to the output of the serial in node. This helps you inspect the raw payload and confirm that data is being received correctly.
- Once you confirm the format of the incoming data, use any of the change, JSON, or function node to parse and convert it into a structured format, here we have used function.
In our case, the machine sends production data every 2 seconds in the following format:
To convert this string into a structured JSON object, you can use a function node with the following code:
let parts = msg.payload.trim().split(' ');
let result = {};

parts.forEach(part => {
    let [key, value] = part.split(':');
    result[key.trim()] = parseInt(value);
});

msg.payload = result;
return msg;
This transforms the string into a JSON object like:
{
  "GOOD": 214,
  "DEFECT": 22
}Tip: You do not need to know JavaScript to use the function node. If you are using FlowFuse, the built-in FlowFuse Assistant can help you write function code using natural language. Simply provide a sample of the data received from your machine and describe the output you expect — the Assistant will generate the function for you.
Handling Request-Response Serial Communication
Not all machines stream data continuously. Some expect a request command, and only then respond with data. In these cases, using a combination of inject, serial out, and serial in nodes can become tricky—especially if you need to match each request with exactly one response. That’s where the serial request node becomes useful.
The serial request node handles this entire pattern for you. Internally, it combines the logic of sending a message and waiting for a single reply, working in a first-in, first-out manner. This means it will only send the next request after receiving a response (or timeout) for the previous one, making it ideal for synchronous devices.
To use it:
- Drag a serial request node from the palette.
- Double-click to configure the port—use the same path and settings as your other serial nodes.
- Connect it to an inject node configured with the command your machine expects, such as
"READ"or"STATUS". - On the output side, connect a debug or function node to handle the response.
Each time you trigger the inject, the command will be sent over the serial port, and the response will be delivered to the output—ready to be parsed just like before. This approach is clean, predictable, and removes the guesswork from matching writes with reads.
The output message includes msg.payload containing the response (if any), msg.status with the result status, and msg.port for reference.
This node is especially useful for polling machines that respond with production counts, part IDs, temperature readings, or system status—but only when asked.
Dynamically Managing Serial Ports
In a perfect setup, the serial device is connected, the port is stable, and everything just works. But in practice, hardware is not always so predictable.
For example, You might disconnect and reconnect a USB-to-serial adapter—and now the device shows up as /dev/ttyUSB1 instead of /dev/ttyUSB0. Or maybe you need to temporarily release the serial port to flash new firmware onto an Arduino. In some environments, the port assignment could change on every reboot, making it difficult to hardcode anything.
Rather than redeploying or editing your flow every time, Node-RED gives you a more flexible option: the serial control node.
This node lets your flow adjust serial communication settings on the fly. You can:
- Stop the serial connection when needed.
- Start it again later.
- Even switch to a different port entirely—without touching the Node-RED editor.
All of this happens by sending a simple message to the control node.
To stop communication:
{ "enabled": false }To start it again:
{ "enabled": true }And if the port changes or needs reconfiguration, you can send everything in one message:
{
  "serialport": "/dev/ttyUSB1",
  "serialbaud": 9600,
  "databits": 8,
  "parity": "none",
  "stopbits": 1,
  "enabled": true
}
This is especially useful when your flow needs to recover automatically—for example, after a USB reconnection—or if you want to let a user select the correct port from a dashboard interface.
Each time a message is received, the node also outputs the current port configuration. This allows you to log or verify changes as part of your flow—making it easy to track what the system is doing behind the scenes.
In short, the serial control node adds a layer of resilience and flexibility that is often essential in real-world deployments—where devices come and go, ports are never quite consistent, and downtime is not an option.
Key Takeaways
Manufacturing floors often bring together a mix of old and new machines. Among them, many still operate on traditional communication methods that are reliable but difficult to integrate with modern systems. These machines continue to perform their core functions well, but without connectivity, they remain isolated from digital workflows.
With FlowFuse and Node-RED, you can bridge that gap—bringing equipment online without changing or replacing existing hardware. From data collection to triggering actions and monitoring performance, your machines can become part of a connected and intelligent system.
Whether you’re in textiles, precision engineering, or automotive manufacturing, FlowFuse helps you unlock the full potential of your existing equipment. No rip-and-replace needed—just smarter connections. Get in touch with us and start building your serial integration flow today.
Discuss your use case with our team
See how FlowFuse can support your architecture, integrations, and deployment needs.
Frequently Asked Questions
What communication parameters do I need to configure for serial connections?
Why am I getting garbled or corrupted data from my serial device?
How do I handle devices that change port assignments (like USB devices)?
What's the difference between RS-232, RS-422, and RS-485?
Can I connect multiple serial devices to a single Node-RED instance?
When should I use the serial request node instead of serial in/out nodes?
How do I parse binary data from serial devices in Node-RED?
What's the best practice for handling serial connection failures in production?
About the Author
Sumit Shinde
Technical Writer
Sumit is a Technical Writer at FlowFuse who helps engineers adopt Node-RED for industrial automation projects. He has authored over 100 articles covering industrial protocols (OPC UA, MQTT, Modbus), Unified Namespace architectures, and practical manufacturing solutions. Through his writing, he makes complex industrial concepts accessible, helping teams connect legacy equipment, build real-time dashboards, and implement Industry 4.0 strategies.
Related Articles:
- OPC UA Tutorial: Advanced Monitoring with Subscriptions, Alarms, and Historical Data
- OPC UA Tutorial: Connect and Exchange Data with Industrial Equipment
- Most Modbus Polling Setups Are Wrong — Here's How to Fix Yours
- Why OPC UA Is Not Replacing Modbus (Yet)
- Rethinking Edge AI's Core Orchestration