Node-RED Buffer Parser Guide: Decode Modbus and Industrial Device Data
A practical guide to visual buffer parsing in Node-RED

Legacy industrial devices communicate in bytes. Your temperature sensor doesn't send you {"temp": 23.5} - it sends you [1, 3, 4, 1, 44, 0, 200, 190, 125]. Those numbers are meaningless unless you know how to decode them.
This is what makes working with legacy PLCs and Modbus sensors challenging. You're not dealing with modern APIs that return JSON. You're dealing with raw binary data where byte 3 might be temperature and byte 4 might be humidity, and if you read them in the wrong order, everything breaks.
Node-RED's Buffer Parser node solves this problem. Instead of writing JavaScript to manually decode every buffer, you configure it once visually and it handles the conversion automatically. In this article, we'll learn how to use this node effectively.
Understanding Buffer Data
When your Modbus sensor responds to a query, Node-RED shows you something like this in the debug panel:
[1, 3, 4, 1, 44, 0, 200, 190, 125]
Nine bytes. Each one is a number between 0 and 255. This data is completely meaningless without context.
Byte 0 might be a device address. Bytes 3 and 4 together might encode temperature. But the buffer itself doesn't tell you any of this - you need the device manual to figure out what goes where.
Take bytes 3 and 4: 1 and 44. If you're supposed to read them as a 16-bit integer, that's either 300 or 11265 depending on byte order. If the device uses a scale factor of 10, the actual temperature could be 30.0°C or 1126.5°C. Get any part of this wrong and your dashboard shows nonsense.
So why do devices work this way? Why not just send {"temperature": 30.0}?
That JSON message takes 21 bytes. The same information in binary takes 2 bytes. When you're on a serial connection running at 9600 baud, sending thousands of sensor readings per day, those extra bytes add up fast.
More importantly, this is how industrial hardware has worked since 1979. Modbus was designed when PLCs had kilobytes of memory. Modern factories still run equipment from the 90s. The protocol isn't going to change because it would be more convenient for us.
You work with what's on the factory floor, this means you need to parse buffers.
Example: Temperature and Humidity Sensor
Suppose you have a temperature and humidity sensor connected via Modbus RTU. When you query it for data, you get this buffer:
[1, 3, 4, 1, 44, 0, 200, 190, 125]
The device manual says this buffer breaks down as:
- Byte 0: Device address (1)
- Byte 1: Modbus function code (3 = read holding registers)
- Byte 2: Data length in bytes (4)
- Bytes 3-4: Temperature reading
- Bytes 5-6: Humidity reading
- Bytes 7-8: CRC checksum
You need to extract temperature and humidity. Everything else is Modbus protocol overhead.
The manual also specifies:
- Temperature: 16-bit unsigned integer, big-endian, divide by 10 for actual value in °C
- Humidity: 16-bit unsigned integer, big-endian, divide by 10 for actual value in %RH
Without Buffer Parser, you'd write a function node like this:
const buffer = Buffer.from(msg.payload);
const temperature = buffer.readUInt16BE(3) / 10;
const humidity = buffer.readUInt16BE(5) / 10;

msg.payload = { temperature, humidity };
return msg;
This works, but it's also fragile. When you need to add a pressure reading next month, you're editing code and hoping you don't break the offset calculations. When someone else looks at this flow, they have no idea what's happening without reading the function and if they don't understand JavaScript, they're stuck.
Buffer Parser turns this into configuration you can see and modify without touching code. Let's walk through a practical example.
But before you start, make sure you have a Node-RED instance running on your edge device. The fastest, easiest, and most production-ready way is using FlowFuse. If you don't have an account yet, create one with our free trial. FlowFuse simplifies managing remote instances and provides the ability to create hosted instances—no matter how many you need to manage, it makes it easy. There are no deployment headaches either; everything is managed by FlowFuse with built-in security. You'll also get access to tools such as DevOps pipelines, snapshots for recovery, audit logs, real-time collaboration with granular role-based access control (RBAC), and much more.
Setting Up the Buffer Parser
The Buffer Parser node is part of the node-red-contrib-buffer-parser package. To install it:
- Open your Node-RED editor
- Click the menu icon (three horizontal lines) in the top-right corner
- Select Manage palette
- Go to the Install tab
- Search for
node-red-contrib-buffer-parser - Click Install
Building the Flow
Now let's create a flow to parse the buffer data. For this example, we'll use an Inject node to simulate Modbus data, so while reading you can follow along and learn.
- Drag an Inject node from the palette onto the canvas
- Double-click the Inject node to open its configuration
- Set msg.payload to "Buffer" from the dropdown
- In the field, enter:
[1, 3, 4, 1, 44, 0, 200, 190, 125]
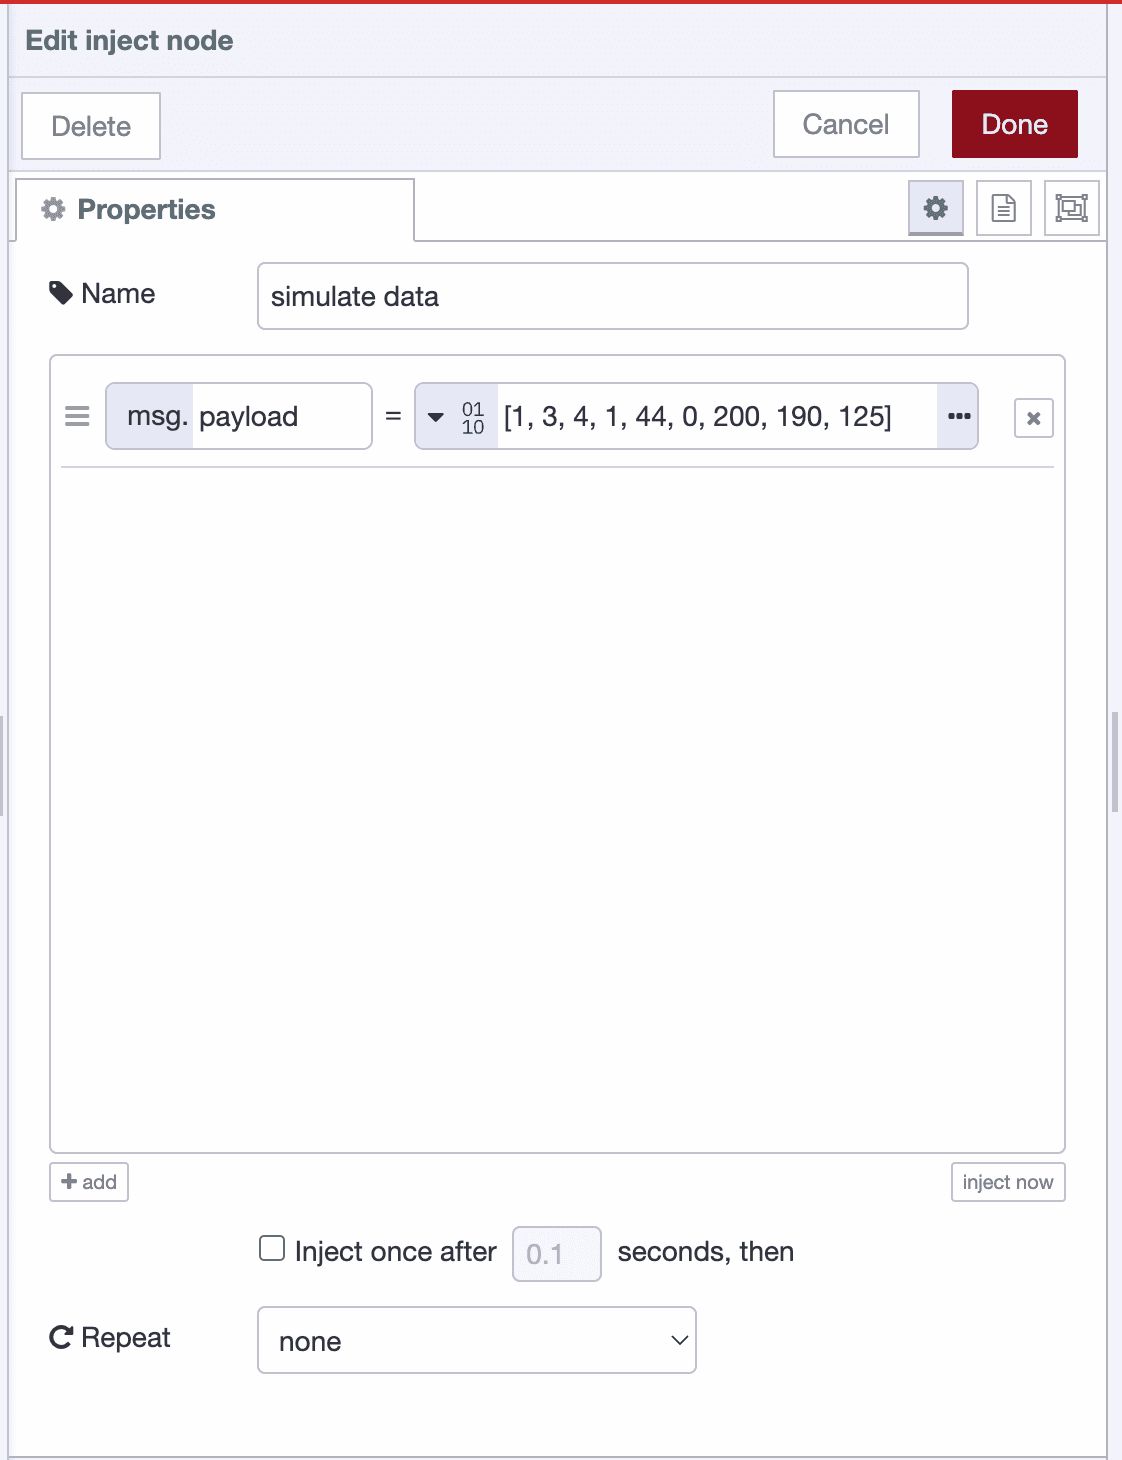
- Click Done
- Drag a Buffer Parser node from the palette onto the canvas
- Drag a Debug node onto the canvas
- Connect the Inject node output to the Buffer Parser node input
- Connect the Buffer Parser node output to the Debug node input
Configuring the Buffer Parser
Now let's configure the Buffer Parser node to extract temperature and humidity.
- Double-click the Buffer Parser node to open its configuration panel
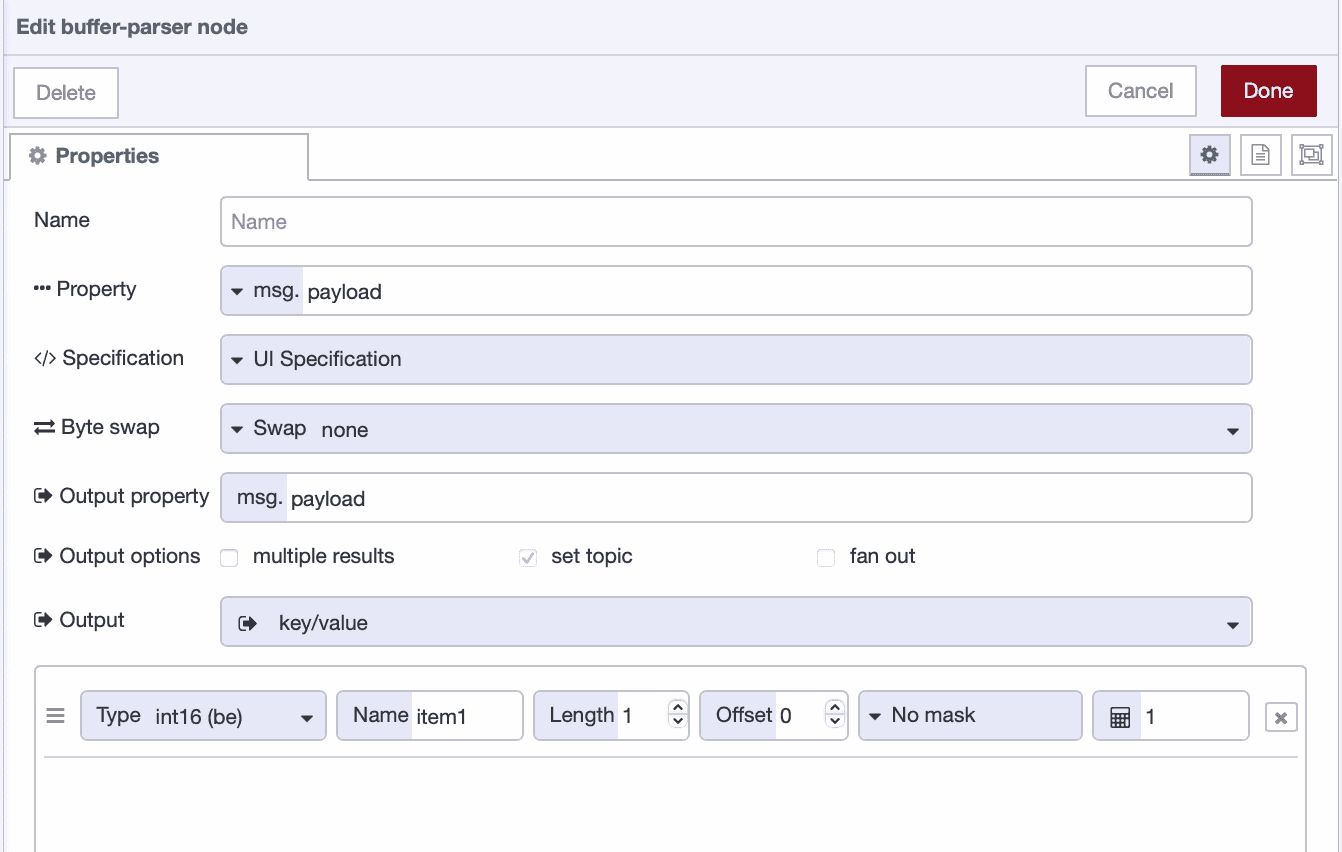
You'll see several fields. Most of them you can ignore for basic parsing. Here's what matters:
Property: Leave this set to msg.payload. This tells the node where to find your buffer data.
Specification: Keep this set to UI Specification. This is the visual method, allowing you to configure everything directly within the node.
Result Type: Set this to "Key/value". This gives you clean JSON output like {"temperature": 30.0, "humidity": 20.0}.
Byte Swap: Leave this set to "No swap" for now. Byte swapping reorders bytes within multi-byte values and is only needed when your device stores data in an unusual format that doesn't match standard big-endian or little-endian conventions. If you've selected the correct endianness (like uint16be or uint16le) and values still look wrong, you might need swap16 (for 16-bit values), swap32 (for 32-bit values), or swap64 (for 64-bit values). Most devices won't require this.
Now let's configure the actual data extraction.
Extracting Temperature
Let's add the first field to extract temperature from bytes 3-4.
- Click the add button at the bottom of the configuration panel to create a new row in buffer parser node
You'll see several fields appear in the row. Let's fill them in:
-
In the Name field, enter
temperature. This is what you'll see in your output JSON. -
In the Type dropdown, select
uint16be- This breaks down as:
uint16= 16-bit unsigned integer (positive values only)be= big-endian (reads bytes in order: first byte is high, second is low)
- The manual specified "16-bit unsigned integer, big-endian" so this is a direct match
- This breaks down as:
-
In the Offset field, enter
3. Temperature data starts at byte 3. Offset counts from zero, so byte 0 is first, byte 3 is fourth. -
In the Length field, enter
1. We're reading one value, not an array of values. Length stays at 1 for single values. -
In the Scale field, enter
0.1. Here's the important part: the Buffer Parser multiplies by the scale value, so to divide by 10, you need to multiply by 0.1. Raw value 300 × 0.1 = 30.0.
Note: Beyond simple multiplication, the Buffer Parser also supports scale equations for more complex transformations. You can use operators like >> for bit shifting (e.g., >>4 to shift right 4 bits), + or - for offsets (e.g., +42 to add 42), / or * for division/multiplication, ** for exponents, and comparison operators like ==, !=, >, < for boolean results. These equations are applied after any mask, giving you powerful options for handling bit-packed data or applying formulas without writing JavaScript.
Let's verify this works with a simple calculation. Bytes 3 and 4 in our buffer are 1 and 44. Big-endian means we read them in order: (1 × 256) + 44 = 300 in decimal. Multiplied by 0.1 gives 30.0°C. Perfect.
Extracting Humidity
Now let's add the second field to extract humidity from bytes 5-6.
-
Click the add button again to create a second row
-
In the Name field, enter
humidity. This will appear as the key in your output JSON. -
In the Type dropdown, select
uint16be- Same as temperature:
uint16= 16-bit unsigned integer (no negative values)be= big-endian (reads bytes in order)
- Same as temperature:
-
In the Offset field, enter
5. Humidity data starts at byte 5. -
In the Length field, enter
1. We're reading a single humidity value. -
In the Scale field, enter
0.1. Again, multiply by 0.1 to effectively divide by 10.
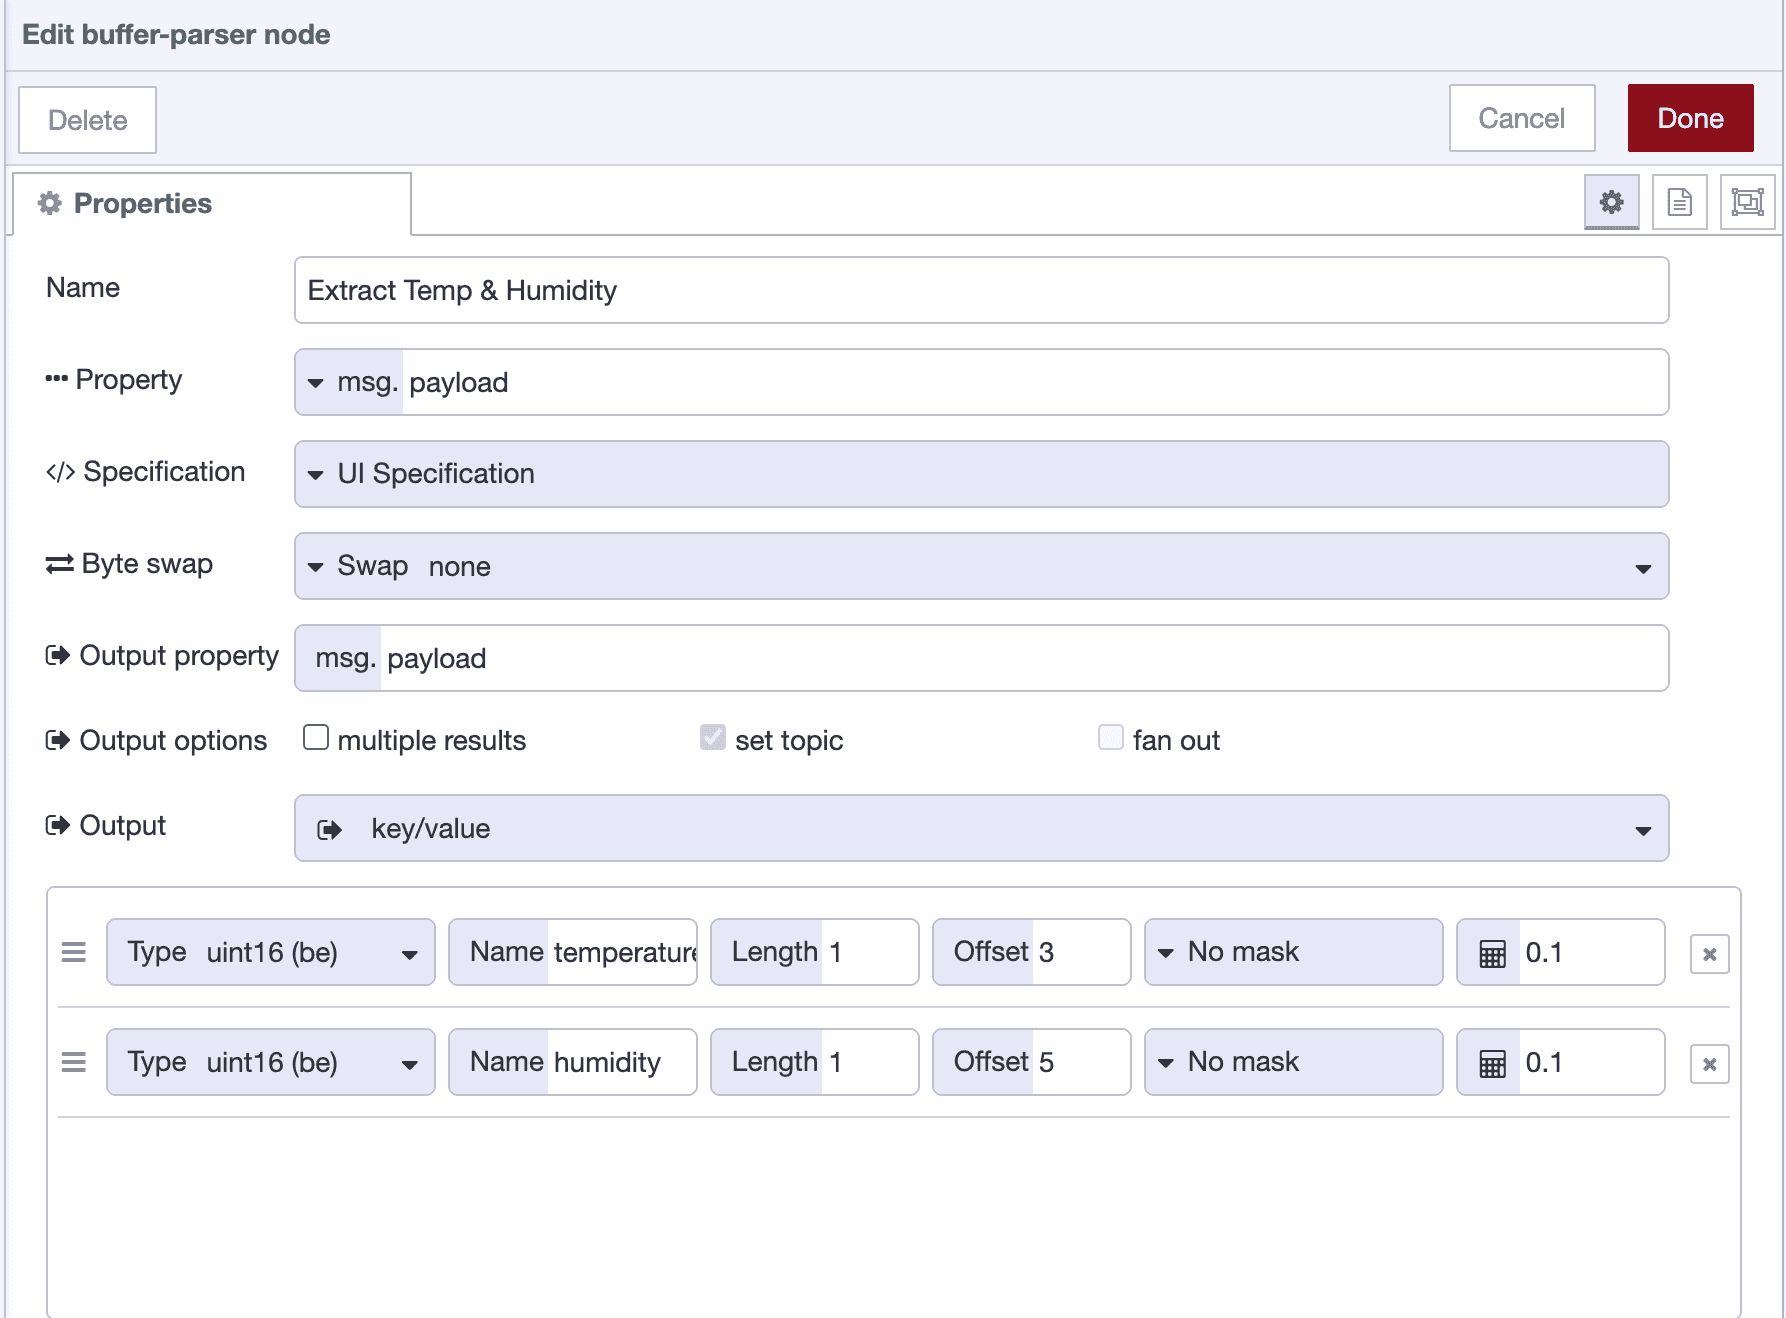
- Click Done to save the configuration
Let's verify this. Bytes 5 and 6 are 0 and 200. Big-endian reads them in order: (0 × 256) + 200 = 200. Multiplied by 0.1 = 20.0% RH. Perfect.
Testing the Configuration
Now let's test if everything works correctly.
- Click Deploy in the top-right corner of the Node-RED editor
- Click the button on the left side of the Inject node to trigger it
- Open the Debug panel on the right side of the editor
Your Buffer Parser output should look like:
{
  "temperature": 30.0,
  "humidity": 20.0
}
This example should work as shown, but with your actual device data, the output may differ. If the values in your JSON don't match what you expect, you're likely running into one of a few common issues. Here's how to recognize and fix them.
If your values are way off—for example, you expect 300 but see 11265, or expect 100 but see 25600—you've got the endianness backwards. Change int16le to int16be (or vice versa) in the Type field. Alternatively, try setting Byte Swap to swap16 (or swap32/swap64 for larger data types).
If you're seeing negative numbers when you know the value should be positive, you're using signed integers when you need unsigned. Change int16 to uint16 (or int32 to uint32) in the Type field.
If your values are exactly 256 times too large or too small, you're using the wrong data type size. If you're using int8 but the device sends 16-bit values, change it to int16be or int16le. If you're using int16 but the device sends 32-bit values, change it to int32be or int32le. Check your device manual for the correct bit size.
If you're getting raw values instead of scaled values (for example, 300 instead of 30.0), it means you either forgot to set the Scale field or set it incorrectly. If the device manual says ‘divide by 10,’ enter 0.1 in the Scale field (not 10). Remember: the Buffer Parser multiplies by the scale, so to divide by 10, you must multiply by 0.1
If every number looks completely wrong, recount your offsets carefully. Check each Offset value and verify against your device manual. Remember that byte 0 is first, byte 1 is second, byte 3 is fourth, and so on. The most common mistake is being off by one byte.
If you're getting only one value when the device sends multiple, check the Length field. If your device sends an array of 5 temperature readings starting at byte 10, set Offset to 10 and Length to 5. The node will return an array of values instead of a single value.
What About Those Other Fields?
The configuration screen has more fields we didn't touch:
Bit Offset only matters when you're using the bool type to extract a single bit from a byte. This field is only visible when the bool type is selected. If you need to check whether bit 3 of byte 7 is set (like a "pump running" status flag), you'd set Offset to 7, Type to bool, and Bit Offset to 3. For reading whole numbers, ignore this field.
Mask is for when multiple values are packed into the same byte. Industrial protocols do this to save space - why waste 8 bits on a simple on/off flag when you can pack eight flags into one byte? If bits 0-3 hold one sensor reading and bits 4-7 hold another, you use masks like 0x0F (binary: 00001111, lower 4 bits) and 0xF0 (binary: 11110000, upper 4 bits) to extract each value separately. You'll know when you need this because the manual will say something like "status bits 0-3 contain pump speed, bits 4-7 contain valve position."
For more details on the Buffer Parser node, you can also explore the official Buffer Parser node documentation — it's comprehensive, well-maintained, and a great reference when working with more advanced parsing options.
When You Need More Complex Parsing
Buffer Parser handles most industrial protocols, but not everything.
If you need conditional parsing where the structure changes based on values in the buffer itself, you'll need JavaScript. For example, if byte 2 tells you how many temperature readings follow and that number varies, Buffer Parser can't handle variable-length structures dynamically.
If you're dealing with bit-packed data where individual bits within bytes have meaning (common in PLC memory maps), you can use the bool type with Bit Offset, but extracting many bits gets tedious. Sometimes a function node doing bitwise operations is cleaner.
If you're using FlowFuse, you don’t even need to write JavaScript yourself. You can simply ask the FlowFuse Expert in plain English, paste what your device manual says, and it will generate the Function node directly on your Node-RED canvas.
For standard Modbus registers, serial sensor protocols, and fixed-structure PLC memory layouts - which covers most industrial data, Buffer Parser does exactly what you need.
Final Thoughts
Binary data from industrial devices isn’t going anywhere. Modbus isn’t disappearing. Neither are PLCs from the 90s or sensors that still speak in raw bytes. This is the reality of factory floors, and it will be for a long time.
The Buffer Parser makes that reality manageable. You don't need to be a buffer expert or master bitwise operations. You just need your device manual, a few minutes to configure the node, and—occasionally—the patience to flip the endianness when a value looks strange. The buffers are still just arrays of bytes, but now you have a tool that turns them into meaningful data without rewriting JavaScript every time you add a new sensor. That's worth something.
And if you’re managing industrial devices at scale—handling remote Node-RED instances, deploying updates across fleets of edge hardware, or keeping everything secure and consistent—FlowFuse can remove much of the daily friction. With features like remote deployment, snapshots, secure device connectivity, and the FlowFuse AI Expert built right into the editor, you can book a free demo. Our team will understand your requirements, show you exactly how FlowFuse fits into your workflow, and guide you on getting the most out of your industrial data pipelines.
Discuss your use case with our team
See how FlowFuse can support your architecture, integrations, and deployment needs.
About the Author
Sumit Shinde
Technical Writer
Sumit is a Technical Writer at FlowFuse who helps engineers adopt Node-RED for industrial automation projects. He has authored over 100 articles covering industrial protocols (OPC UA, MQTT, Modbus), Unified Namespace architectures, and practical manufacturing solutions. Through his writing, he makes complex industrial concepts accessible, helping teams connect legacy equipment, build real-time dashboards, and implement Industry 4.0 strategies.
Table of Contents
Related Articles:
- 5 Places Smart Factories Are Already Using AI
- How to Monitor Industrial Network Health Using SNMP
- Edge vs Cloud AI in Manufacturing: Where Each Actually Belongs
- How to Connect to Beckhoff TwinCAT PLC Using ADS (2026)
- FlowFuse 2.28: Troubleshoot Faster, Manage Edge Devices Centrally, and More Self-Hosted Flexibility